
iPhone 12 Pro Screen Replacement
Duration: 45 minutes
Steps: 33 Steps
Heads up! The earpiece speaker and sensor assembly stuck to the back of your screen is custom-matched with your iPhone right out of the box.
Got a cracked iPhone 12 Pro screen or one that's just not responding? Maybe it's not even showing anything when powered on? No worries! This guide will walk you through swapping out that old screen with a fresh new one, also known as the display assembly. There's a little assembly attached to the back of your old display, which includes the earpiece speaker and sensor – it’s like the secret sauce that makes your Face ID work. You’ll need to transfer it carefully to your new screen, so take your time! If this part gets damaged or replaced, Face ID will stop working, and to get it back up and running, you’ll need Apple or an Apple-authorized tech to handle it. A heads up: If you're on iOS 17.6 or earlier, replacing the screen will turn off True Tone, even if you’re using an original Apple screen. But, if you're rocking iOS 18 or newer, you can calibrate the new screen with Apple’s Repair Assistant and restore that True Tone goodness. If you run into trouble, don't stress – schedule a repair and let the experts take care of it.
Step 1

Heads up: Before diving in, make sure your iPhone’s battery is below 25%. A charged lithium-ion battery can be a bit dramatic and might catch fire or explode if punctured. Stay safe and keep it chill!
Opening up the iPhone's display? Just a heads up: you'll be messing with its waterproof seals. Make sure you have some replacement seals on hand before diving in, or be extra careful to keep liquids away if you put your iPhone back together without swapping those seals out. Happy repairing!
- First things first, power off your iPhone. Safety first, folks!
- Grab your pentalobe screwdriver and unscrew the two 6.75 mm screws at the bottom edge of your iPhone. They’re the little guys that hold it all together.
Step 2


Be careful not to shove that opening pick too deep; it could harm your device. A little mark on your pick can go a long way in avoiding any mishaps.
Feeling fancy? You can also add some measurements to the other corners of your pick for extra flair!
For a clever hack, tape a coin to your pick about 3 mm from the tip. It's a simple trick that works wonders!
- Grab your trusty marker and measure 3 mm from the tip of the opening pick. Mark it with a permanent marker. This will be your starting point for the next step—easy peasy!
Step 3


Pop on some safety glasses to keep your eyes safe from any rogue glass that might decide to take a little detour during the repair.
Got a cracked screen on your iPhone? No worries, just tape over the glass to keep things from getting worse and to avoid any sharp edges during the repair. Safety first!
If the suction cup isn't sticking, a little superglue to the rescue can help keep it in place while you work your magic.
- Place some strips of clear packing tape across the iPhone's screen, overlapping each one until the whole surface is covered. Think of it like wrapping a gift, but for your phone!
- If the suction cup isn’t sticking properly in the next steps, no worries! Just fold a sturdy piece of tape (like duct tape) into a handle, and use that to lift the screen instead.
Step 4


The next three steps highlight the Anti-Clamp, our handy tool designed to make opening your device a breeze. Not using the Anti-Clamp? No worries! Just scroll down three steps for a different method.
For all the details on mastering the Anti-Clamp, check out this guide.
If your iPhone's surface feels a bit too slick for the Anti-Clamp to grip, try using tape to give it a little extra traction.
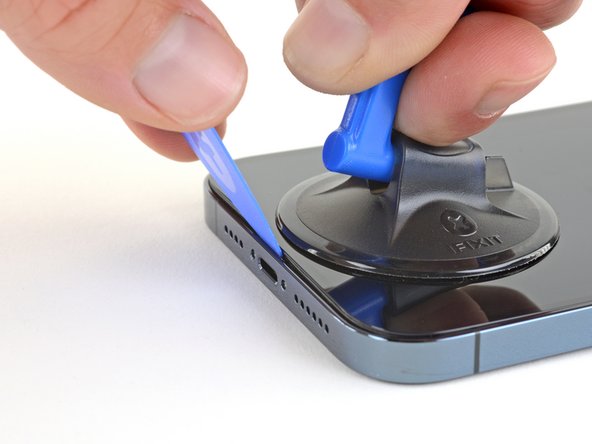
- Grab the blue handle and pull it back to release the Anti-Clamp’s arms.
- Slide the arms onto either the left or right side of your iPhone.
- Place the suction cups close to the bottom edge of your iPhone—one on the front, the other on the back.
- Press the cups together to create a strong suction grip on the spot.
Step 5


- Gently pull the blue handle forward to lock those arms in place.
- Give the handle a clockwise twist all the way around—360 degrees or until you see those cups start to stretch.
- Keep an eye on those suction cups to ensure they stay perfectly aligned. If they start to drift apart, just loosen them a bit and realign the arms.
Step 6


Turn no more than a quarter turn at a time, then take a breather for a minute. Let the Anti-Clamp and a little patience do their magic.
Want the full scoop on using a hair dryer like a pro? Check out this handy guide.
If the Anti-Clamp isn’t opening up enough space, heat things up a bit more and give the handle a smooth quarter turn.
- Prop your iPhone up on something solid like a hardcover book so it stays put and level—makes the next steps way easier.
- Grab a hair dryer and warm up the bottom edge of your iPhone until it feels a bit too hot to touch.
- Give it a minute for the adhesive to loosen and create a little gap to work with.
- Slip an opening pick under the plastic screen bezel once the Anti-Clamp has made enough space.
- Skip the next three steps.
Tools Used

Step 7

Keep your hair dryer on the move! Don't let it linger in one spot for too long—let it dance around instead.
- Grab a hair dryer or heat gun and warm up the bottom edge of your iPhone for about 90 seconds, or until it feels just a bit too hot to handle. This helps loosen things up so you can get to work!
Tools Used

Step 8


- Grab your single suction handle and stick it near the bottom edge of the phone—but steer clear of the very edge of the glass to keep things smooth.
Tools Used

Step 9


Be sure to slide that opening pick right under the thick plastic bezel—this way, you’ll keep your screen safe and sound! Look for a little visual gap, and make sure the pick isn’t snagging on anything. If that gap is playing hard to get, just gently lift the screen a bit more.
The adhesive keeping the screen sealed is pretty stubborn – getting that first gap open will take some muscle. If you're struggling to get things started, try adding a bit more heat and gently rocking the screen up and down to weaken the glue. Once you've loosened it up enough, you'll have just enough space to slide in your tool and move on to the next step.
- Give the suction cup a steady upward pull—think of it as a gentle screen stretch—to open up a little space between the screen and the frame.
- Slide an opening pick into the gap at a sharp angle, like you're sneaking it into a secret club.
Step 10


- Grab a hair dryer and warm up the right side of your iPhone (the one with the power button) for about 90 seconds, or until it feels just a bit too warm to touch. You want to make sure the screen softens up a little, making the next step easier!
Tools Used
Step 11


Be careful not to push your pick more than 3 mm in, as you might accidentally mess with some sensitive internal parts.
- Gently work your opening pick around the bottom right corner of the iPhone to free up that sticky adhesive.
- Keep sliding that pick up along the right edge of the iPhone until you hit the top right corner.
- Once you reach the top right corner, just leave the pick there for now and keep going.
Step 12

- Grab a hair dryer and warm up the top edge of your iPhone for about 90 seconds, or until the screen feels just a bit too toasty to touch.
Tools Used
Step 13


Keep your pick insertion under 3 mm to avoid messing with those top sensors!
- Glide your opening pick along the top right corner of your iPhone to loosen up that stubborn adhesive.
- Let the pick chill in the top left corner for now—don’t rush it!
Step 14


- Grab a hair dryer and give the left edge of your iPhone a warm hug for about 90 seconds, or until it feels just a tad too toasty for your fingertips.
Tools Used
Step 15

Watch out for those fragile cables running along the left edge of your iPhone. It's best not to stick your pick in that area—doing so could cause some unwanted damage to those cables.
Step 16


Start twisting gently—no need to rush, let the adhesive do its thing at its own pace.
If the adhesive is being stubborn, give the left edge a little heat boost and try again.
- Pop in a second opening pick at the bottom left corner of your iPhone.
- Give both picks a gentle twist at the same time to unlock the left edge clips.
Step 17


Hold up on pulling the display all the way off—there are still some delicate ribbon cables hanging out, connecting it to the iPhone's logic board.
- Turn your iPhone so the right side is facing you.
- Open up the iPhone by swinging the display up from the right edge, just like flipping open a book cover.
- Prop the display up against something sturdy to keep it steady while you work on your phone.
- When putting it back together, place the display in position, line up the clips along the top edge, and gently press the top edge into place before snapping the rest down. If it doesn’t click in smoothly, double-check the clips around the display to make sure they’re straight and not bent.
Step 18

Keep a close eye on every screw during this repair and make sure each one goes back exactly where it came from. Mixing them up could cause some trouble for your iPhone!
- Unscrew the two 1.1 mm Y000 screws that are holding the battery and display connector cover in place.
- Before you snap everything back together, it's a great idea to power on your device and give everything a quick test. Just make sure to shut it down fully before diving back into the next steps.
Step 19

- Pop off the cover and get ready to dive in.
Step 20


Go easy on the black silicone seal around this and other board connections—it's there to keep water and dust out. Treat it with care so your device stays protected.
- Grab a spudger or your clean fingernail and gently lift the battery connector from its home on the logic board.
- Tilt the connector a little away from the board to keep it from accidentally reconnecting and powering up the phone while you're working on it.
Tools Used

Step 21


- Gently use a spudger or even your fingernail to unplug the display cable connector.
- When it's time to reconnect, line up one side of the connector and press down until you hear a click, then do the same on the other side. Avoid pressing in the middle to keep those pins happy and safe from bending.
Tools Used
Step 22


- Pop that digitizer cable connector loose using a spudger or your trusty fingernail—no need to be shy, just be gentle.
- If your screen acts like it's on a coffee break and ignores your touch, unplug the battery, give that connector another go, and make sure it clicks in snug with no dust or debris lurking in the socket. Good connections make happy screens!
Tools Used
Step 23

- Grab your Y000 driver and unscrew the four screws holding down the front sensor connector cover.
- Three of these screws are 1.1 mm long—tiny but mighty.
- The last one is a 1.4 mm-long screw, standing a little taller than the rest.
Step 24


- Lift the cover from the left like you're opening a tiny door, just until the little clip on the right lets go.
- Take the cover off and set it aside.
- When putting it back, slide the right clip into its slot first, then swing the rest of the cover down to lock it in.
Step 25


- Gently pry apart the front sensor assembly cable connector using a spudger or your fingernail. It should pop free with a little nudge. If it’s being stubborn, no worries—just take your time and be careful.
Tools Used
Step 26

- Take off the display assembly like you're opening a book to a new chapter.
- If you're keen on keeping things splash-proof, this is the perfect moment to refresh that waterproof adhesive around the display edges.
Step 27

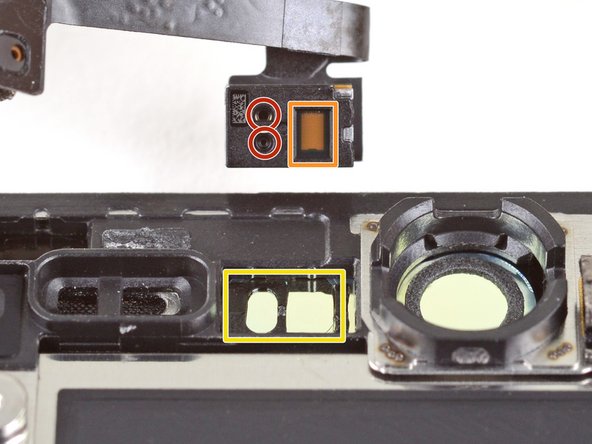
- Unscrew the four screws holding the speaker/sensor assembly to the back of the display.
- Two Phillips screws, each 1.4 mm long.
- One Y000 screw with a 1.7 mm long shoulder.
- One Y000 screw, 1.2 mm in length.
Step 28


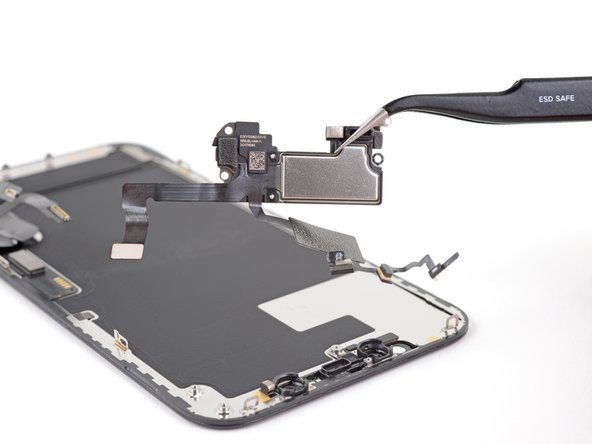
The speaker is still hanging on by a super thin ribbon cable. Handle it gently to avoid any accidental stress or damage to the cable.
The earpiece speaker is gently stuck in place, like it's hanging out and doesn't want to leave just yet.
- Take your trusty spudger and use its point to gently lift up the top edge of the speaker.
- Now, flip the speaker assembly over, moving it downward and away from the top edge of the display.
Tools Used
Step 29

- Grab your hair dryer, heat gun, or get that iOpener warmed up, and let it work its magic on the top front of the display for a solid 1-2 minutes. This helps loosen up the sticky adhesive holding the sensors in place—making your next steps way easier.
Tools Used

Step 30


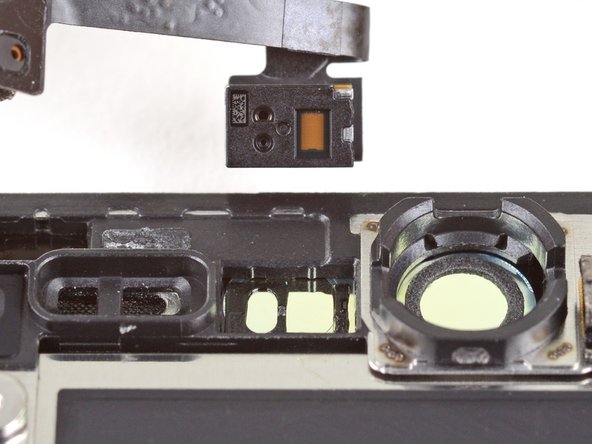
Keep an eye out for the light sensor ribbon cables when prying—they’re sneakier than they look!
- Gently use the tip of a spudger to pop the ambient light sensor out of its little home in the front panel.
- Slide the spudger under the ambient light sensor and its cable to carefully loosen the adhesive holding the cable in place.
Tools Used
Step 31


- Grab your trusty spudger and gently nudge the microphone out of its cozy spot in the front panel. Give it a little lift and separate it from its notch with care.
Tools Used
Step 32


- Gently slide the pointy end of a spudger under the proximity sensor and flood illuminator module to pop it out from its snug little spot in the front panel.
Tools Used
Step 33
- Check out your new part next to the old one—sometimes a sneaky bit of adhesive or a leftover component needs to be swapped over before you install.
- Ready to wrap things up? Just reverse those steps to put your device back together.
- Got a new part that needs calibration? On iOS 18 and up, head to Settings → General → About → Parts & Service History, tap Restart & Finish Repair, and follow the prompts.
- Old parts hanging around? Drop them off with an R2 or e-Stewards certified recycler—they’ll know what to do.
- If your device is still acting up, don’t sweat it! Try some basic troubleshooting, or drop by our iPhone 12 Pro Answers community for some repair wisdom. And if you hit a wall, you can always schedule a repair.


