
iPhone 13 Pro Max Battery Replacement
Duration: 45 minutes
Steps: 38 Steps
Ready to swap out that battery on your iPhone 13 Pro Max? If your battery's a little puffed up, be sure to handle it with care. Quick note: If you’re rocking iOS 17.6 or earlier, your iPhone might throw up a 'genuine battery' warning after the fix, even if you're using Apple’s own parts. If everything else works fine, just shrug it off. But if you're on iOS 18 or later, you'll want to use Apple’s Repair Assistant to authenticate your shiny new battery. Want your new battery to work like a charm? After finishing up the install, give it a full charge to 100%, keep it plugged in for at least two more hours, and then drain it till your iPhone powers down from low battery. Finally, charge it again without interruptions all the way to 100%. And if this all sounds like too much, feel free to schedule a repair for a pro touch.
Step 1

Heads up! Before diving in, make sure your iPhone battery is below 25%. Those charged lithium-ion batteries can be a little dramatic and may catch fire or even explode if they're punctured. Better safe than sorry!
Opening up your iPhone means you're going to disturb its waterproof seals. Be sure to have some replacement seals on hand before diving deeper, or just keep your fingers crossed to dodge any liquid disasters if you decide to put it all back together without them.
- Make sure to power down your iPhone before you start taking it apart.
- Next, grab your screwdriver and remove the two 6.8 mm-long pentalobe P2 screws located at the bottom edge of the iPhone.
Step 2


Be careful not to push your opening pick too deep, as it could hurt your device. A quick trick is to mark your pick to keep things safe.
Feel free to mark the other corners of the pick with different measurements to get an even better feel for it.
Alternatively, you can tape a coin about 3mm from the tip of your pick for a handy guide.
- Grab your opening pick and give it a stylish 3 mm mark from the tip using a permanent marker. Precision never looked so good!
Step 3


Pop on some safety glasses to keep your eyes safe from any sneaky glass bits that might fly around during the repair.
Got a cracked iPhone screen? No worries! Just grab some tape and cover that glass to keep it from shattering further and protect yourself during the repair.
If you find yourself in a pinch, a little superglue can work wonders to stick that suction cup to the screen.
- Cover the entire screen with overlapping strips of clear packing tape. Make sure every inch of the front is sealed with tape.
- If the suction cup isn't sticking as it should, grab some strong tape (duct tape works wonders) and fold it into a handle to help lift the screen instead.
Tools Used


Step 4


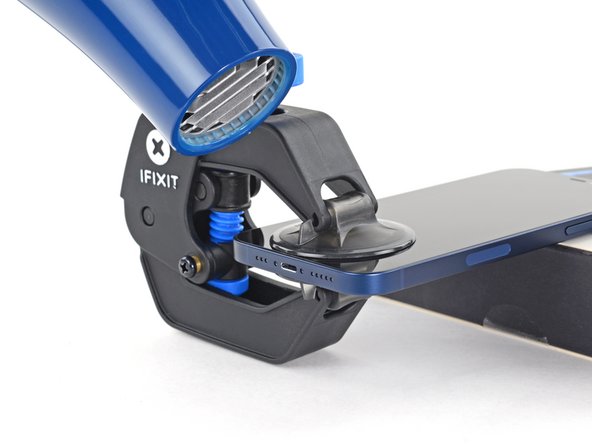
The next three steps show off the Anti-Clamp, a tool we came up with to make opening your device a breeze. If you’re not using the Anti-Clamp, no worries—just skip ahead three steps for an alternative method.
Want to master the Anti-Clamp? We’ve got you covered—check out this guide for all the deets.
If you’re finding that your iPhone’s surface is a little too slick for the Anti-Clamp to grip, just throw on some tape to give it a bit more traction.
- Pull the blue handle back to release the Anti-Clamp's arms.
- Slide the arms onto either the left or right side of your iPhone.
- Place the suction cups near the bottom edge of the iPhone—one on the front and one on the back.
- Press the cups together to create suction on the area you want.
Step 5


- Slide the blue handle away from the hinge to switch on opening mode.
- Rotate the handle clockwise until you notice the suction cups starting to stretch out.
- Keep an eye on the suction cups to make sure they stay lined up. If they start to drift, gently loosen them and adjust the arms to get everything back in sync.
Step 6


No need to bust a move—just twist a quarter turn, then chill for a minute before going again. Let the Anti-Clamp do its thing. Patience pays off!
Want to master the art of hair dryer heat? Take a peek at this guide for the full breakdown.
If the Anti-Clamp is acting shy and won’t give you enough wiggle room, just hit the spot with a little more heat, then give the handle a quarter turn—like you’re dialing in the perfect tune.
- Set your iPhone on a solid surface, like a sturdy hardcover book, so it can chill hands-free and lie flat. This will make the next steps a breeze!
- Grab a hair dryer and warm up the bottom edge of your iPhone. It should feel just a tad too hot to touch, but not dangerously so.
- Take a minute to let the adhesive loosen up and create a perfect little opening gap.
- When the Anti-Clamp gives you enough space, slide an opening pick under the screen's plastic bezel.
- Feel free to skip the next three steps. You got this!
Tools Used

Step 7

Keep your hair dryer on the move! Don't let it chill in one spot for too long.
- Grab your trusty hair dryer or heat gun and warm up the bottom edge of your iPhone for about 90 seconds, or until the screen feels a bit too toasty to handle.
Tools Used

Step 8


- Place a suction handle on the bottom edge of your phone—just steer clear of that glass edge, okay?
- Give that suction cup a good pull with steady pressure to help form a little gap between the screen and its frame.
- Now, slide an opening pick into that gap beneath the screen's plastic bezel.
The adhesive keeping your screen firmly in place is pretty tough, so creating that first little gap is going to take some elbow grease. If it's feeling like a struggle, no worries! Just add a bit more heat and gently rock the screen up and down to loosen the adhesive. Once you've got a gap, you’ll be all set to slip in your tool and keep moving forward.
Tools Used

Step 9


- Grab your hair dryer and give the right edge of your iPhone (that’s the side with the power button) a cozy blast for about 90 seconds, or until the screen feels a bit too warm for comfort.
Tools Used
Step 10


Keep your pick shallow—no deeper than 3 mm—to avoid messing with sensitive stuff inside.
- Glide your opening pick around the bottom right corner of your iPhone and break up that sticky adhesive—you’ve got this!
- Keep cruising up the right edge with the pick, heading for the top right corner.
- When you reach the top right corner, let the pick hang out there for a minute before moving on.
Step 11

- Grab your trusty hair dryer and warm up the top edge of your iPhone for about 90 seconds, or until it feels just a tad too toasty to touch. You've got this!
Tools Used
Step 12


Keep your pick shallow—no deeper than 3 mm—or you might poke the delicate top sensors.
- Gently glide the opening pick around the top right corner of your iPhone to break free that stubborn adhesive.
- Keep that pick snugly in the top left corner while you move forward. You're doing great!
Step 13


- Grab your hair dryer and warm up the left edge of your iPhone for about 90 seconds, or until it feels pretty hot (but not scorching).
Tools Used
Step 14

Heads up! There are some fragile cables running along the left edge of your iPhone. Avoid poking your pick there to keep everything safe and sound.
Step 15


Go easy with the twist—no need to rush.
If the adhesive is putting up a fight, give the left edge another round of heat.
- Pop in another opening pick at the bottom left corner of your iPhone. You've got this!
- Now, give both picks a little twist at the same time until those left edge clips decide to let go. Easy peasy!
Step 16


Hold up! The display's still tethered to the iPhone’s logic board by some delicate ribbon cables—don’t try to pull it off just yet.
- Take your suction handle off the screen.
- Turn your iPhone so the right side is facing you.
- Open your iPhone by swinging the display up from the right edge, like flipping open a book cover.
- Prop the display up by leaning it against something sturdy while you work inside.
- When putting it back together, place the display in position, line up the clips along the top edge, and gently press the top edge down before snapping the rest of the display into place. If it’s not clicking in smoothly, check the clips around the edges to make sure none are bent or out of place.
Tools Used
Step 17

As you work through this repair, keep a close eye on each screw and make sure it finds its way back to the same spot. You don’t want to risk any oops moments that could mess with your iPhone!
- Grab your trusty Y000 screwdriver and remove the three 1.3 mm screws holding the battery connector cover in place. You've got this!
- Now, here's a little tip: this is an excellent time to power up your iPhone and check that everything is working smoothly before you seal the display back on. Just make sure to turn your iPhone off completely before diving back into your repair. Happy fixing!
Step 18

- Pop off the battery connector cover and reveal the magic underneath. It's easier than you think!
Step 19


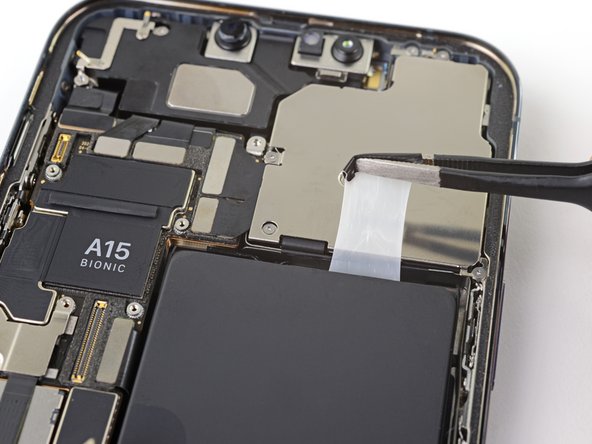
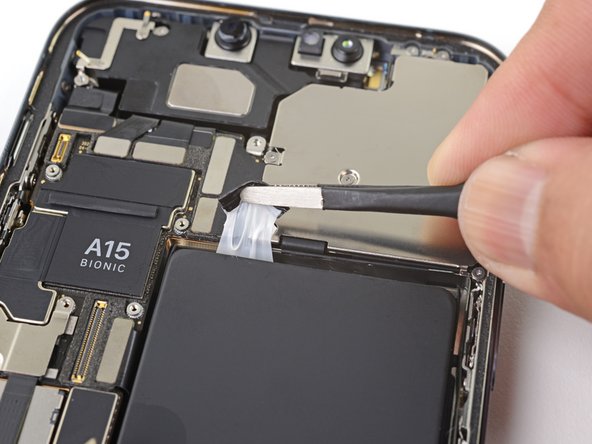
Careful around that black silicone seal hugging the board connections—it’s like a little raincoat and dust shield for your device. Keeping it intact means your phone stays happier for longer!
- Gently use the pointy end of a spudger or a clean fingernail to lift the battery connector out of its socket on the logic board.
- Carefully bend the connector away from the logic board just a bit to keep it from accidentally reconnecting and powering up the phone while you work.
Tools Used

Step 20


- Grab a spudger or just use a clean fingernail—whatever works! Pop the display connector up from its spot on the logic board, nice and easy.
- When you’re ready to snap that connector back in, line it up carefully and press down one side until you hear that satisfying click. Hit the other side next. Skip pressing in the middle—bent pins are a big nope. Take your time so everything lines up just right!
Tools Used
Step 21

- Grab your trusty Y000 screwdriver and unscrew the two tiny 1.1 mm screws holding down the front sensor connector cover.
- Switch things up with a Phillips screwdriver to tackle the other two screws on the cover:
- One is a 1.5 mm screw—little but mighty.
- The other is a 1.8 mm screw—slightly bigger, just to keep things interesting.
Step 22


- Gently lift off the front sensor connector cover to get things moving.
Step 23


- Gently use the pointed end of a spudger to carefully unplug the front sensor assembly cable connector.
Tools Used
Step 24


- Take off the display assembly.
- If you're feeling fancy during reassembly, now's your moment to swap out the waterproof adhesive around the edges of the display.
Step 25

- Grab your trusty Phillips driver and take out those four 1.5 mm screws holding the loudspeaker in place. Easy peasy!
- Next up, you'll find two screws with larger heads. Unscrew those carefully.
- And don't forget the two smaller-headed screws—they've got your back too. Unscrew them and you're almost there!
Step 26


- Gently slide an opening pick between the top edge of the taptic engine and the adhesive strip that's sticking around it. You're doing great!
Step 27

- Lift out the loudspeaker and set it aside.
Step 28


- Gently lift the Taptic Engine cable with the pointed end of a spudger to free it from its connection.
Tools Used
Step 29

- Grab your trusty Phillips screwdriver and tackle those two screws holding the Taptic Engine in place.
- Next up, whip out your standoff screwdriver to take out that sneaky 2.9 mm standoff screw that's keeping the Taptic Engine snug.
- Don't forget to remove that one 1.8 mm screw.
- And last but not least, say goodbye to the one 1.9 mm screw.
Step 30


- Pop out the Taptic Engine and give it a gentle wiggle to free it from its cozy spot.
Step 31

The battery is stuck to the back case with four strips of stretch-release adhesive—two along the bottom edge and two along the top edge.
Next up, you'll gently pull each tab to stretch out the adhesive under the battery. These "command-strip" style adhesives lose their grip when stretched, making battery removal a breeze.
If a strip snaps, no worries! They don’t always behave perfectly. Keep going for tips on dealing with any broken strips.
- Each adhesive strip has a stylish black pull-tab chilling at the end, gently stuck to the edge of the battery like it's holding on for dear life.
Step 32


Heads up: No poking or stabbing the battery with sharp stuff. Trust me, you don’t want it leaking weird chemicals or turning into a mini fire show.
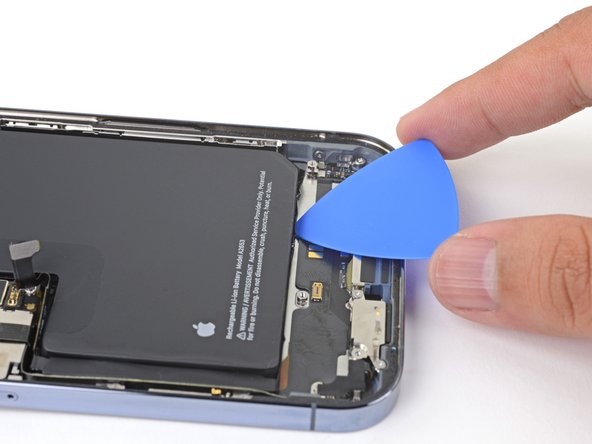
- Grab your trusty blunt-nosed tweezers and gently pull down both battery adhesive tabs at the bottom edge—like giving your battery a little stretch before the big lift!
Tools Used

Step 33


If any adhesive strips break off under the battery and go MIA, don't sweat it! Just carefully pull out the other strips and keep rolling with the steps below.
- Start by gently grabbing the first pull-tab with your fingers or the middle of a spudger, and slowly pull it away from the battery towards the bottom of your iPhone. Take it nice and easy!
- If by chance the adhesive strip decides to break off, no worries! Use your fingers or a pair of blunt tweezers to fish it out, then keep pulling—just don’t go prying under that battery.
- Pull firmly enough to keep the strip taut but remember, don't overdo it. Give it a moment to stretch and let go of its grip from under the battery.
- Make sure not to press down on the battery. Hold your iPhone securely by its sides so it feels cozy.
- Keep that strip flat and wrinkle-free. Aim to pull evenly across the entire strip instead of just focusing on the middle or one side.
- When pulling, try to maintain a low angle to prevent the strip from catching on the edge of the battery.
Step 34


If the adhesive has come loose underneath the battery and is out of reach, just move on to the next step. You've got this!
- Alright, grab that second pull-tab with your fingers or a trusty spudger, and gently tug it away from the battery, heading towards the bottom of the iPhone. You've got this!
- If the adhesive strip decides to play hard to get and breaks off, don't panic! Just try to fish it out with your fingers or some blunt tweezers, and keep on pulling—just remember, no prying under the battery, okay?
- Now, follow the same game plan as before: keep your hands light on the battery, make sure that strip stays flat and wrinkle-free, and pull at a nice low angle. You've got the hang of this!
Step 35


- Grab your trusty blunt-nosed tweezers and an opening pick, then gently lift and peel away those last two battery adhesive pull-tabs hanging out at the top edge of the battery.
Tools Used
Step 36

Watch out not to let the battery take a flying leap when the last adhesive strip gives way.
- Just like before, gently pull the last two tabs one at a time to stretch and peel off the remaining adhesive strips keeping the battery stuck. Watch out—try not to catch the adhesive on anything!
- If you managed to get all the adhesive strips off, feel free to skip the next step.
- If not, no worries—keep going with the next step below.
Step 37


Don't try to muscle the battery out! If it's giving you trouble, just add a little more alcohol to help loosen things up. And definitely, no need to stab or crush the battery with your pry tool. Patience is key!
- Having a tough time getting that battery out? No worries! Just drop a few splashes of high-concentration (over 90%) isopropyl alcohol around the edge of the battery where that pesky adhesive is hanging on.
- Now, hang tight for about a minute; this will give the alcohol time to work its magic on the adhesive.
- With your trusty opening pick or the flat end of a spudger, gently nudge the battery up and away. You've got this!
Tools Used

Step 38

- Check out your new part next to the old one—sometimes there are bits that need to move over, or protective stickers that need to come off before you pop it in.
- Ready to put everything back together? Just step through the guide in reverse, like rewinding a repair mixtape.
- If your new part needs a digital handshake, iOS 18 lets you calibrate it with Apple's Repair Assistant. Update your device, head to Settings → General → About → Parts & Service History, hit Restart & Finish Repair, and follow the instructions.
- Got leftover tech bits? Keep it green by dropping them off at a certified R2 or e-Stewards recycler.
- If things went sideways, try some classic troubleshooting—or swing by our iPhone 13 Pro Max Answers community for advice. Still stuck? You can always schedule a repair and let Salvation Repair take it from here.


