iPhone 15 Microphone Replacement
Duration: 45 minutes
Steps: 35 Steps
Ready to give your iPhone 15's microphone a little TLC? If your phone struggles to catch your voice or acts up randomly, it might be time for a swap. This guide covers the main microphone, which can be replaced on its own. Just so you know, your iPhone has two other mics: one built into the charging port assembly and another in the power button assembly. Grab some replacement back glass adhesive to wrap up this repair. And if it ever gets tricky, you can always schedule a repair!
Step 1


Let your phone’s battery drop below 25% before you start—charged lithium-ion batteries like to keep things spicy, so a lower charge means a safer repair time.
- Disconnect any cables hanging out of your phone—let’s give it some space.
- Press and hold the power button along with a volume button, then slide to turn off your phone. It’s like tucking your device in for a nap.
Step 2


Find a nice flat spot near the bottom edge where your suction cup can get a good grip. No bumps allowed!
- When your screen or back glass is seriously cracked, slap on some overlapping strips of packing tape to keep the shards in check and make taking it apart a breeze.
Step 3


Pushing the pick in too far can poke things it shouldn’t—let’s not do that. Mark your pick to know exactly how deep to go.
Feeling extra precise? Mark the pick at different spots for each corner.
Or, if you want to get creative, tape a coin 3 mm from the tip and you’ve got yourself a handy depth gauge.
- Grab your opening pick and mark a spot 3 mm from the tip with a permanent marker—makes it easy to keep track while you work!
Step 4


- Grab your trusty P2 pentalobe driver and carefully unscrew the two 7.7 mm screws on either side of the charging port. Steady hands make for smooth repairs!
Step 5

Keep your cool—don't let the phone get too toasty, or the battery might not appreciate the heat!
- Fire up your hair dryer or heat gun and warm up the bottom edge of the back glass until it feels nice and toasty.
Tools Used


Step 6


- Stick a suction handle onto the bottom edge of the back glass—give it a little love tap to make sure it’s hanging on.
- Pull up on that handle with a steady, confident tug. You’re aiming for a gap between the glass and the frame, not a Hulk moment.
- Slide the tip of an opening pick into the gap you’ve made—think ninja, not bulldozer.
Tools Used

Step 7

As you carefully slice through the adhesive holding that back glass, keep an eye out for these key areas:
- Careful! There's a fragile cable connecting the back glass to the phone, right near the volume down button. Don’t go poking around here with your pick, or you might just slice that cable.
- You’ll notice several spring contacts around the edge of the phone. Take it slow and don’t push your pick in too deep – we don’t want to bend any of these little guys.
Step 8


Keep your opening pick shallow—don't go deeper than 5 mm along the bottom edge, or you'll risk poking something you shouldn't!
- Gently glide your pick back and forth along the bottom edge to break that adhesive seal like a pro.
- Keep your pick snugly in the bottom right corner to stop that sticky stuff from sealing back up.
Step 9

- Warm up the right edge of the back glass until it feels toasty to the touch.
Step 10


Keep your pick under 7 mm along the right edge—don't go too deep or you'll hit some sensitive spots.
Avoid slicing past the volume buttons to steer clear of damaging the wireless charging cable. It's a tight spot, so be gentle!
- Swing your pick around the bottom right corner, gliding it over to the volume down button—stop when you hit a big, stubborn clip holding the back glass in place.
- Leave the pick hanging out there, so that sneaky adhesive doesn’t try to stick things back together.
Step 11

- Warm up the left edge of the back glass until it feels toasty under your fingers.
Step 12


When you're working along the left edge, be sure not to push your pick in more than 5mm. Keep it gentle, steady, and just the right depth to avoid any oops moments!
- Pop a second opening pick in at the bottom edge.
- Swing that pick around the bottom left corner like a pro.
- Slide your pick all the way up to the top left corner to loosen the adhesive.
- Keep this pick in place so the adhesive doesn’t sneak back together.
Step 13

- Warm up the top edge of the back glass until it feels hot when you touch it.
Step 14


Keep your pick shallow—no deeper than 3 mm along the top edge, or you'll poke something you don't want to meet.
You may hear and feel some clicks as the top clips release. It’s a good sign – just a little pop and you’re on your way!
- Take your second opening pick and swivel it from the top left corner over to the top right corner to gently slice through the adhesive.
- Keep that pick in place so the adhesive doesn’t sneak back together on you.
Step 15

- Warm up the top right corner of the back glass until it's nice and toasty. You’ll know it’s ready when it feels warm to the touch!
Step 16


Keep your pick shallow—no more than 4 mm deep along the right edge, or you might poke something you didn’t mean to!
- Twist the second opening pick around the top right corner and slide it toward the volume up button to loosen up the adhesive. Easy does it, and you're on your way!
Step 17


If the back glass feels like it’s holding on for dear life, circle back around the edges to spot any adhesive spots or stubborn clips that might still be clinging on.
- Carefully swing the back glass open toward the right side of the phone.
- Lean the back glass against something raised to keep the cable relaxed and safe.
Step 18

As you work through this repair, keep your screws organized—each one deserves to return to its original home.
- Grab your trusty tri-point Y000 driver and get ready to tackle those two 1.3 mm-long screws holding the lower connector cover in place. You've got this!
Step 19


- Grab your tweezers and slide the cover toward the top of the phone—this little move pops it free from the logic board.
- Lift the cover off and set it aside like a pro.
- When you're putting things back together, hook the top edge of the cover into its slot on the logic board before locking it down with its screw.
Tools Used

Step 20


To reconnect a press connector, line it up with its socket and gently press down on one side until you hear that satisfying click. Then, press the other side in place. Make sure it sits nice and flat — sometimes the rubber insulation around the socket can get in the way, preventing a proper connection.
Look for a plus and minus sign on the connector head to help you align it properly.
- Keep the back glass steady with one hand and gently twist it just enough to peek at the battery press connector sitting right below the volume buttons.
- Grab your trusty opening pick and carefully pry up the battery press connector to unplug it from the logic board.
Step 21


- Grab your tri-point Y000 driver and spin out that 0.9 mm screw that's holding down the middle connector cover. Piece of cake!
Step 22


- Grab the flat end of your spudger (or just use your finger) and nudge the cover down toward the bottom of the phone until the top pops free.
- Lift the cover off and set it aside.
- When you’re putting things back together, line up the cover so its tab sits behind the clip on the logic board. Hold it down with one finger and slide it forward to snap the clip in place.
Tools Used

Step 23


- Grab your trusty opening pick and gently lift up to disconnect the wireless charging coil and NFC connector. It’s a simple step, just take it slow and steady!
Step 24

- Let's get that back glass off! You'll want to remove it carefully.
- Now, while you're putting everything back together:
- Here’s a smart move: test your repair before sealing your phone back up. Just reconnect the battery and back glass temporarily, turn your phone on, and make sure everything is running smoothly. Once you're satisfied, power it down again and continue with the reassembly.
- Use this guide to reapply adhesive and get your back glass back in place.
Step 25

- Grab your trusty tri-point Y000 driver and unscrew the 1.3 mm-long screw that holds the grounding clip and loudspeaker in place. You got this!
- Next up, take your Phillips #000 driver and remove the four 1.6 mm-long screws that are keeping the loudspeaker secure. Easy peasy!
Step 26


- Gently slide the flat end of your spudger under the right edge of the loudspeaker and lift it up just enough to grab it with your fingers.
Tools Used
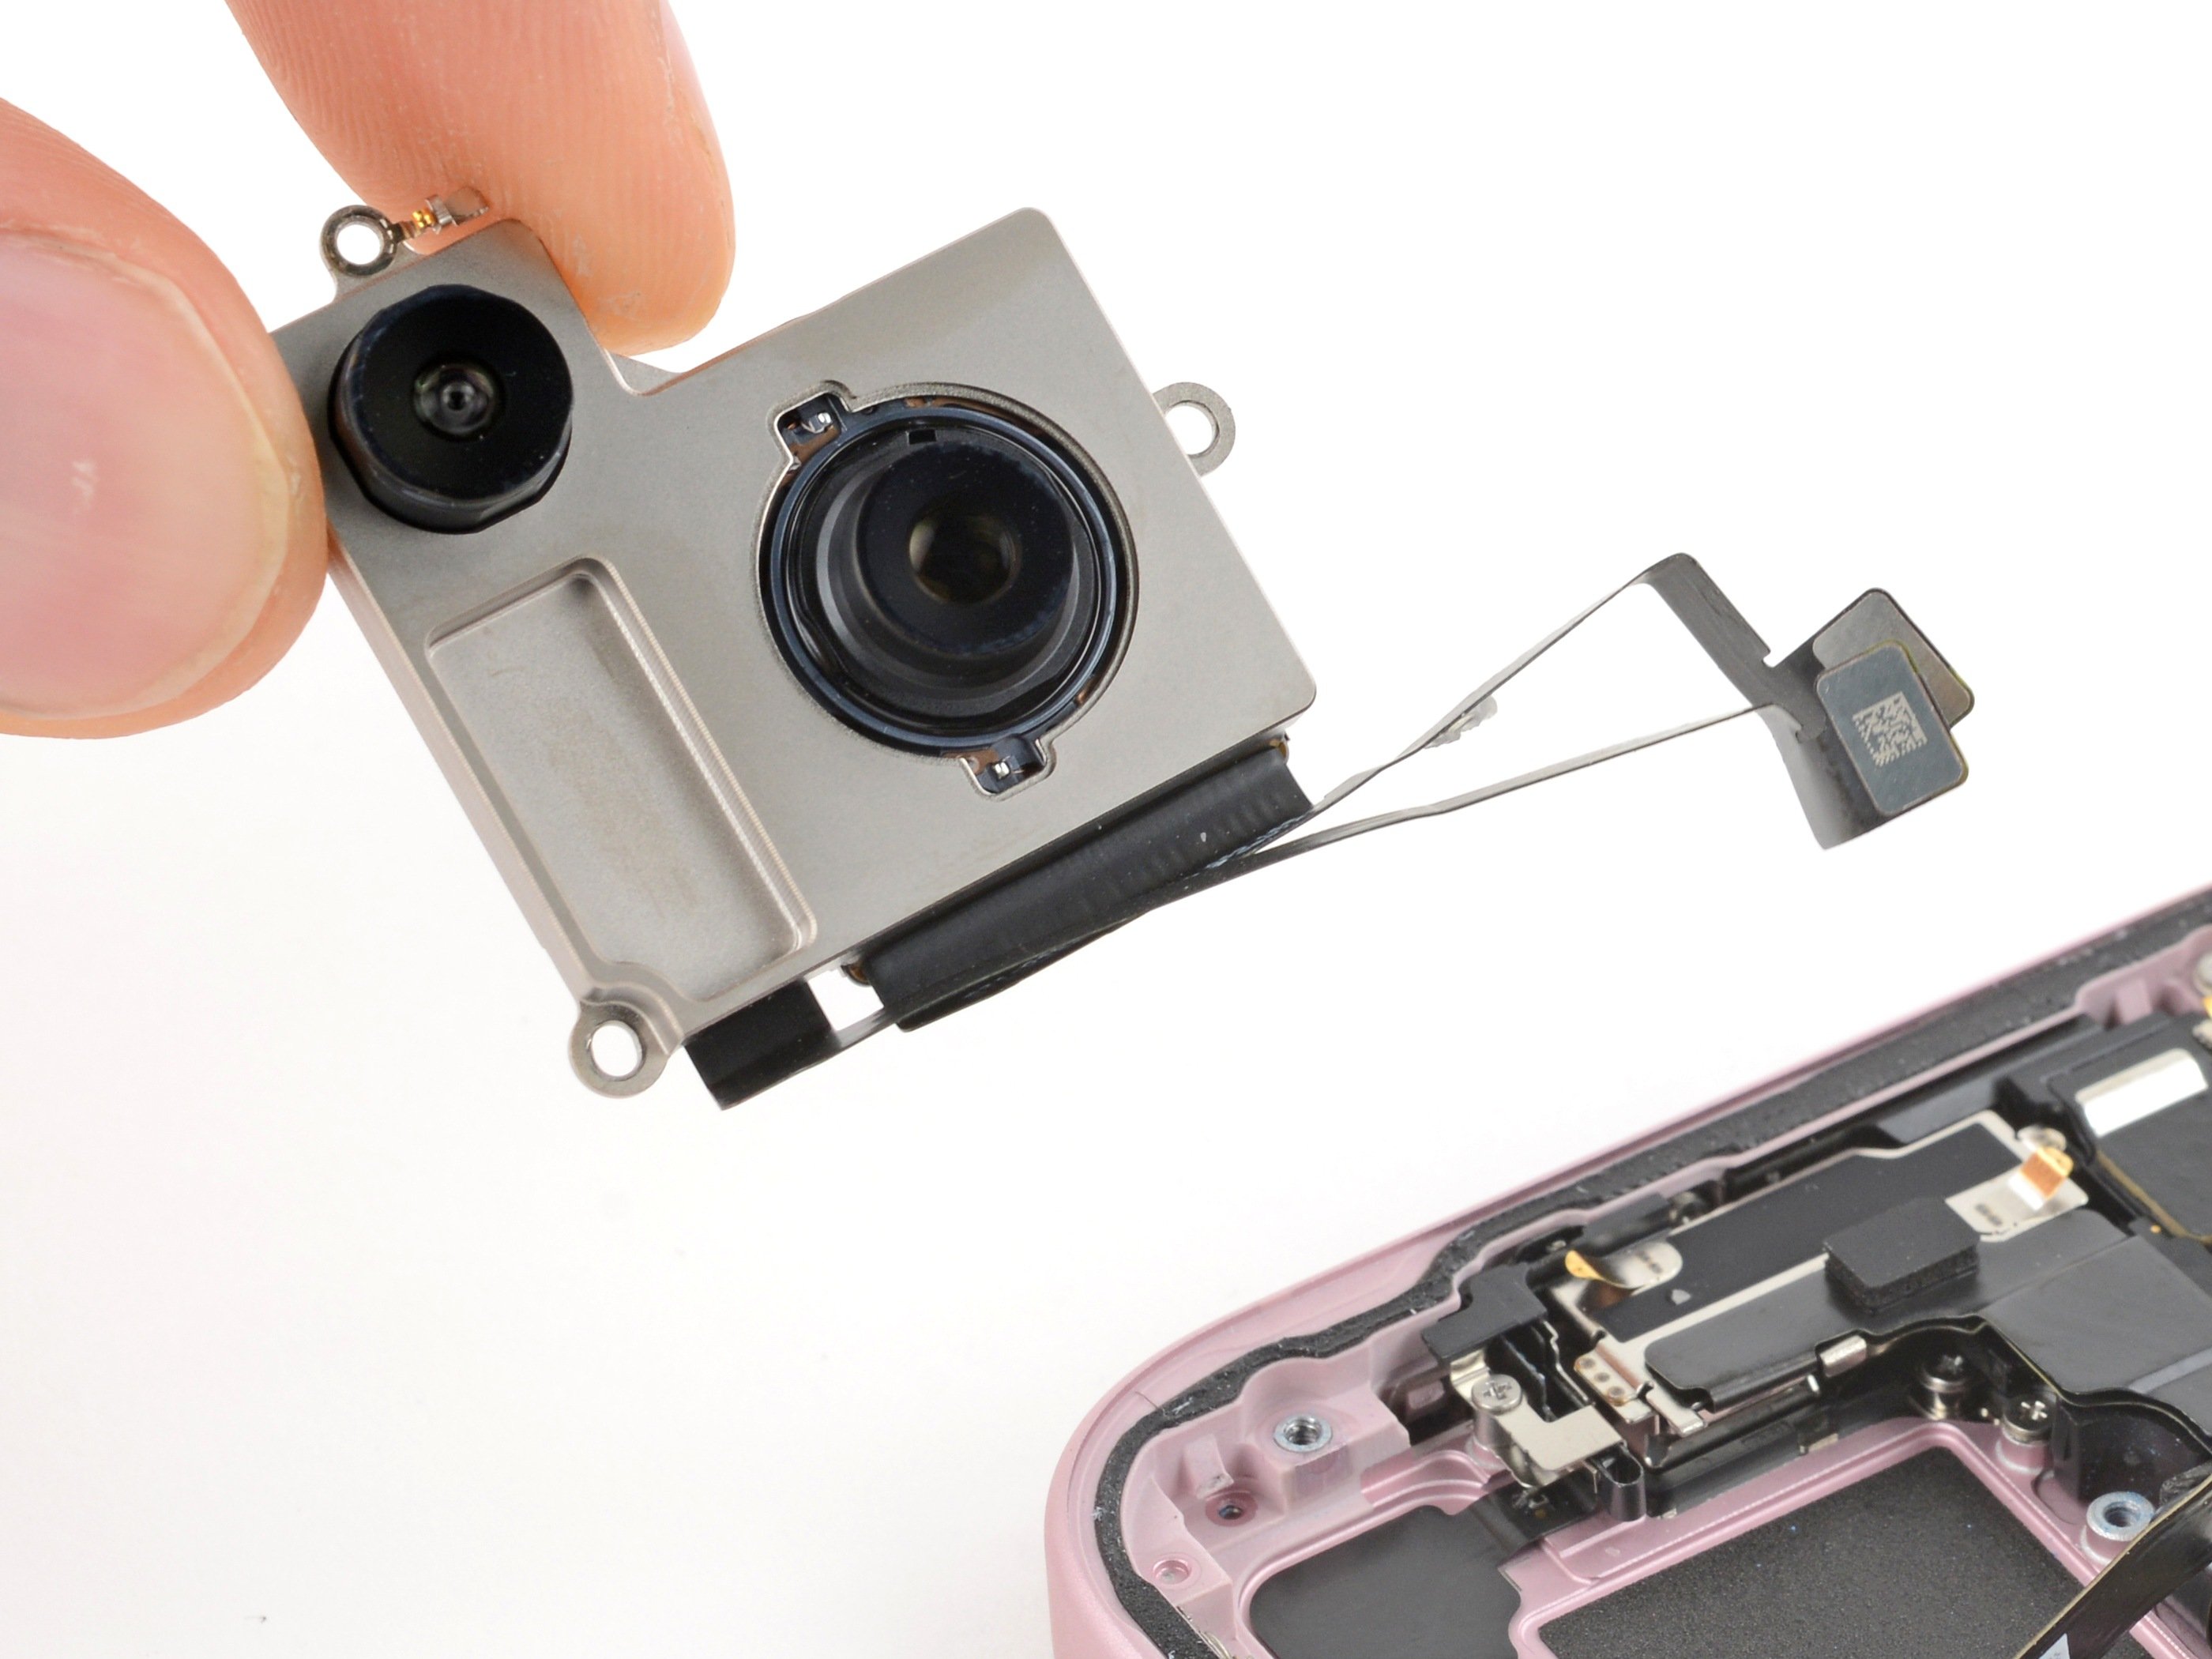
Step 27


- Take out the loudspeaker and set it aside—it's time for a little quiet on the set!
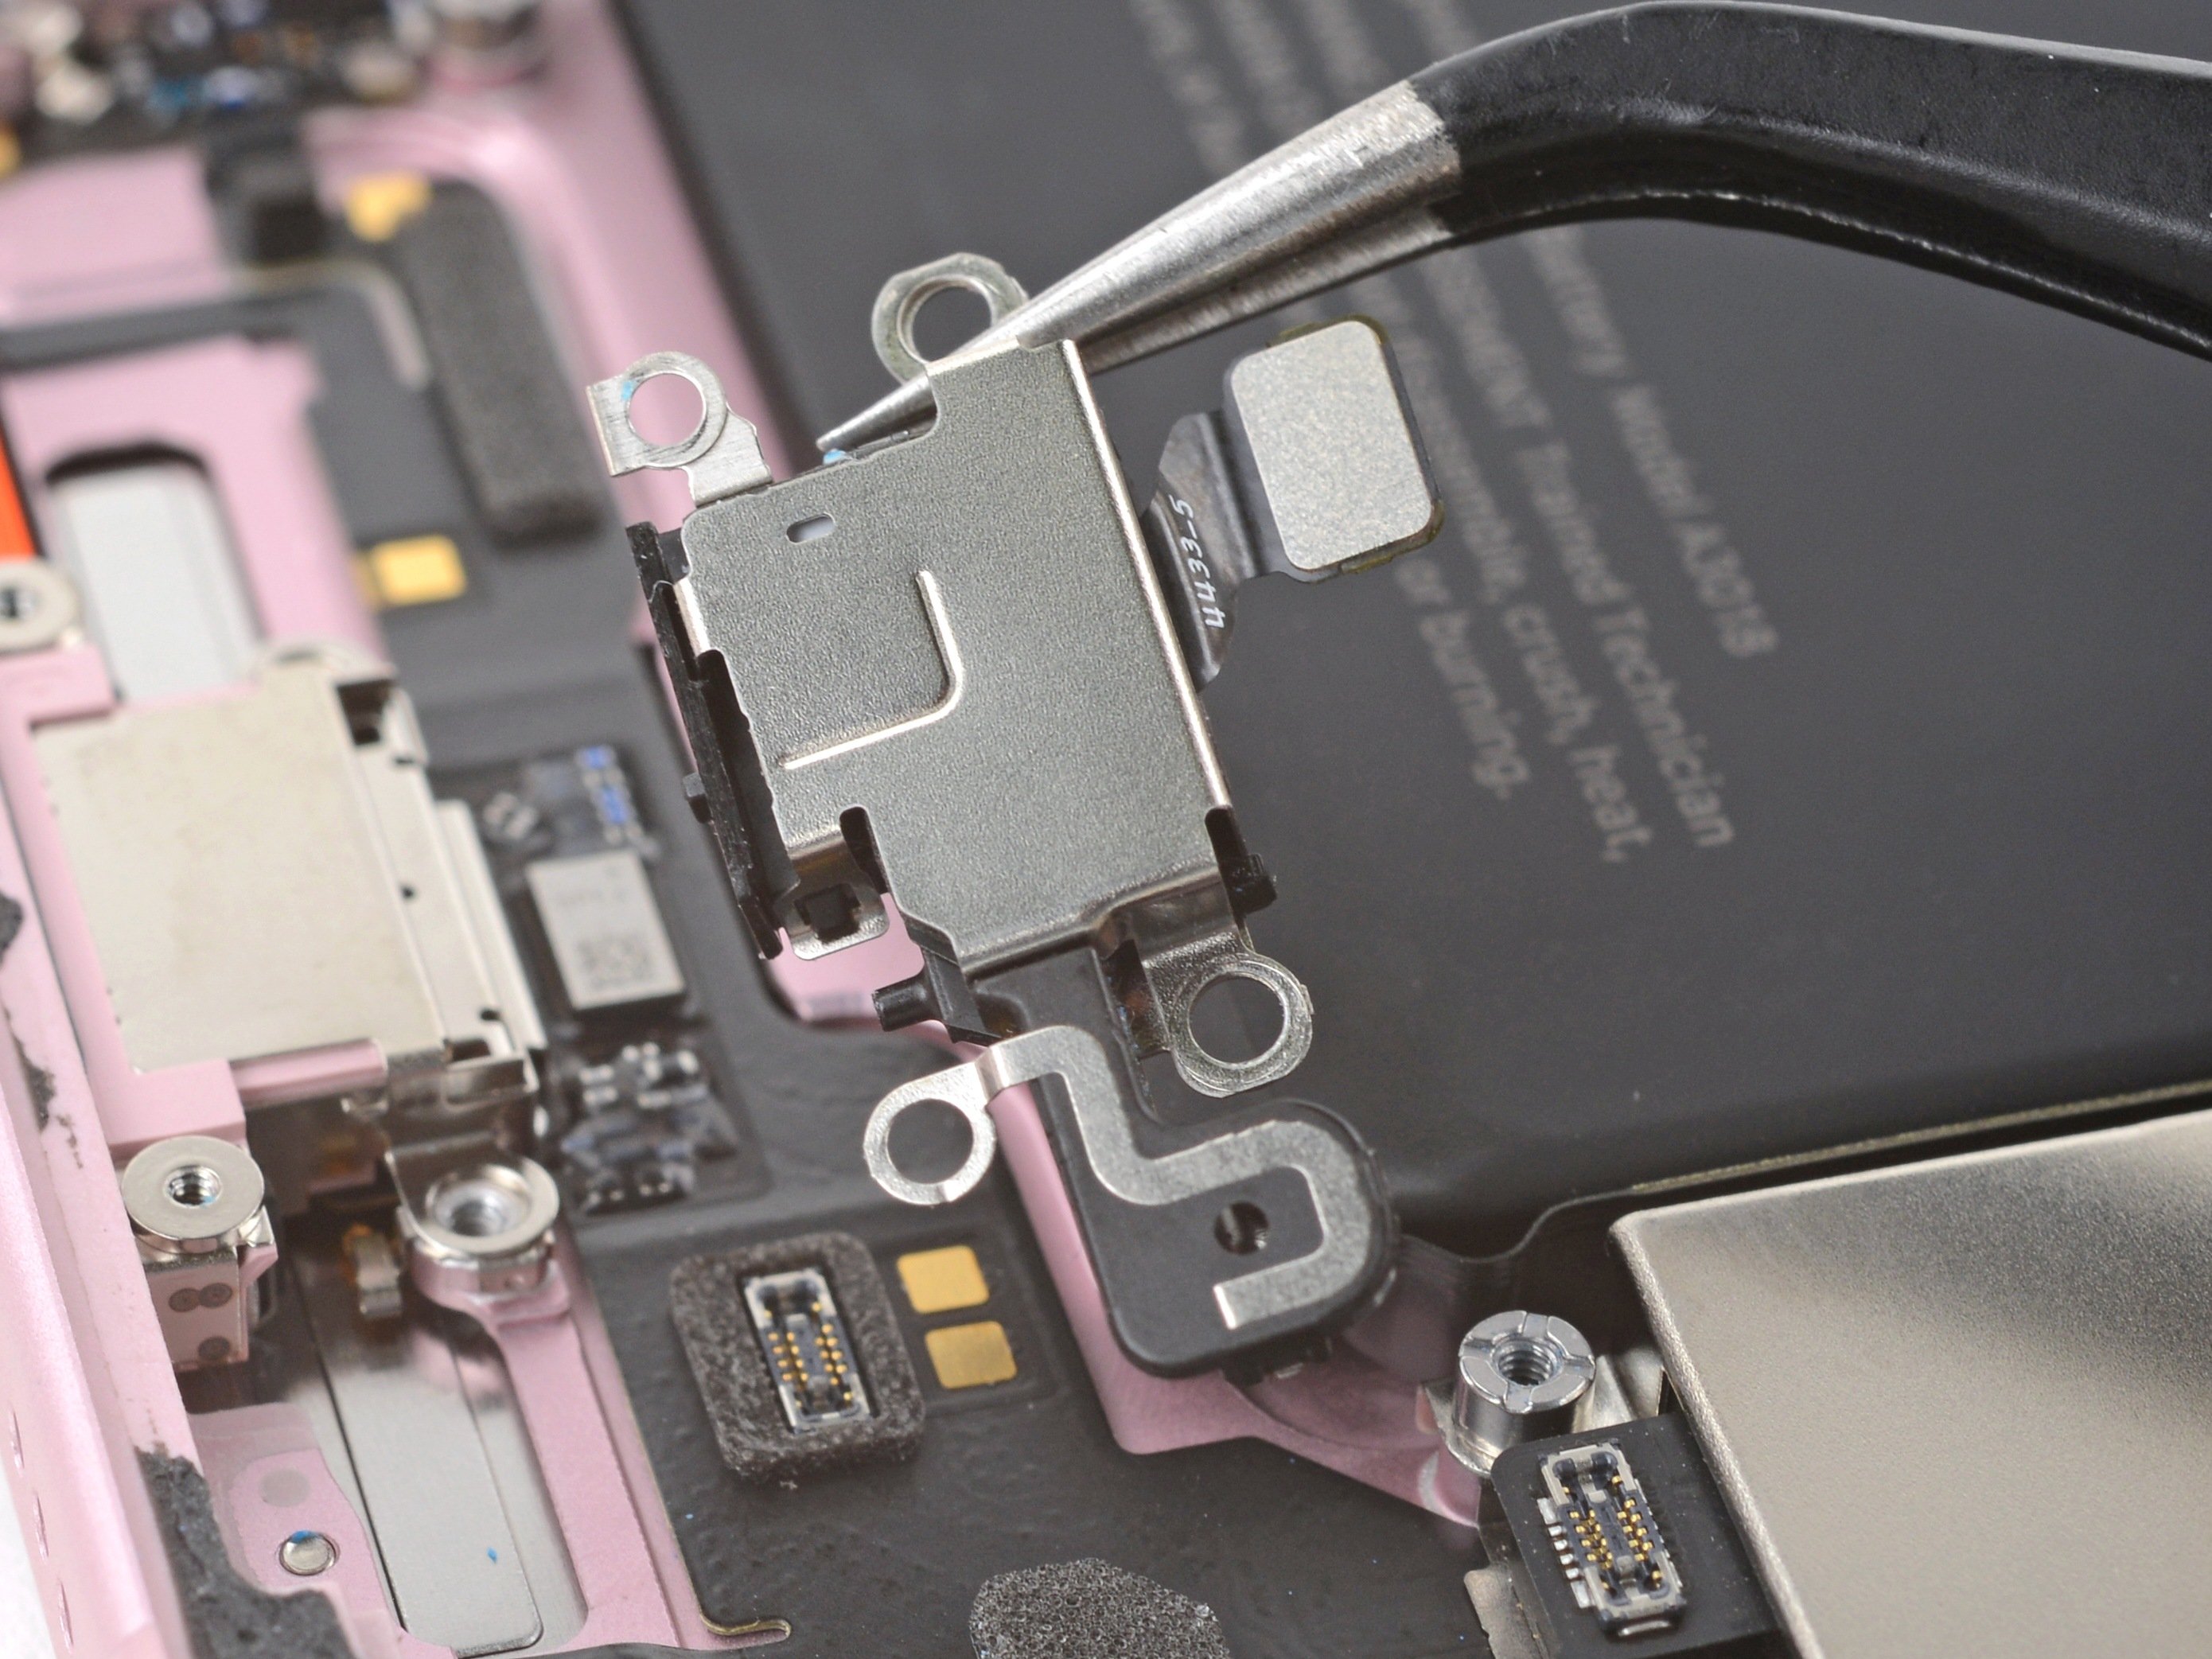
Step 28

- Grab your Phillips #000 screwdriver and take out the two 1.9 mm screws holding down the Taptic Engine connector cover.
- Lift off the cover and set it aside like the legend you are.
Step 29


- Gently use the tip of your spudger to lift and disconnect the Taptic Engine press connector. Keep it light and steady, and you'll be on your way in no time!
Tools Used
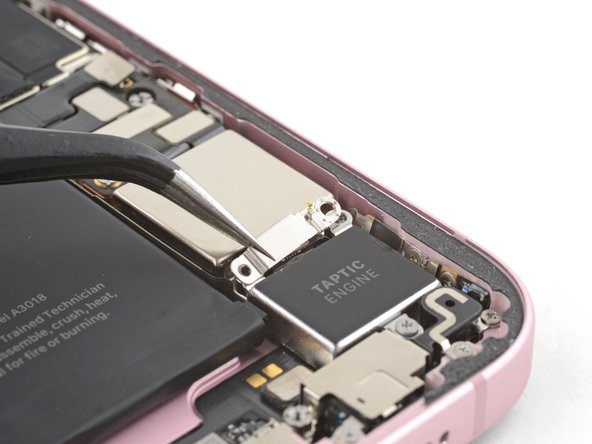
Step 30

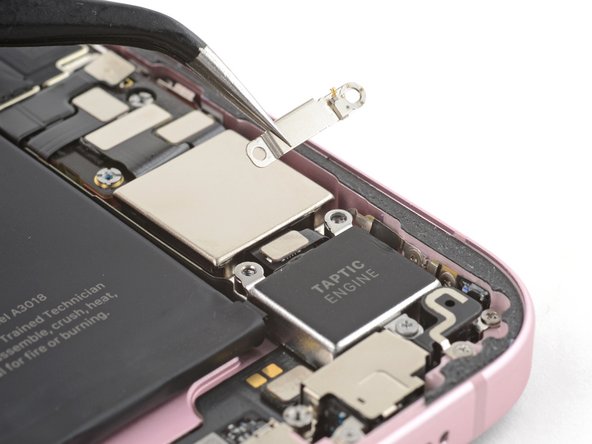
- Grab your trusty Phillips #000 driver and get ready to tackle that 1.9 mm screw holding the Taptic Engine in place. Let's make it happen!
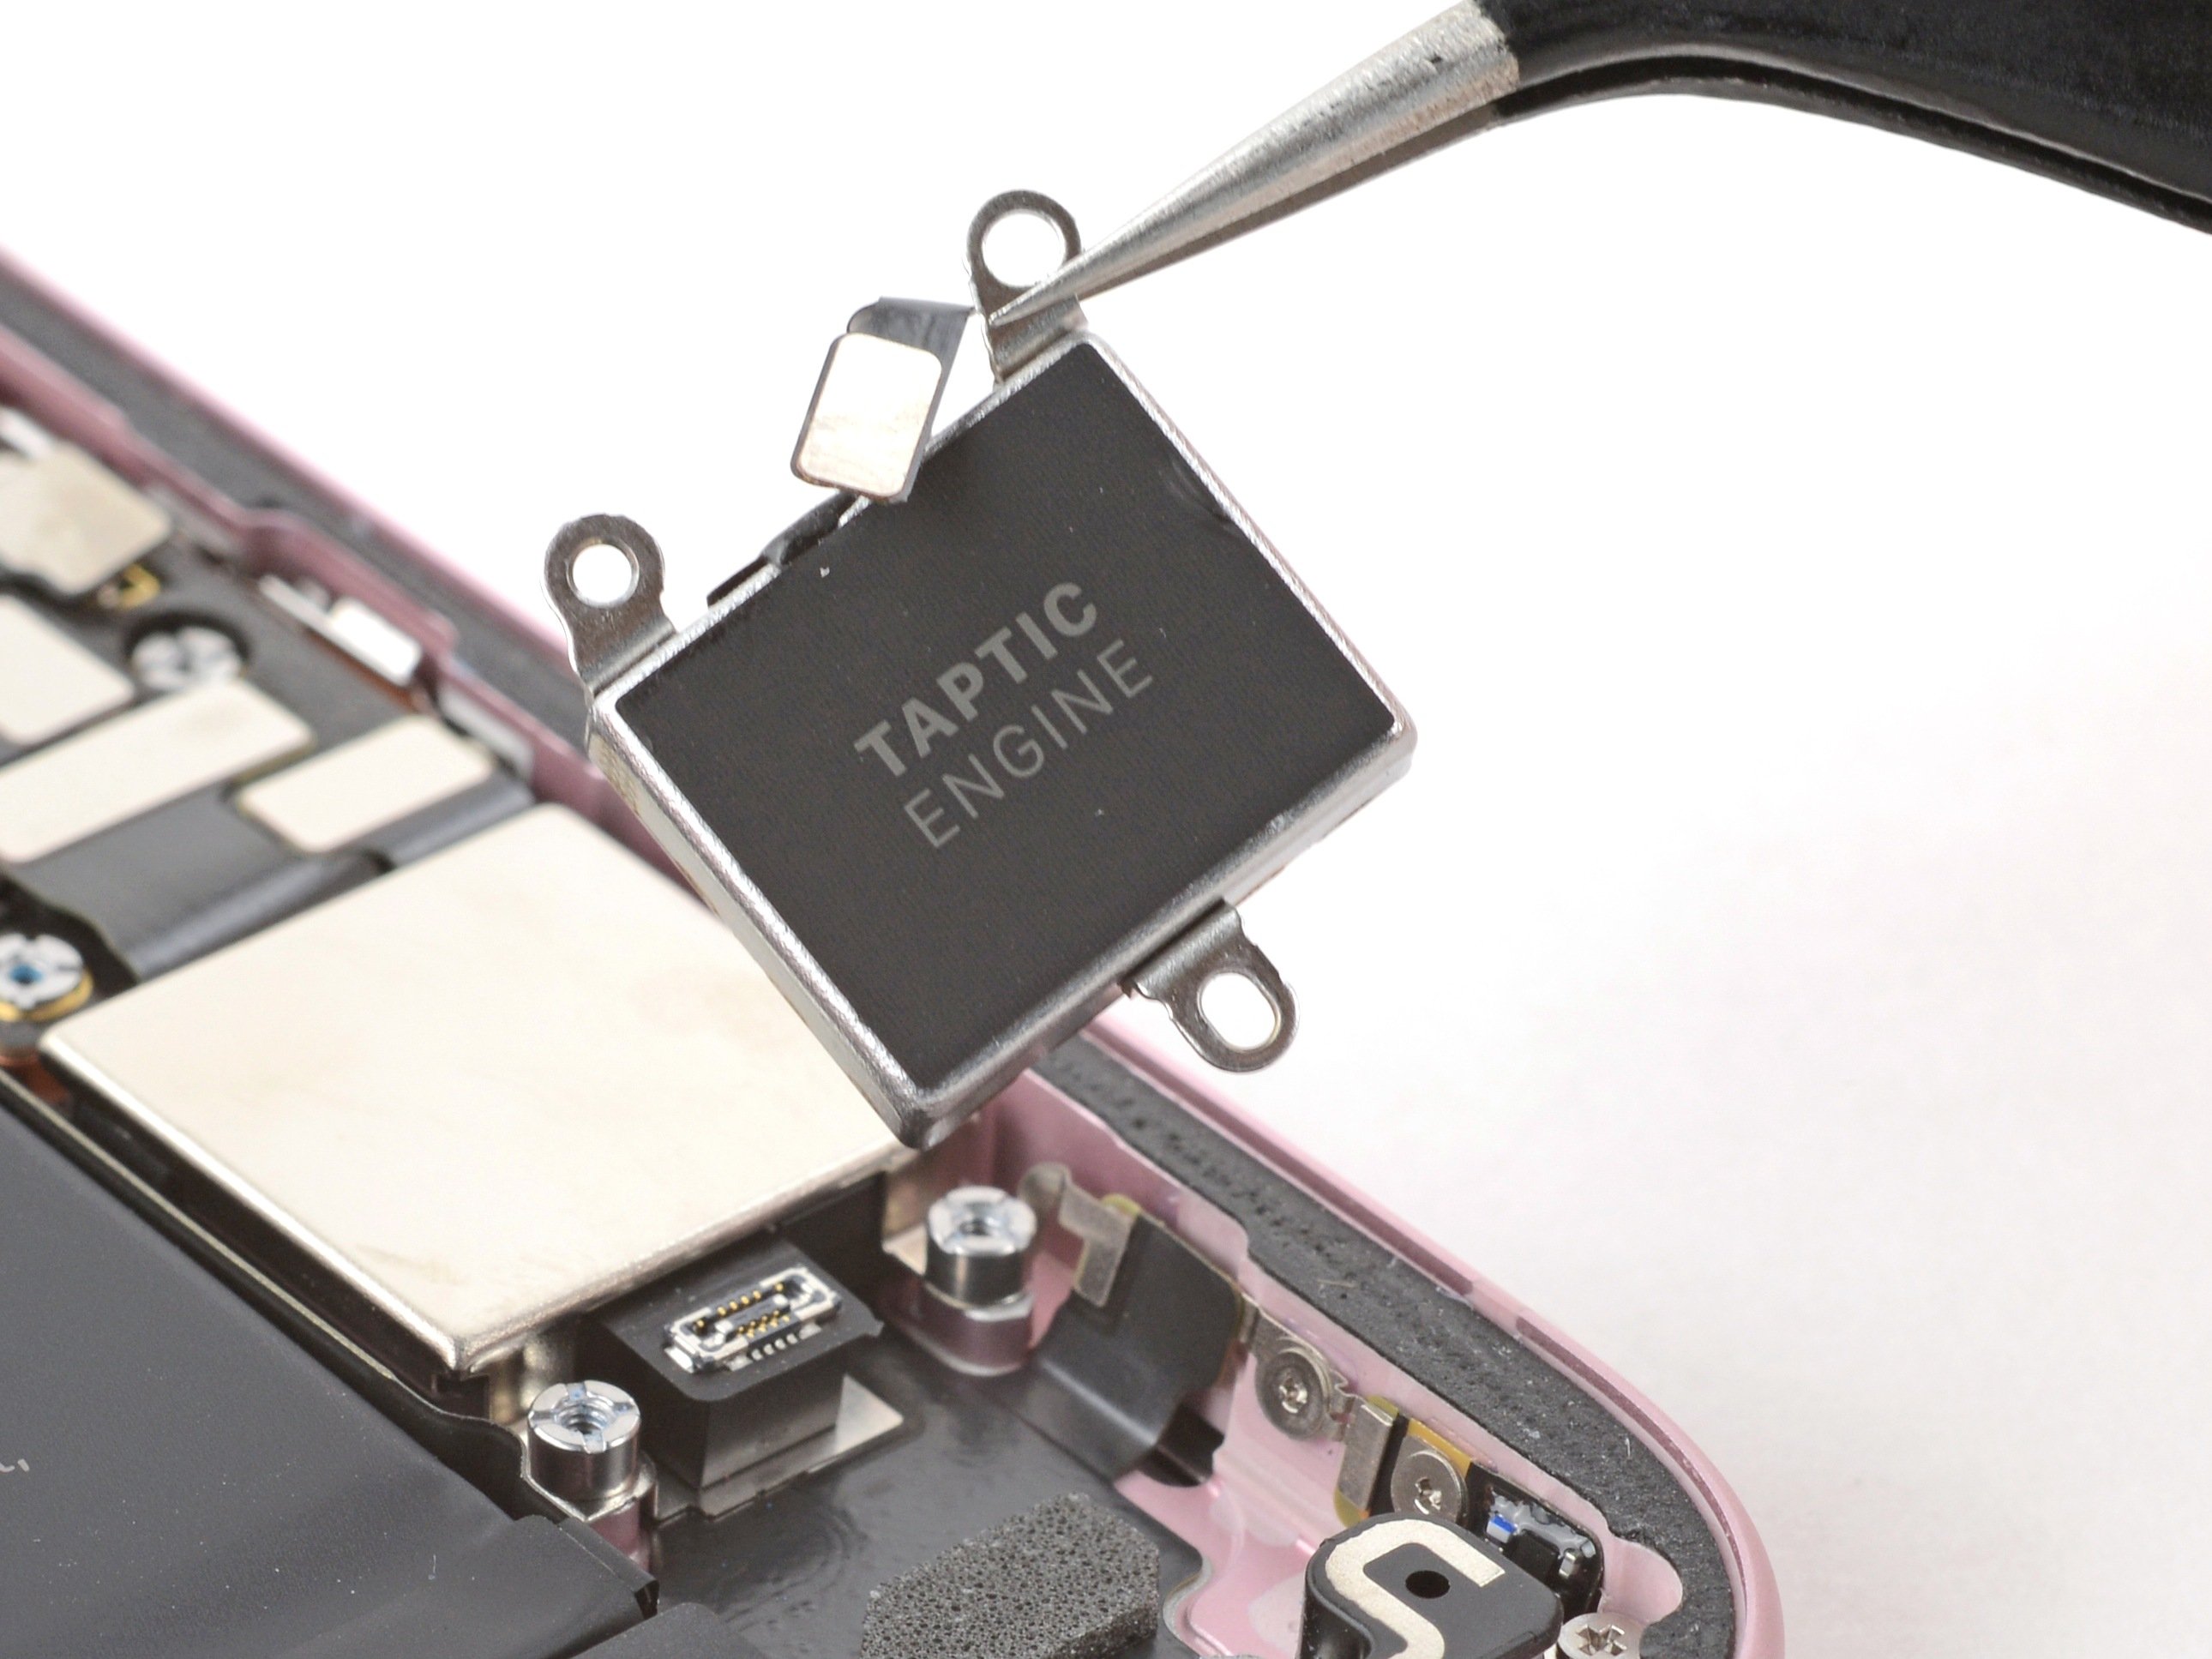
Step 31


- Grab some tweezers or just your fingers and carefully pop out the Taptic Engine.
Tools Used
Step 32


- Carefully use the tip of your spudger to gently lift and disconnect the microphone press connector.
Tools Used
Step 33

No standoff driver? No problem! A slim flathead screwdriver will do the trick—just take it easy and try not to chew up those shallow screw slots.
- Grab your trusty tri-point Y000 driver and unscrew the 1.3 mm screw holding down the grounding clip and microphone—nice and easy!
- Switch to your Phillips #000 driver and remove the 1.3 mm screw securing the bottom right corner of the microphone. You're doing great!
- Time for the standoff driver: take out the two 3 mm standoff screws keeping the top of the microphone in place. Almost there!
Step 34


The microphone is held in place with a strong adhesive gasket, so be gentle when handling it. Watch out for those delicate grounding tabs around the microphone – they’re thin and can easily bend. Take your time, and if you're not sure, it's always cool to schedule a repair.
- Slide the flat end of your spudger under the top edge of the microphone—like you’re sneaking a cookie from the jar.
- Gently pry upward until the sticky stuff holding the microphone starts to let go.
Tools Used
Step 35


- To put your phone back together, just follow these steps in reverse. It’s like rewinding a movie, but with more screws.
- Don’t toss those old parts—drop them off with an R2 or e-Stewards certified recycler and give them a second life.
- Stuck? Try a few troubleshooting tricks, or swing by our Answers community for a nudge in the right direction.
- If things still aren’t working out, you can always schedule a repair and let us take it from here!