iPhone 16 Pro Max Back Glass Replacement
Duration: 45 minutes
Steps: 46 Steps
Ready to say goodbye to that shattered back glass on your iPhone 16 Pro Max? This guide will walk you through swapping it out for a fresh one. Grab some replacement back glass adhesive for a solid finish. When you’re done, make sure to calibrate any genuine Apple parts with Repair Assistant for a smooth experience. If the process throws you for a loop, you can always schedule a repair and let the pros handle it.
Step 1


Let your iPhone's battery drop below 25% before starting—charged lithium-ion batteries can be a bit touchy, so it’s safer this way.
- Disconnect any cables connected to your iPhone. Then, press and hold the power button along with either volume button until you see the slider, and slide it to turn off your device. If you need help, you can always schedule a repair.
Step 2


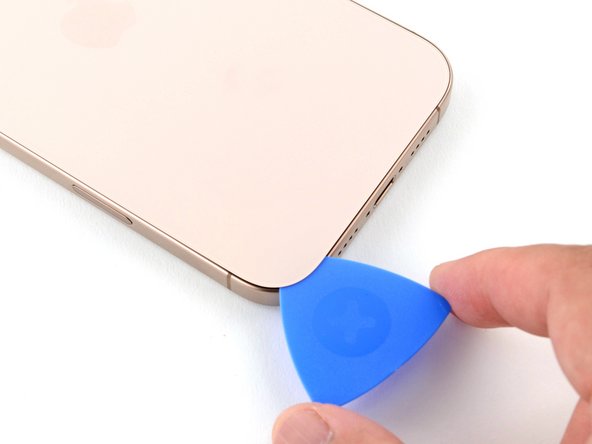
Find a nice flat spot near the bottom edge—big enough for your suction cup buddy to get a good grip.
- If your screen or back glass has a serious crack, don't worry – just cover it up with a few layers of packing tape. It’ll protect you from the shards and make the disassembly process way smoother.
Tools Used

Step 3


- Grab your P2 pentalobe driver and spin out the two 7.4 mm screws sitting on either side of the charge port. Easy does it—don’t drop them!
Step 4


- Grab your trusty permanent marker and take a moment to measure out 3 mm from the tip. Make a nice little mark on that opening pick to guide you on your adventure.
Be careful not to insert your opening pick too deep, or it might end up damaging your device. To avoid that, mark your pick beforehand so you know exactly where to stop. You can also get creative—mark different corners of the pick with various measurements to keep track. Another handy trick: tape a coin about 3 mm from the tip of the pick. This acts as a built-in depth stop, giving you extra control. If you need a hand with any part of the process, you can always schedule a repair.
Tools Used

Step 5

The next couple of steps will guide you on how to create that crucial initial gap using a suction handle—easy does it!
Another option is to warm up the back glass with an iOpener. Follow these tips to heat it up just right and apply the iOpener like a pro.
- Grab a hair dryer or heat gun and gently warm up the bottom edge of the back glass until it feels nice and toasty to the touch.
Tools Used


Step 6


If you don't see a gap, try heating the edge a bit more and giving it another shot.
- Grab a suction handle and stick it to the bottom edge of that back glass like a pro.
- Give it a solid, steady pull to pop open a little gap between the back glass and the frame—you're doing great!
- Now, slide the tip of an opening pick into that gap and let's keep this adventure rolling!
Tools Used
Step 7

When you’re slicing through the adhesive around the back glass, keep your pick shallow—don't go deeper than 3 mm, or you might poke at some sensitive spots hiding underneath.
- Be careful of that fragile cable connecting the back glass to the iPhone, right by the volume up button. Keep your pick away from this area to prevent any accidental snips!
- Look out for the multiple spring contacts circling the edge of the iPhone. They're sneaky little things!
Step 8

If the adhesive is putting up a real fight, just give that edge a little heat for about a minute and give it another go.
- Gently slide the opening pick along the bottom edge to carefully cut through the adhesive.
- Keep the pick wedged in the bottom-left corner to stop the adhesive from snapping back together.
Step 9

- Grab your trusty hair dryer or a heat gun and gently warm up the left edge of that back glass until it feels pleasantly warm to the touch.
Tools Used
Step 10


Keep your pick within 3 mm max—going deeper might mess with those spring contacts, and we don’t want that!
You'll get a satisfying snap and a little wiggle as the metal clips let go.
- Slip a second pick into the bottom-left corner, right next to the first one. Gently slide your pick along the left edge to loosen the adhesive and lift the metal clips. Keep this pick in place at the top-left corner to stop the adhesive from sticking back together. If you need help, you can always schedule a repair.
Step 11

- Grab your trusty hair dryer or heat gun and warm up the top edge and top-right corner of the back glass until it feels nice and toasty.
Tools Used
Step 12


Keep your pick to a maximum of 3 mm deep, or you might just get a surprise visit from the spring contacts!
- Gently insert a third pick into the top-left corner to get things started. Then, glide the pick along the top edge and around the top-right corner, stopping right above the volume up button. Keep that pick in place to stop the adhesive from snapping back together—helps keep things open and accessible.
Step 13

- Grab your trusty hair dryer or heat gun and warm up the right edge of that back glass until it’s toasty enough to touch.
Tools Used
Step 14


Be careful not to push your pick in deeper than 3 mm – we don't want to accidentally mess with those delicate spring contacts!
- Pop a fourth opening pick into that bottom-right corner like it's no big deal.
- Gently glide the pick around the corner and up the right edge, halting just below the volume down button - you got this!
- Keep that pick in place to stop the adhesive from turning back into a sticky situation.
Step 15


Now the back glass should lift away from the frame like a charm. If it's acting stubborn, grab your pick and cruise around the edges again—there might be some sneaky adhesive or a clip that's still holding on.
- Gently swing the back glass to the right side of your iPhone to peel off the remaining adhesive.
- Place a clean, sturdy object under the back glass to support it while you continue.
Step 16

- Grab your trusty tri-point Y000 driver and let's get to work! Remove those three screws holding down the battery connector cover like a pro:
- Two screws that are 1.3 mm long – not too long, not too short!
- And don't forget about that sneaky little 1.0 mm long screw hiding in there!
Step 17


- Gently lift off that battery connector cover and say hello to the inner workings of your device!
Step 18


- Grab your spudger and gently pop up the battery connector—think of it as giving your phone a little nudge to wake up from a nap.
Tools Used

Step 19

- Grab your tri-point Y000 screwdriver and gently unscrew the four screws holding down the back glass connector cover: two 1.3 mm-long screws and two 1.0 mm-long screws. If you need a hand with this, you can always schedule a repair.
Step 20


- Gently pop the back glass connector cover straight up and take it off. Easy does it!
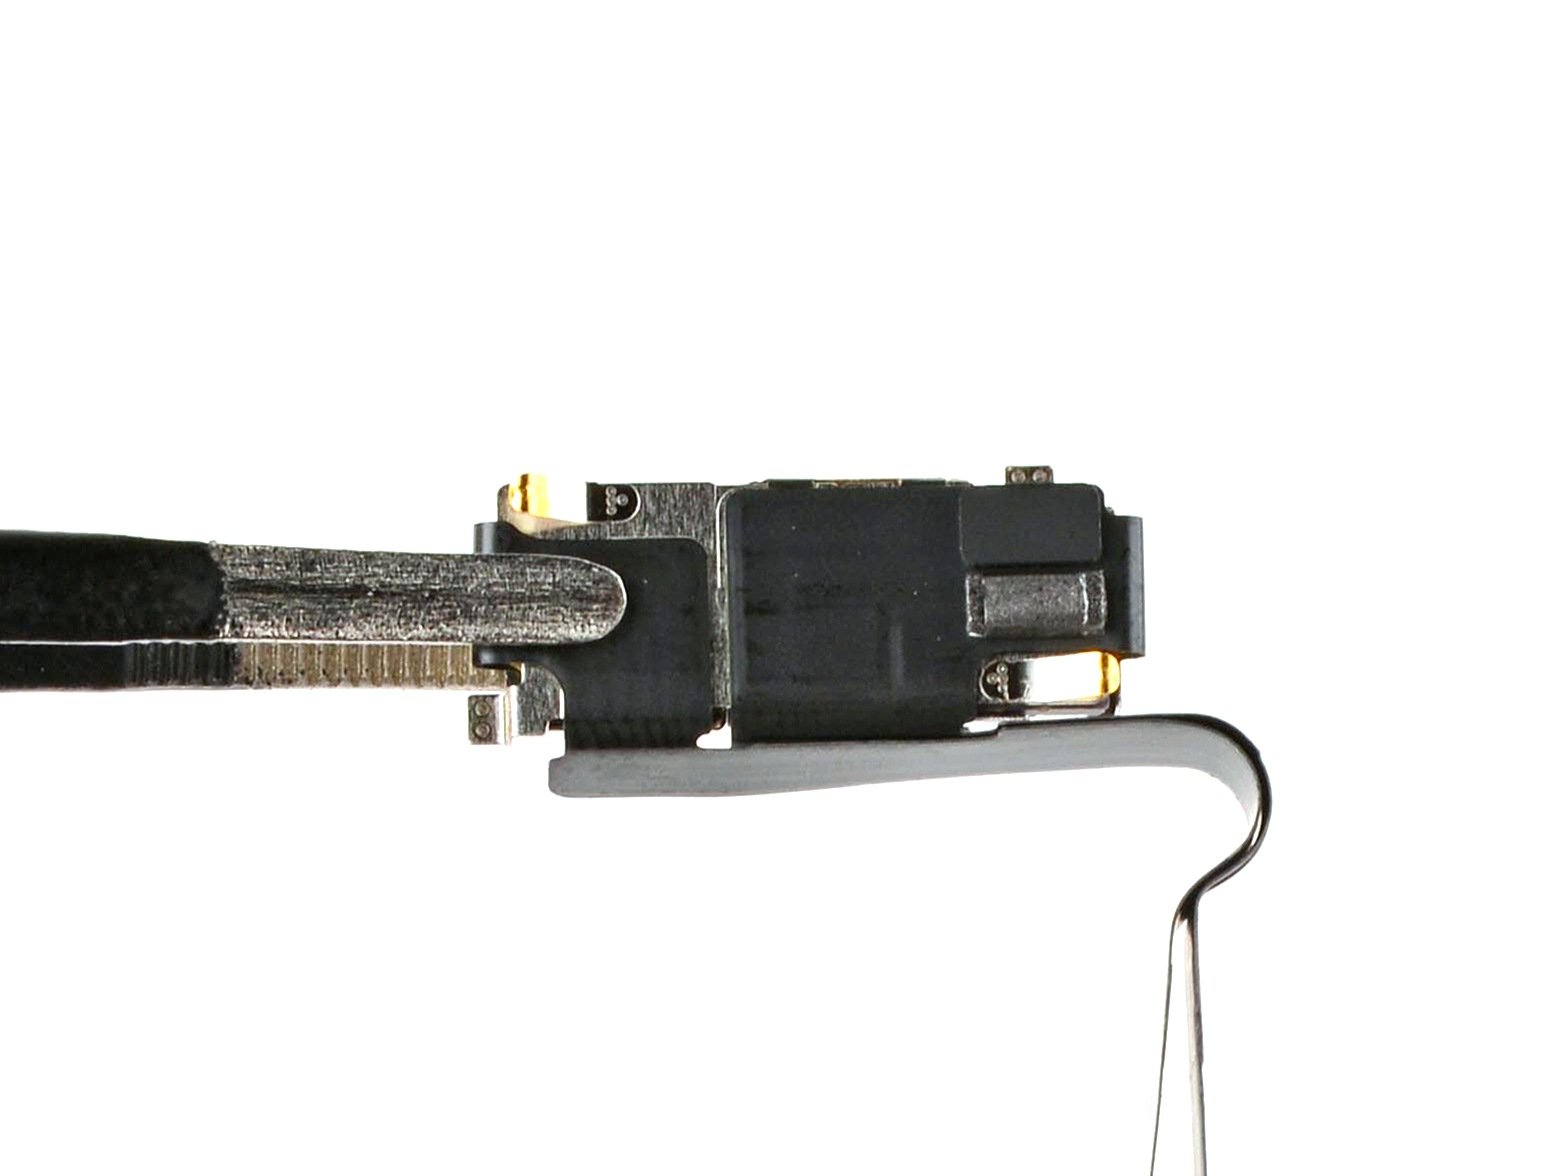
Step 21


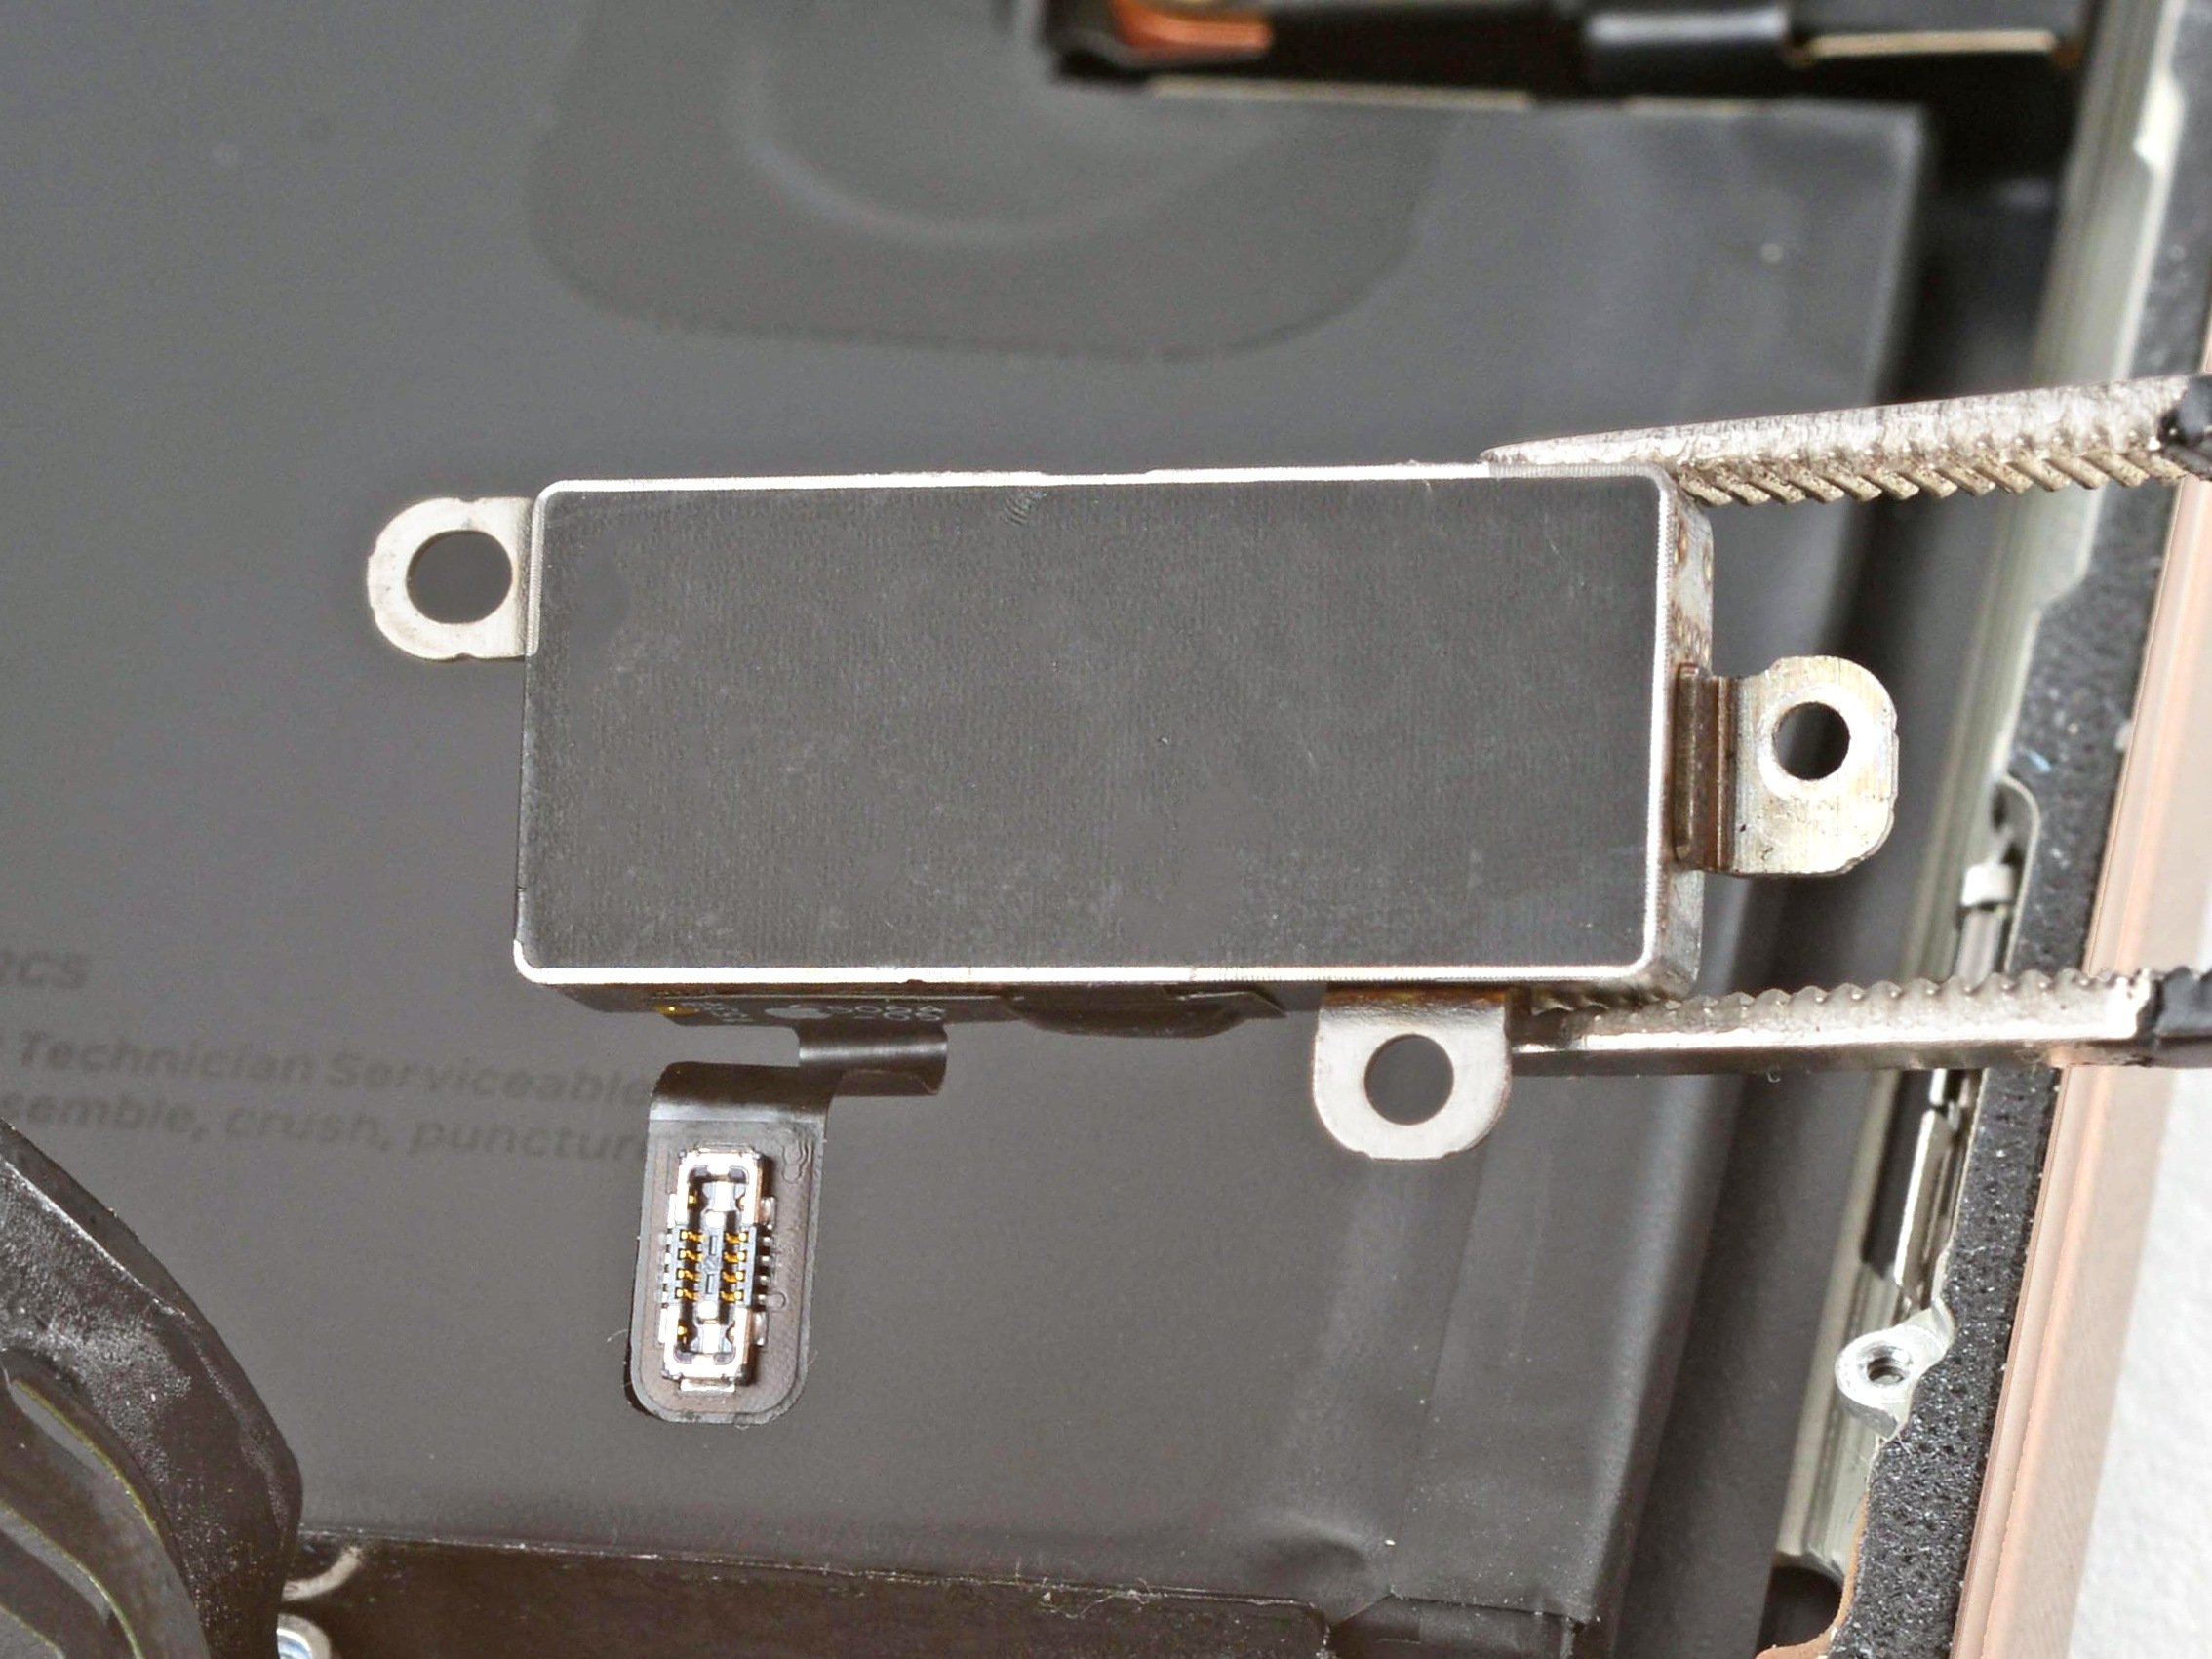
- Gently use the tip of a spudger to lift and unplug the back glass connector.
Tools Used
Step 22

- Carefully peel off the back glass like you're unveiling a secret treasure. Just take your time and gently work your way around, no need to rush. Once it's off, you're on the right track!
Step 23

Awesome job on getting through the disassembly! Now, let’s dive into the reassembly of your iPhone. It's going to be a breeze!
Keep in mind that depending on your iPhone model, some of the reassembly images might not match exactly. But don't worry, the steps will still be spot on for your device!
Step 24


Carefully navigate around the delicate grounding clips while cleaning the frame. If one gets bent out of shape, just nudge it back gently with your fingers or tweezers—no biggie!
- Grab some blunt nose tweezers or your trusty fingers to gently pry away those stubborn chunks of adhesive stuck around the frame's edge.
- Take a spudger and give it a little loving scrape to remove any remaining adhesive residue from the frame.
- If the adhesive is playing hard to get, don't hesitate to warm things up a bit—grab a hair dryer or heat gun and coax it off with some gentle heat.
Tools Used
Step 25


- If you’re planning to reuse your back glass, grab a microfiber or lint-free cloth, add a few drops of high-strength isopropyl alcohol (90% or above), and give the edges a good wipe to get the surface ready for fresh adhesive.
Step 26

Take your time with this step! A spotless frame makes sure that the adhesive goes on smoothly and sticks just right, giving you the best possible bond. It’s all about the details!
- Take a lint-free cloth or a coffee filter and wrap it around the tip of your spudger. Add a few drops of isopropyl alcohol (90% or higher) to the cloth.
- Gently wipe along the edges of the frame in one smooth direction to clear away any sticky adhesive leftovers.
Tools Used
Step 27

Line up the adhesive using clues like the camera cutout and the notches along the edges—think of them as your road map for getting that sticky stuff right where it belongs.
- Place the adhesive sheet on the frame and check to make sure it's oriented just right.
Step 28


Heads up: this adhesive is seriously clingy! Keep it away from everything until you're ready to stick it to the frame.
If your adhesive comes with more than one liner, go ahead and peel off the one that reveals the sticky side meant for the frame.
- Find that little tab in the corner of the adhesive sheet, grab it with confidence, and peel back the liner to reveal about a third of the sticky goodness underneath.
Step 29


Once you press the adhesive down, it’s a one-and-done deal—no moving it around. If it’s not quite right, you’ll need to peel it off and start fresh with new adhesive.
- Line up the sticky edge of the adhesive strip with the matching edge of your iPhone’s frame like a pro.
- Once it’s in place, give that adhesive a gentle press to stick it down nice and snug.
Step 30


No spare adhesive strips? No problem! You can put your iPhone back together and use it for now, but just a heads-up: the water resistance won’t be up to par until you swap in new adhesive.
When the adhesive is lined up just right, the edges will fit snugly and look sharp.
If the adhesive is a bit off, gently nudge the longer edges to line up with the frame perfectly.
If you see any wrinkles or creases popping up, peel it off and start fresh with a new strip of adhesive.
- Keep peeling away the liner from the adhesive like you’re unwrapping a gift, and gently press the sticky part into place. Easy does it—no rush needed.
Step 31


Take care around those delicate grounding clips. If one gets bent out of place, no worries—just nudge it back gently with your fingers or tweezers.
Apply gentle pressure—pressing too hard can stretch or warp the adhesive, making your repair trickier. Take it slow and steady for the best results. If you need help, you can always schedule a repair.
- Grab your spudger and gently work it around the whole edge of your iPhone, pressing down the adhesive as you go.
Tools Used
Step 32


Hey there! Before you dive into reassembling your iPhone, take a moment to check if those little liner coverings are still hugging the edges. They're doing a great job keeping the adhesive from making any unexpected friends. So, hold off on peeling those off just yet!
- Grab your trusty spudger or just use your fingers to gently lift that pull tab attached to the big front liner. It's usually hanging out in one of the corners, just waiting for you!
- Now, take that pull tab and give it a little tug to peel the large front liner away from the sticky stuff holding it down. Easy peasy!
Tools Used
Step 33

- Stand the back glass up along your iPhone’s right edge, like you’re giving it a little sidekick pose.
Step 34

- Gently use your finger or the flat end of a spudger to nudge the back glass connector into place on the logic board until it snaps in nicely.
Tools Used
Step 35

Now's your chance to give your iPhone a quick test run before you seal it up! Go ahead and power it on to ensure everything's working as it should. Once you're satisfied, power it back down and let's continue putting it back together.
If your iPhone refuses to power on, no worries! Just connect it to a power source and give it another shot.
In the event you've swapped out the logic board and the screen still won't light up, fear not! Just refer to the screen guide to manually hook up that display connector.
- Go ahead and give that battery press connector a gentle nudge with your finger or a spudger, and let it snap into place on the logic board. You're doing great!
Tools Used
Step 36

- Line up the back glass connector cover with the screw holes and gently set it in place—like matching sock pairs, but for your device.
Step 37

- Grab your tri-point Y000 driver and pop in the four screws holding down the back glass connector cover:
- Two screws, each 1.3 mm long
- Two screws, each 1.0 mm long
Step 38

- Line up the battery connector cover with its screw holes and gently set it down in place.
Step 39

- Grab your trusty tri-point Y000 driver and let's get those screws in place for the battery connector cover:
- Two screws that are 1.3 mm long, ready to be secured.
- And don't forget the one little 1.0 mm long screw to complete the trio!
Step 40


As you peel away the liners, just be mindful that nothing comes in contact with that sticky adhesive. Keep it safe and sound!
- Gently use your fingers or a spudger to lift and peel away all the liners around the edges, revealing the adhesive underneath.
- Give the frame and back glass a once-over to spot any leftover liners and remove them. Make sure nothing sneaky is left behind!
Tools Used
Step 41


If you hit a spot that feels like it's fighting back, chances are a perimeter clip is a little out of shape and getting squeezed by the frame. Take a peek where things get sticky and give any bent clips a gentle nudge back into place.
- Gently set the back glass onto the frame, starting with the top edge.
- Give the edges a firm press so the back glass snaps in nice and flush with the frame.
Step 42

Heating things up softens the adhesive, making it easier for everything to stick together like a charm.
- Grab a hair dryer, heat gun, or iOpener and gently warm up the edges of the back glass until it feels just a tad too toasty to touch.
Tools Used
Step 43


- Give your iPhone a gentle but firm squeeze around the edges—like you're trying to wake it up after a long nap.
Step 44


You can also grab some vise clamps and gently secure them around your device’s edges to help the new adhesive set perfectly.
- Set your iPhone down screen-side down on a clean, flat surface—think of it as giving it a little face-down timeout.
- Wrap a strip of tape all around the edges of the back glass to keep that shiny finish safe and sound.
- Line up some coins around the back glass edges until you’ve built a little coin wall as tall as those camera bumps—think of it as a mini fortress for your phone.
Tools Used
Step 45


Coins might leave a little mark on the bottom book cover, so avoid using anything you actually like!
A little pressure now and then helps the adhesive do its thing—think of it as a friendly hug for your device to seal the deal.
- Stack 3-4 hefty books right on top of your iPhone, making sure it's snug and centered. Keep the books in place for about 30 minutes to help things settle. If you need a hand at any point, just schedule a repair with Salvation Repair.
Tools Used

Step 46
- Once you've wrapped up your repair, don’t forget to calibrate that shiny new replacement part using Apple's Repair Assistant. Just hop over to Settings→General→About→Parts & Service History, hit Restart & Finish Repair, and follow the friendly prompts on your screen.
- Got some e-waste? Make sure to drop it off at an R2 or e-Stewards certified recycler. It's good for the planet!
- Things didn’t go as smoothly as you hoped? No worries! Try a bit of basic troubleshooting, or feel free to reach out to our Answers community for a helping hand. And remember, if you need further assistance, you can always schedule a repair.