iPhone 16 Pro Max LiDAR Sensor Replacement
Duration: 45 minutes
Steps: 52 Steps
Looking to swap out the LiDAR sensor in your iPhone 16 Pro Max? No worries! This guide walks you through the process step-by-step. Just keep in mind, you'll need some replacement back glass adhesive to seal everything up snug. If you get stuck at any point, remember you can always schedule a repair with Salvation Repair for a little extra help. Let’s get that sensor replaced and your device back in action!
Step 1


Let your iPhone's battery dip below 25% before proceeding — a full lithium-ion battery can be a bit of a safety concern. If you need a hand, you can always schedule a repair.
- Disconnect all cables from your iPhone to start fresh.
- Press and hold the side button and either volume button until the power off slider appears, then slide to turn off your iPhone.
Step 2


Ensure there's a flat, non-textured area near the bottom edge that's large enough for a suction cup to latch onto easily. This will help you get a good grip as you start lifting the component.
- If your screen or back glass has seen better days with those cracks, grab some packing tape and lay down a few overlapping strips over the glass. This will keep you safe and make taking things apart a breeze!
Tools Used

Step 3


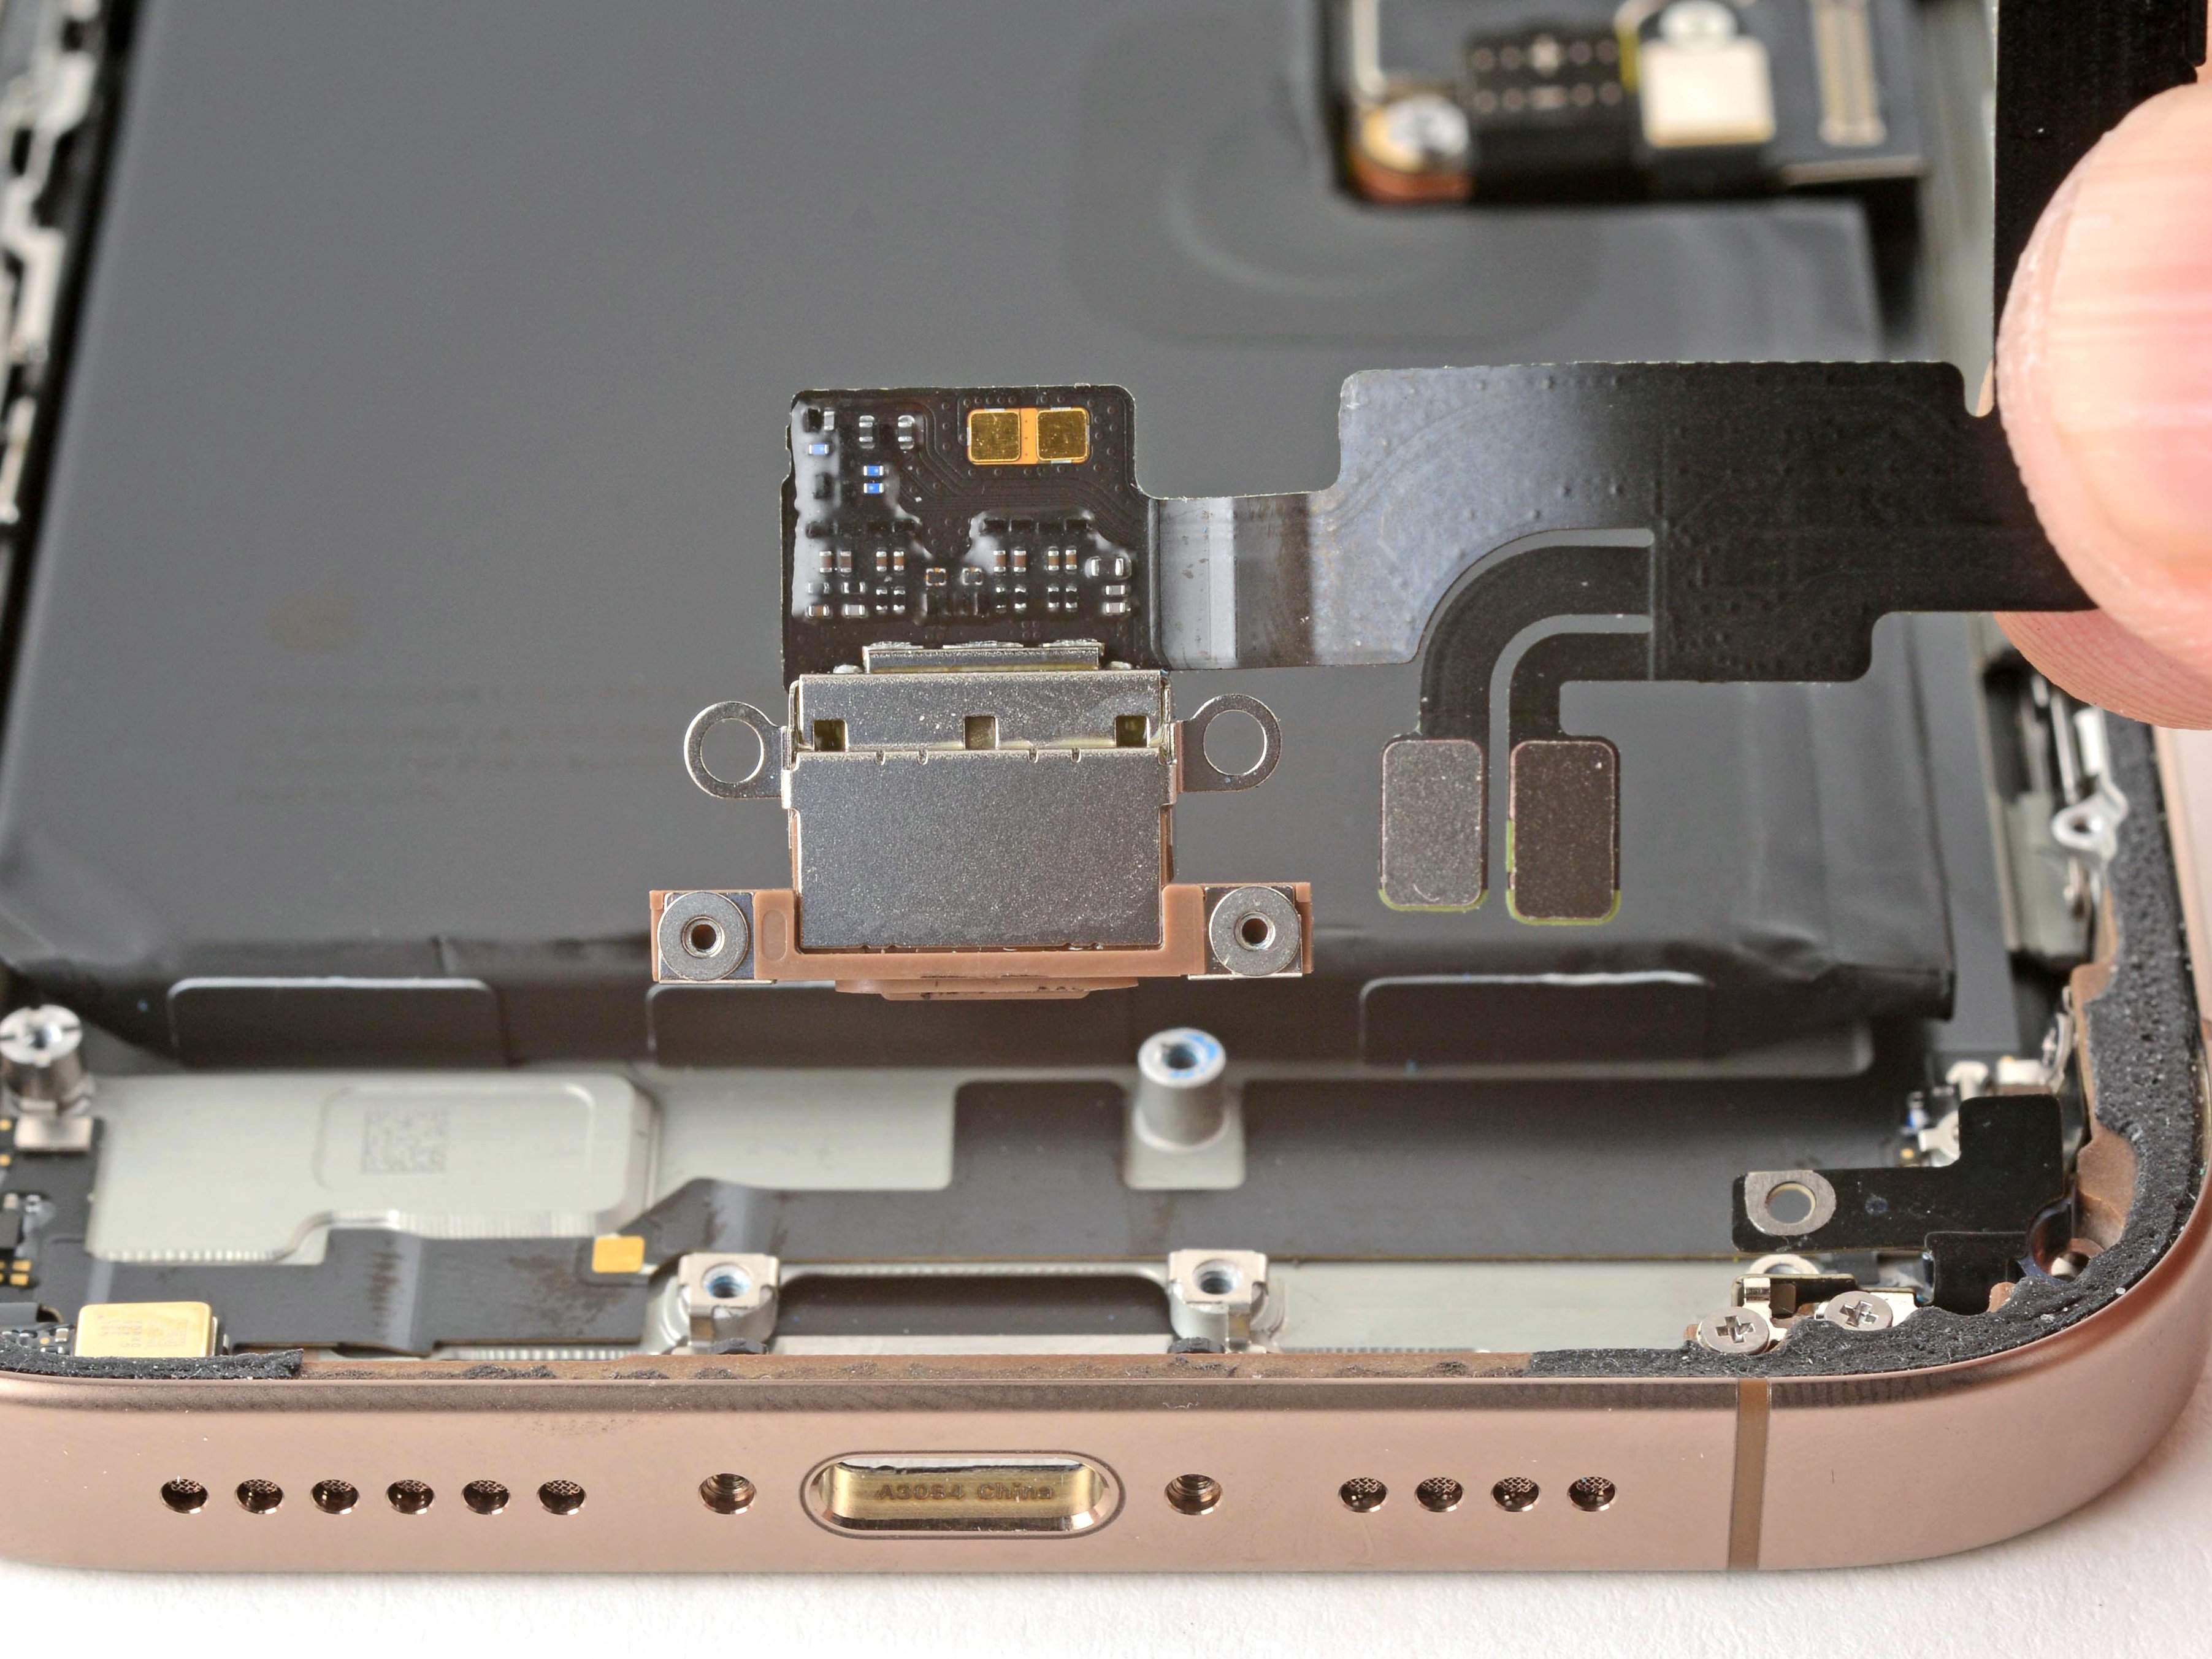
- Grab a P2 pentalobe screwdriver and carefully remove the two 7.4 mm screws on each side of the charge port. If you need help, you can always schedule a repair.
Step 4


If you shove the opening pick in too deep, it might mess up your device. To keep things safe, mark your pick to know exactly how far to go.
Feel free to mark the other corners of your pick with different measurements for extra precision.
Another cool trick: tape a coin to your pick about 3 mm from the tip to act as a stopper.
- Use a ruler to measure 3 mm from the tip, then mark that spot on the opening pick with a permanent marker. Keep it precise and steady—you're setting up for a smooth repair. If you need a hand, you can always schedule a repair.
Tools Used

Step 5

These next two steps will guide you through making a small opening using a suction handle—think of it as your trusty sidekick for this part.
Alternatively, you can warm up the back glass with an iOpener. Follow these tips to heat it just right and get that iOpener working its magic.
- Grab a hair dryer or heat gun and gently warm up the bottom edge of the back glass until it feels warm to the touch. This helps loosen things up for the next step.
Tools Used


Step 6


If nothing's budging, give that edge some extra heat and give it another shot!
- Grab a suction handle and stick it to the bottom edge of that back glass.
- Give it a solid pull upwards with a consistent force to pop open a little gap between the back glass and the frame.
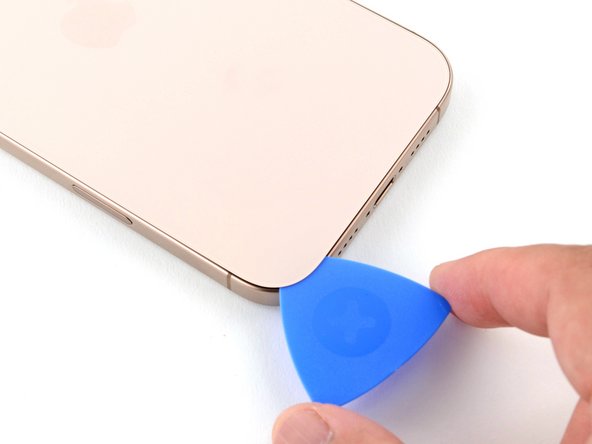
- Slide the tip of an opening pick into that gap you just created.
Tools Used
Step 7

As you gently slice through the adhesive holding the back glass in place, keep your pick no deeper than 3 mm to avoid any accidental damage to the surrounding areas. Take it slow and steady—you're doing great!
- Be careful of that fragile cable connecting the back glass to your iPhone, right by the volume up button. It's a little shy, so keep your pick away from it to prevent any accidental snips!
- Look out for the multiple spring contacts hanging out around the edges of your iPhone. They're just doing their job, but we need to give them some space!
Step 8

If the adhesive isn't giving up easily, give it a quick reheat for about a minute and then try slicing again. Sometimes a little extra warmth makes all the difference.
- Gently slide the opening pick along the bottom edge to cut through the adhesive holding the device together.
- Keep the opening pick in the bottom-left corner to prevent the adhesive from sticking back together as you work.
Step 9

- Grab a hair dryer or heat gun and gently warm up the left edge of the back glass until it feels nice and toasty to the touch.
Tools Used
Step 10


Keep your pick within 3 mm, or you might accidentally give those spring contacts a little too much love!
As you glide through, you’ll hear and feel those metal clips giving way—like a tiny victory dance!
- Pop in a second opening pick at the bottom-left corner, right next to your first pick.
- Gently glide your pick along the left edge to break the adhesive seal and free those metal clips.
- Keep that pick snugly in the top-left corner to stop the adhesive from getting all clingy again.
Step 11

- Grab a hair dryer or heat gun and gently warm up the top edge and top-right corner of the back glass until it feels comfortably warm to the touch.
Tools Used
Step 12


Keep it shallow! Don’t go deeper than 3 mm with your pick – you don’t want to accidentally mess with the spring contacts down there.
- Pop a third opening pick into the top-left corner like you’re inserting a secret agent on a mission.
- Carefully slide that pick across the top edge and around the top-right corner, but pause just above the volume up button – it’s taking a breather!
- Keep this pick in place to stop the adhesive from throwing a fit and resealing.
Step 13

- Grab a hair dryer or heat gun and gently warm up the right edge of the back glass until it feels warm to the touch. Keep it steady and patient, and you'll be ready for the next step in no time.
Tools Used
Step 14


Be gentle when inserting your pick—stick to about 3 mm max to keep those spring contacts happy and undamaged.
- Pop a fourth opening pick into the bottom-right corner like a pro.
- Carefully slide that pick around the corner and up the right edge, stopping just below the volume down button.
- Keep this pick in place to stop the adhesive from snapping back together.
Step 15


At this stage, the back glass should be ready to pop off from the frame. If it’s feeling like it’s playing hard to get, take a moment to run your pick around the edges again to see if you’ve missed any sneaky bits of adhesive or clips holding it back.
- Gently pry open the back glass to the right of the iPhone to break the remaining adhesive seal.
- Support the back glass with a clean, sturdy object to keep it steady while you work.
Step 16

- Grab a tri-point Y000 screwdriver and gently remove the three screws holding down the battery connector cover—think of it as unscrewing a tiny treasure chest!
- There are two screws, each 1.3 mm long—easy peasy to spot and remove.
- And one little screw, just 1.0 mm in length—like the cherry on top of your repair sundae.
Step 17


- Gently lift off the cover that protects the battery connector. Get ready to dive into the heart of your device!
Step 18


- Grab your spudger and gently pry up the battery press connector to disconnect it. Easy does it—you're just separating a tiny connector from its socket. If you need help along the way, you can always schedule a repair for extra hands.
Tools Used

Step 19

- Grab your tri-point Y000 screwdriver and gently remove the four screws holding down the back glass connector cover—two are 1.3 mm long, and two are 1.0 mm long. Take your time and keep track of those tiny screws. If you need a hand, you can always schedule a repair.
Step 20


- Carefully lift the back glass connector cover straight up to remove it, giving it a gentle wiggle if needed. If you need help, you can always schedule a repair.
Step 21


- Gently use the tip of a spudger to lift and unplug the back glass connector.
Tools Used
Step 22

- Start by carefully removing the back glass panel to access the internals. Take your time and handle with care to avoid any cracks or damage. If you need a hand along the way, you can always schedule a repair.
Step 23


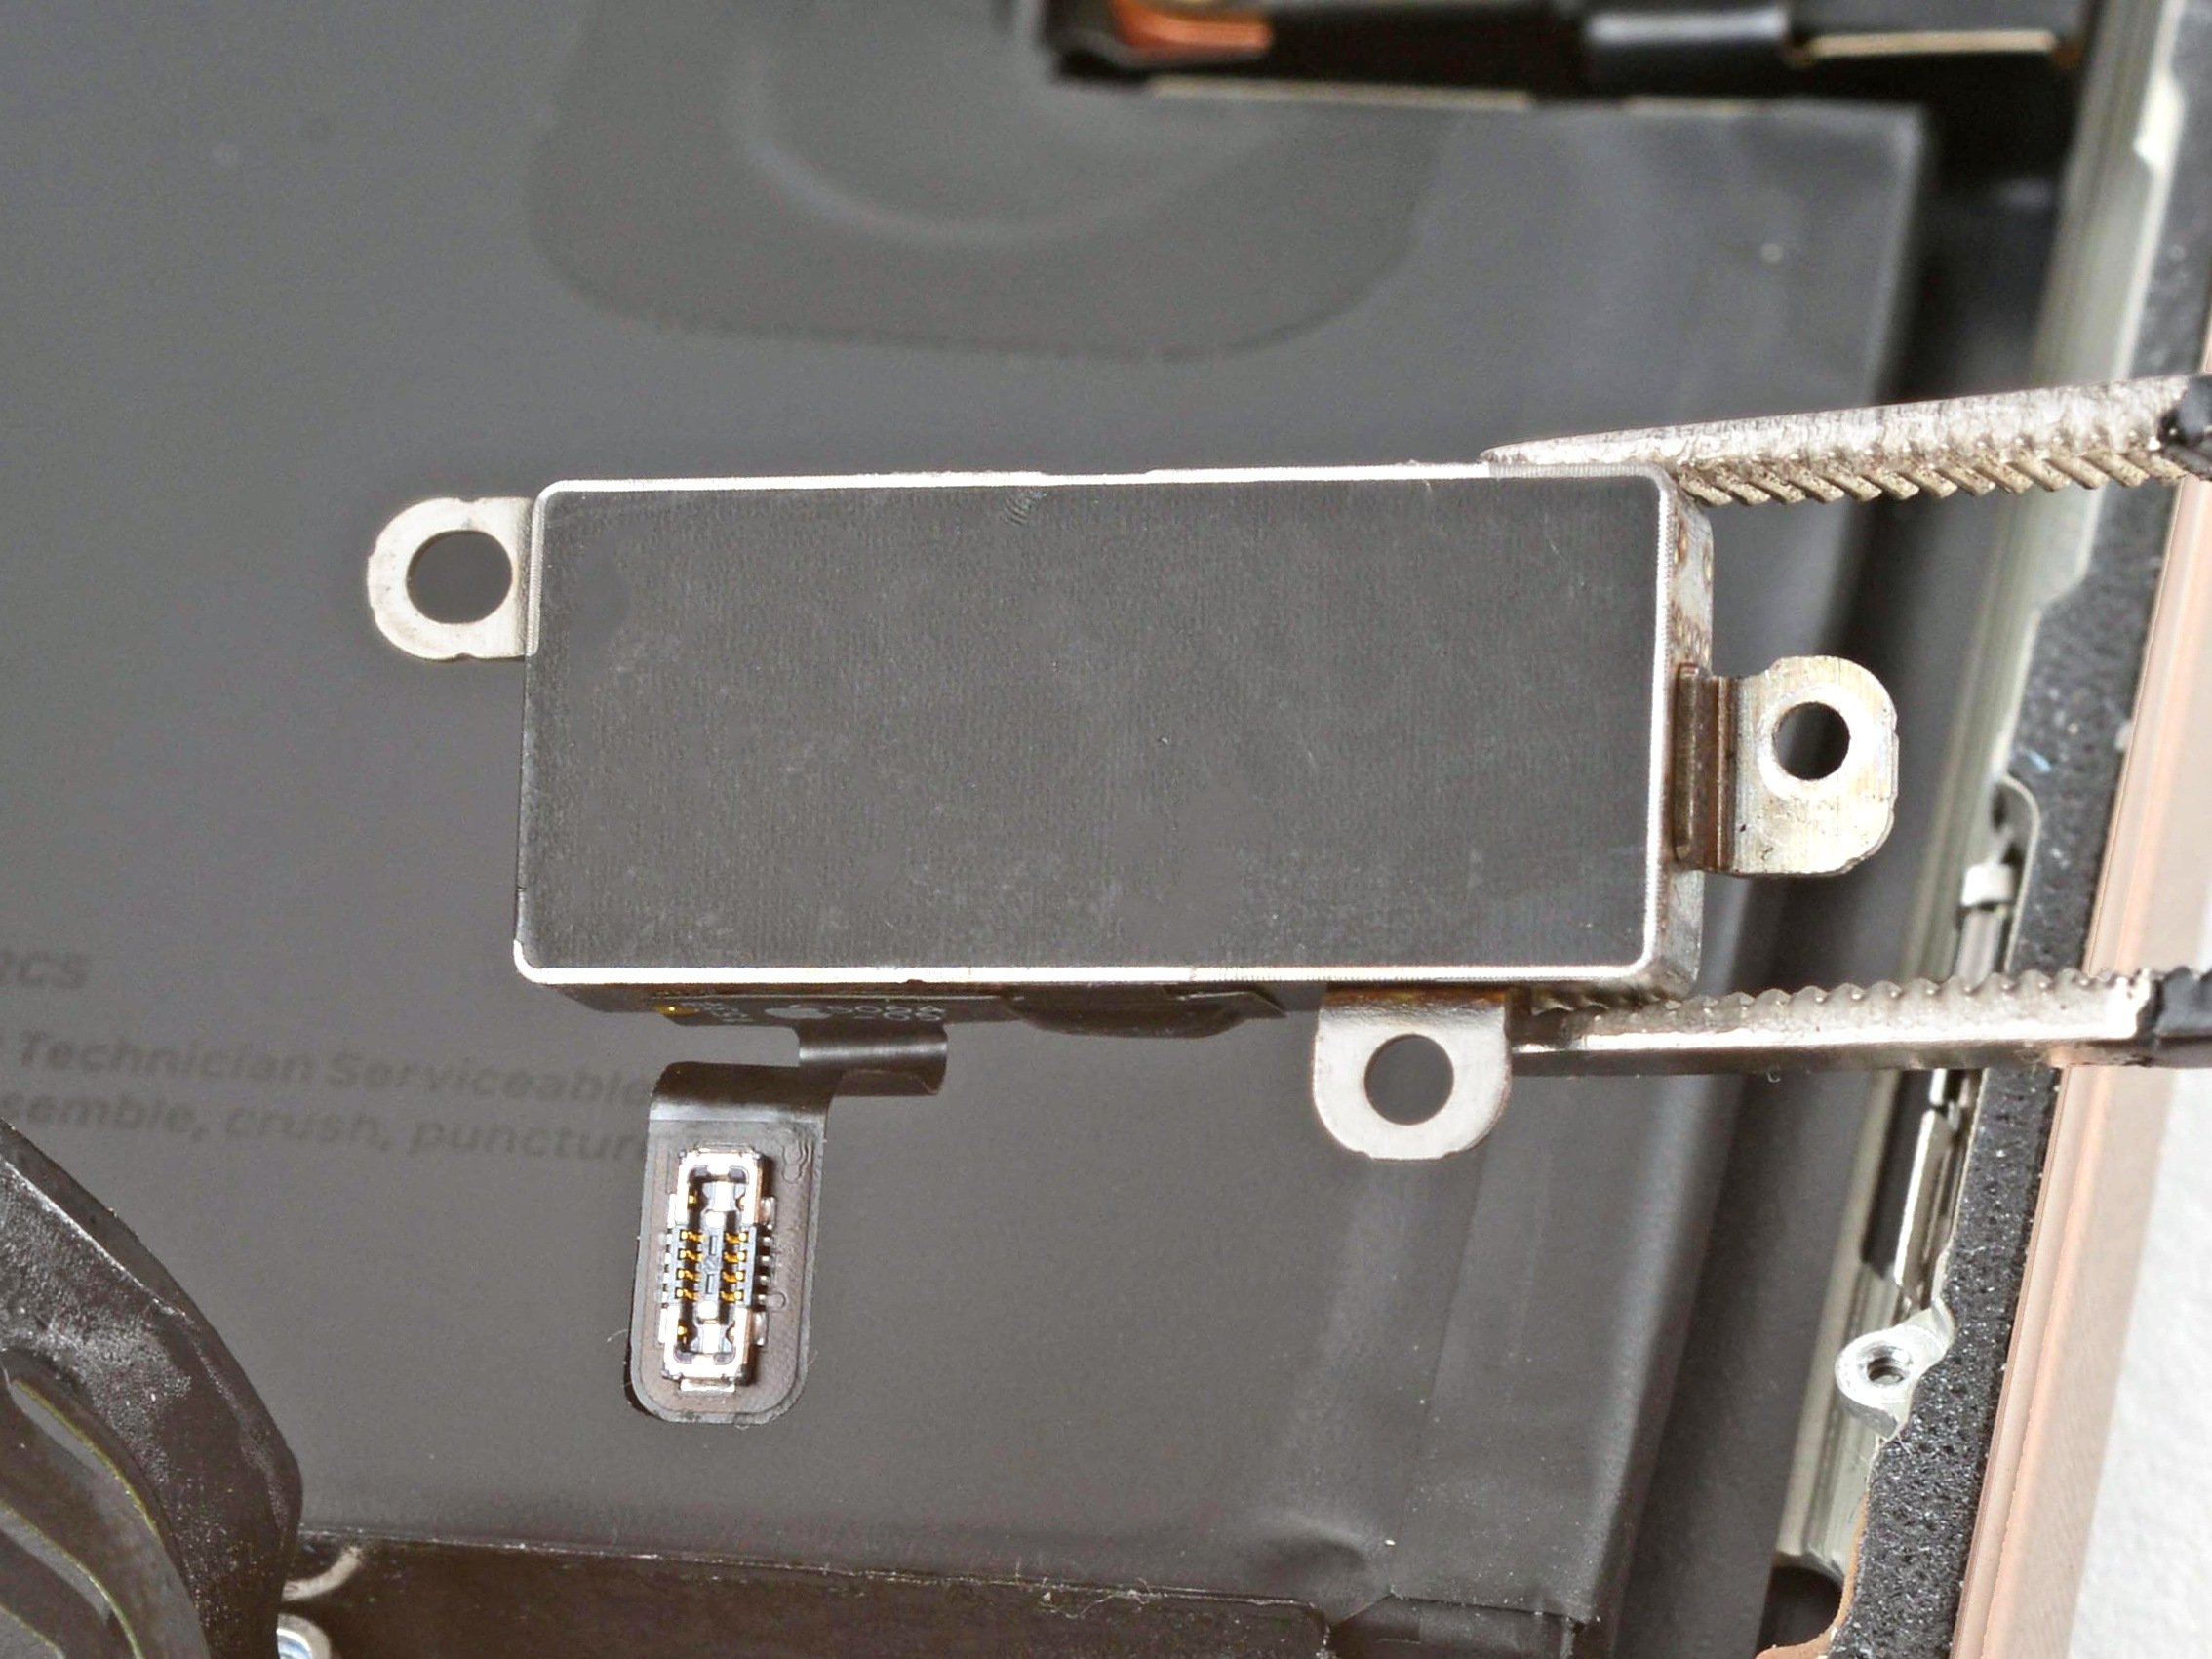
- Grab a spudger and gently pry up to disconnect the LiDAR sensor connector—easy does it!
Tools Used
Step 24


- Grab your trusty Phillips screwdriver and let's get those LiDAR sensor screws out of there:
- First up, we have a 1.6 mm-long screw, nice and easy!
- Next, there's a slightly longer 2.9 mm-long screw, just waiting to be freed!
Step 25


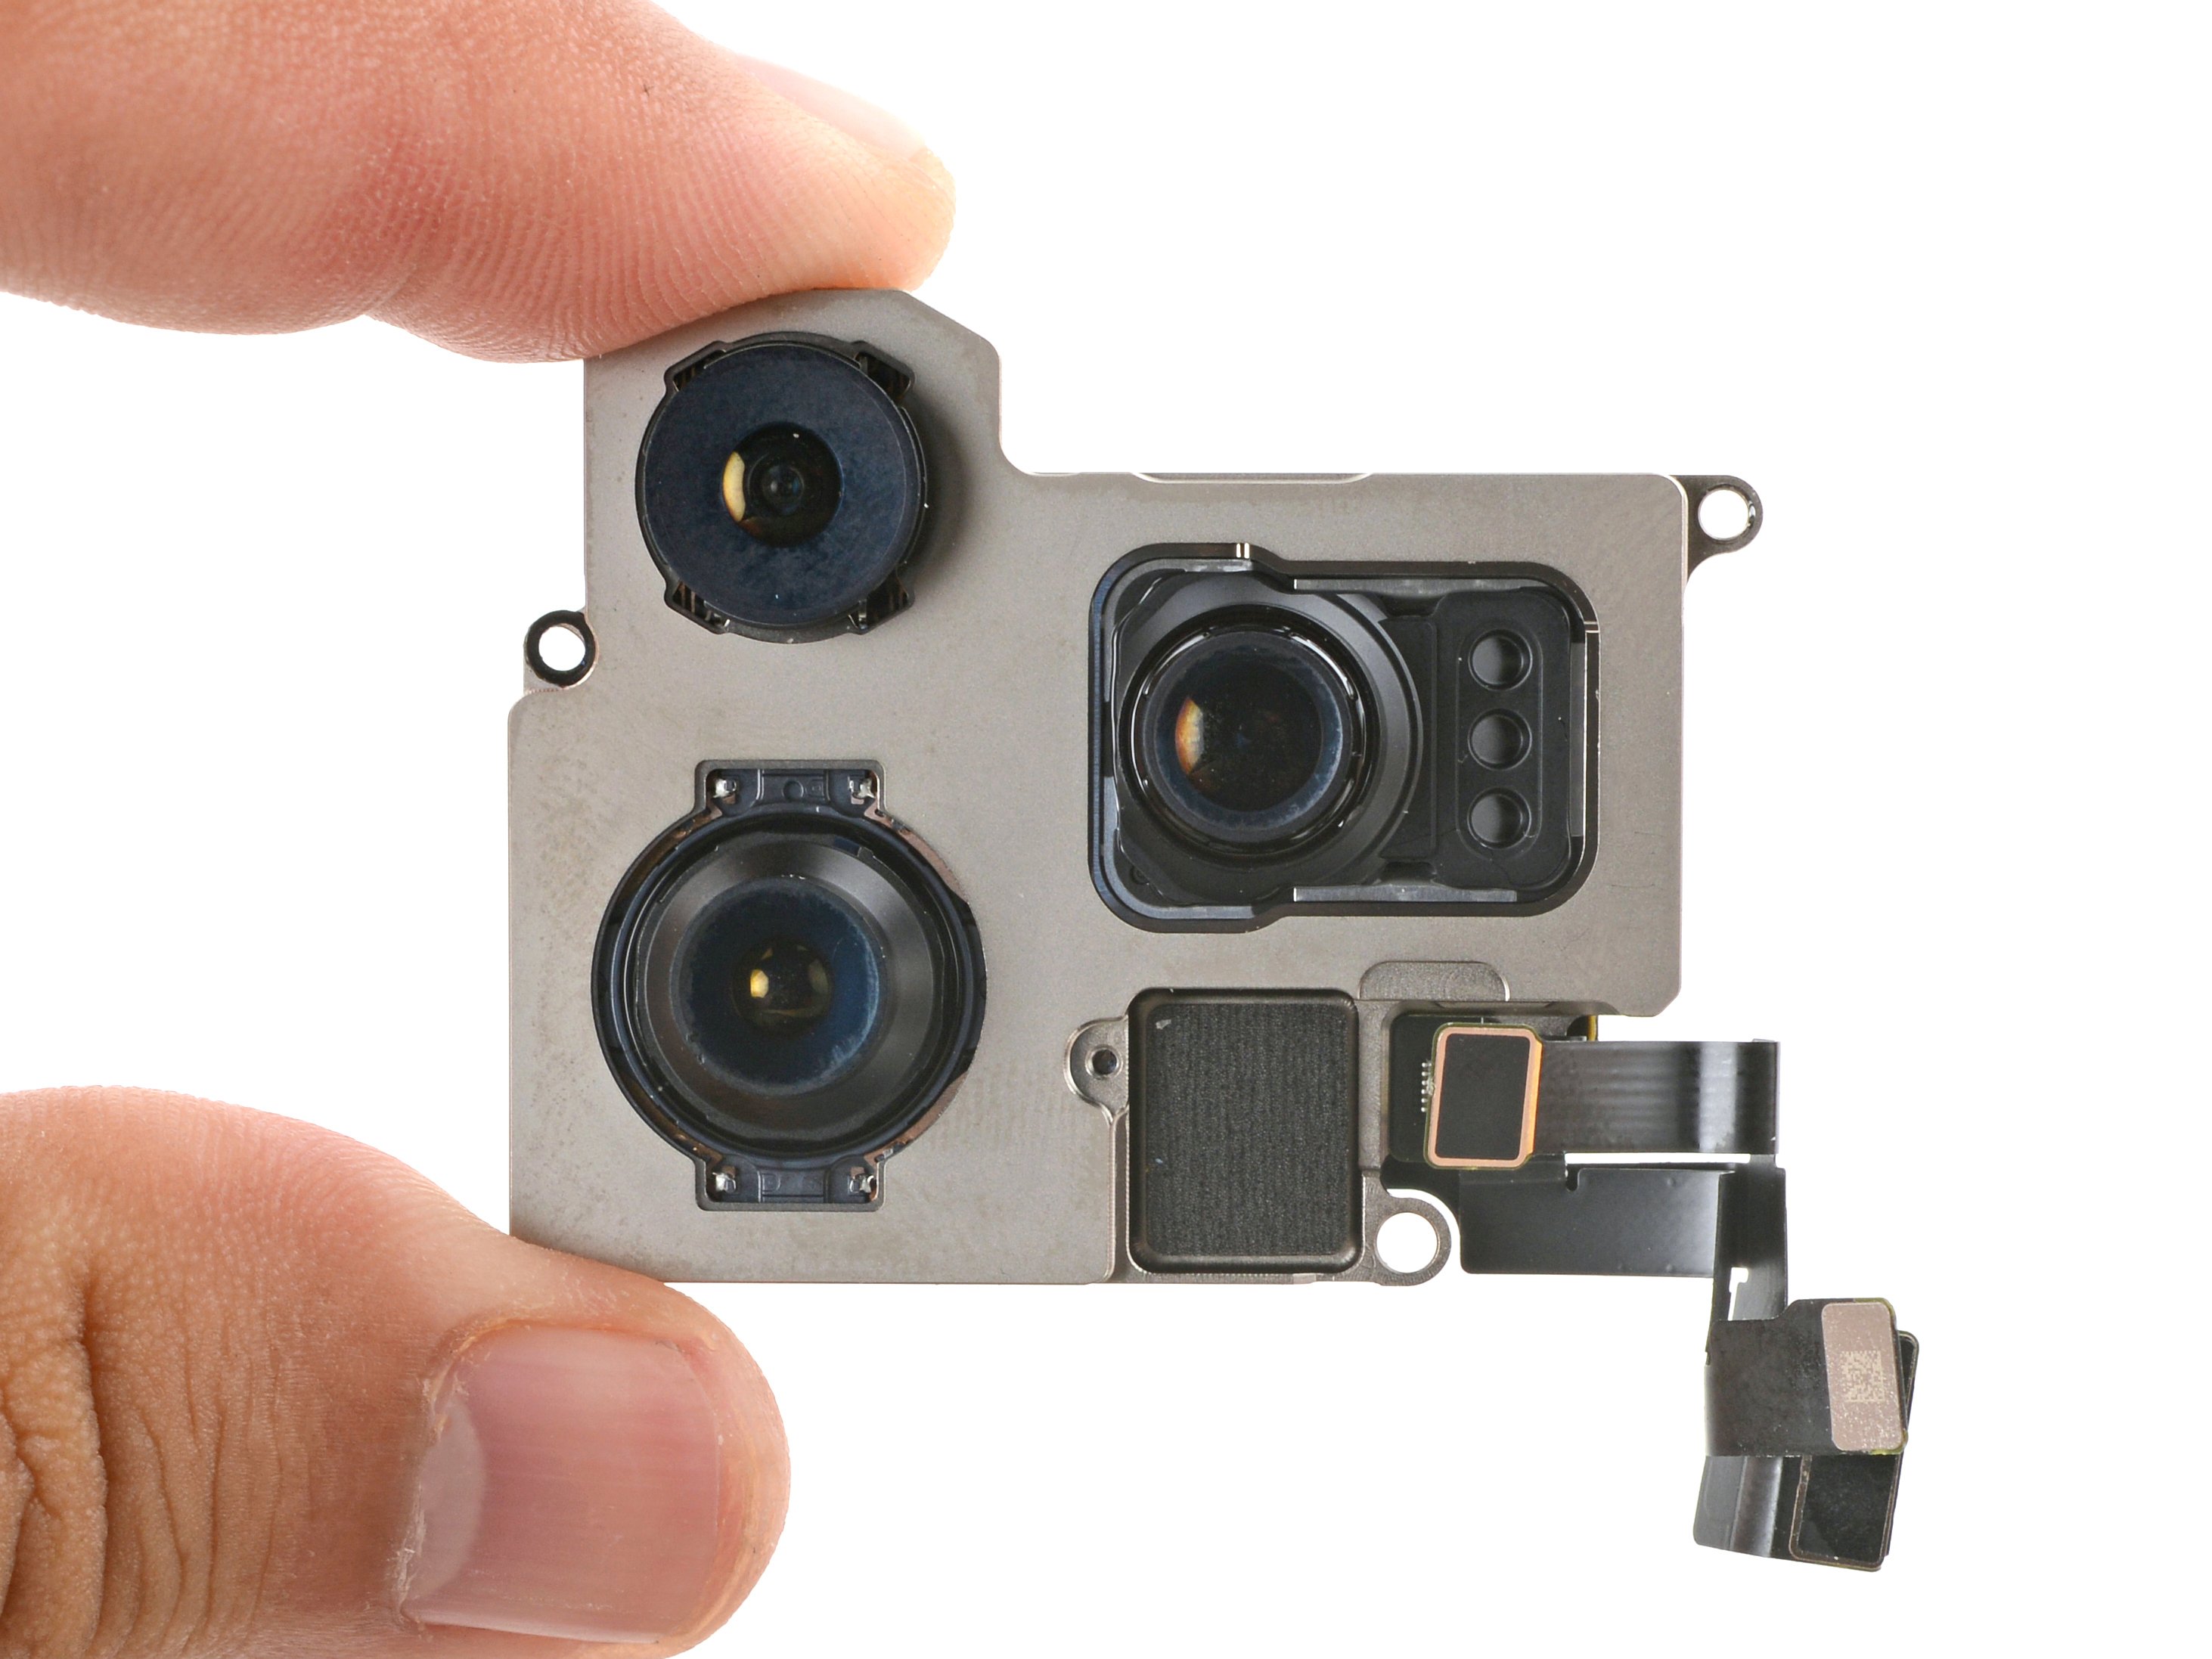
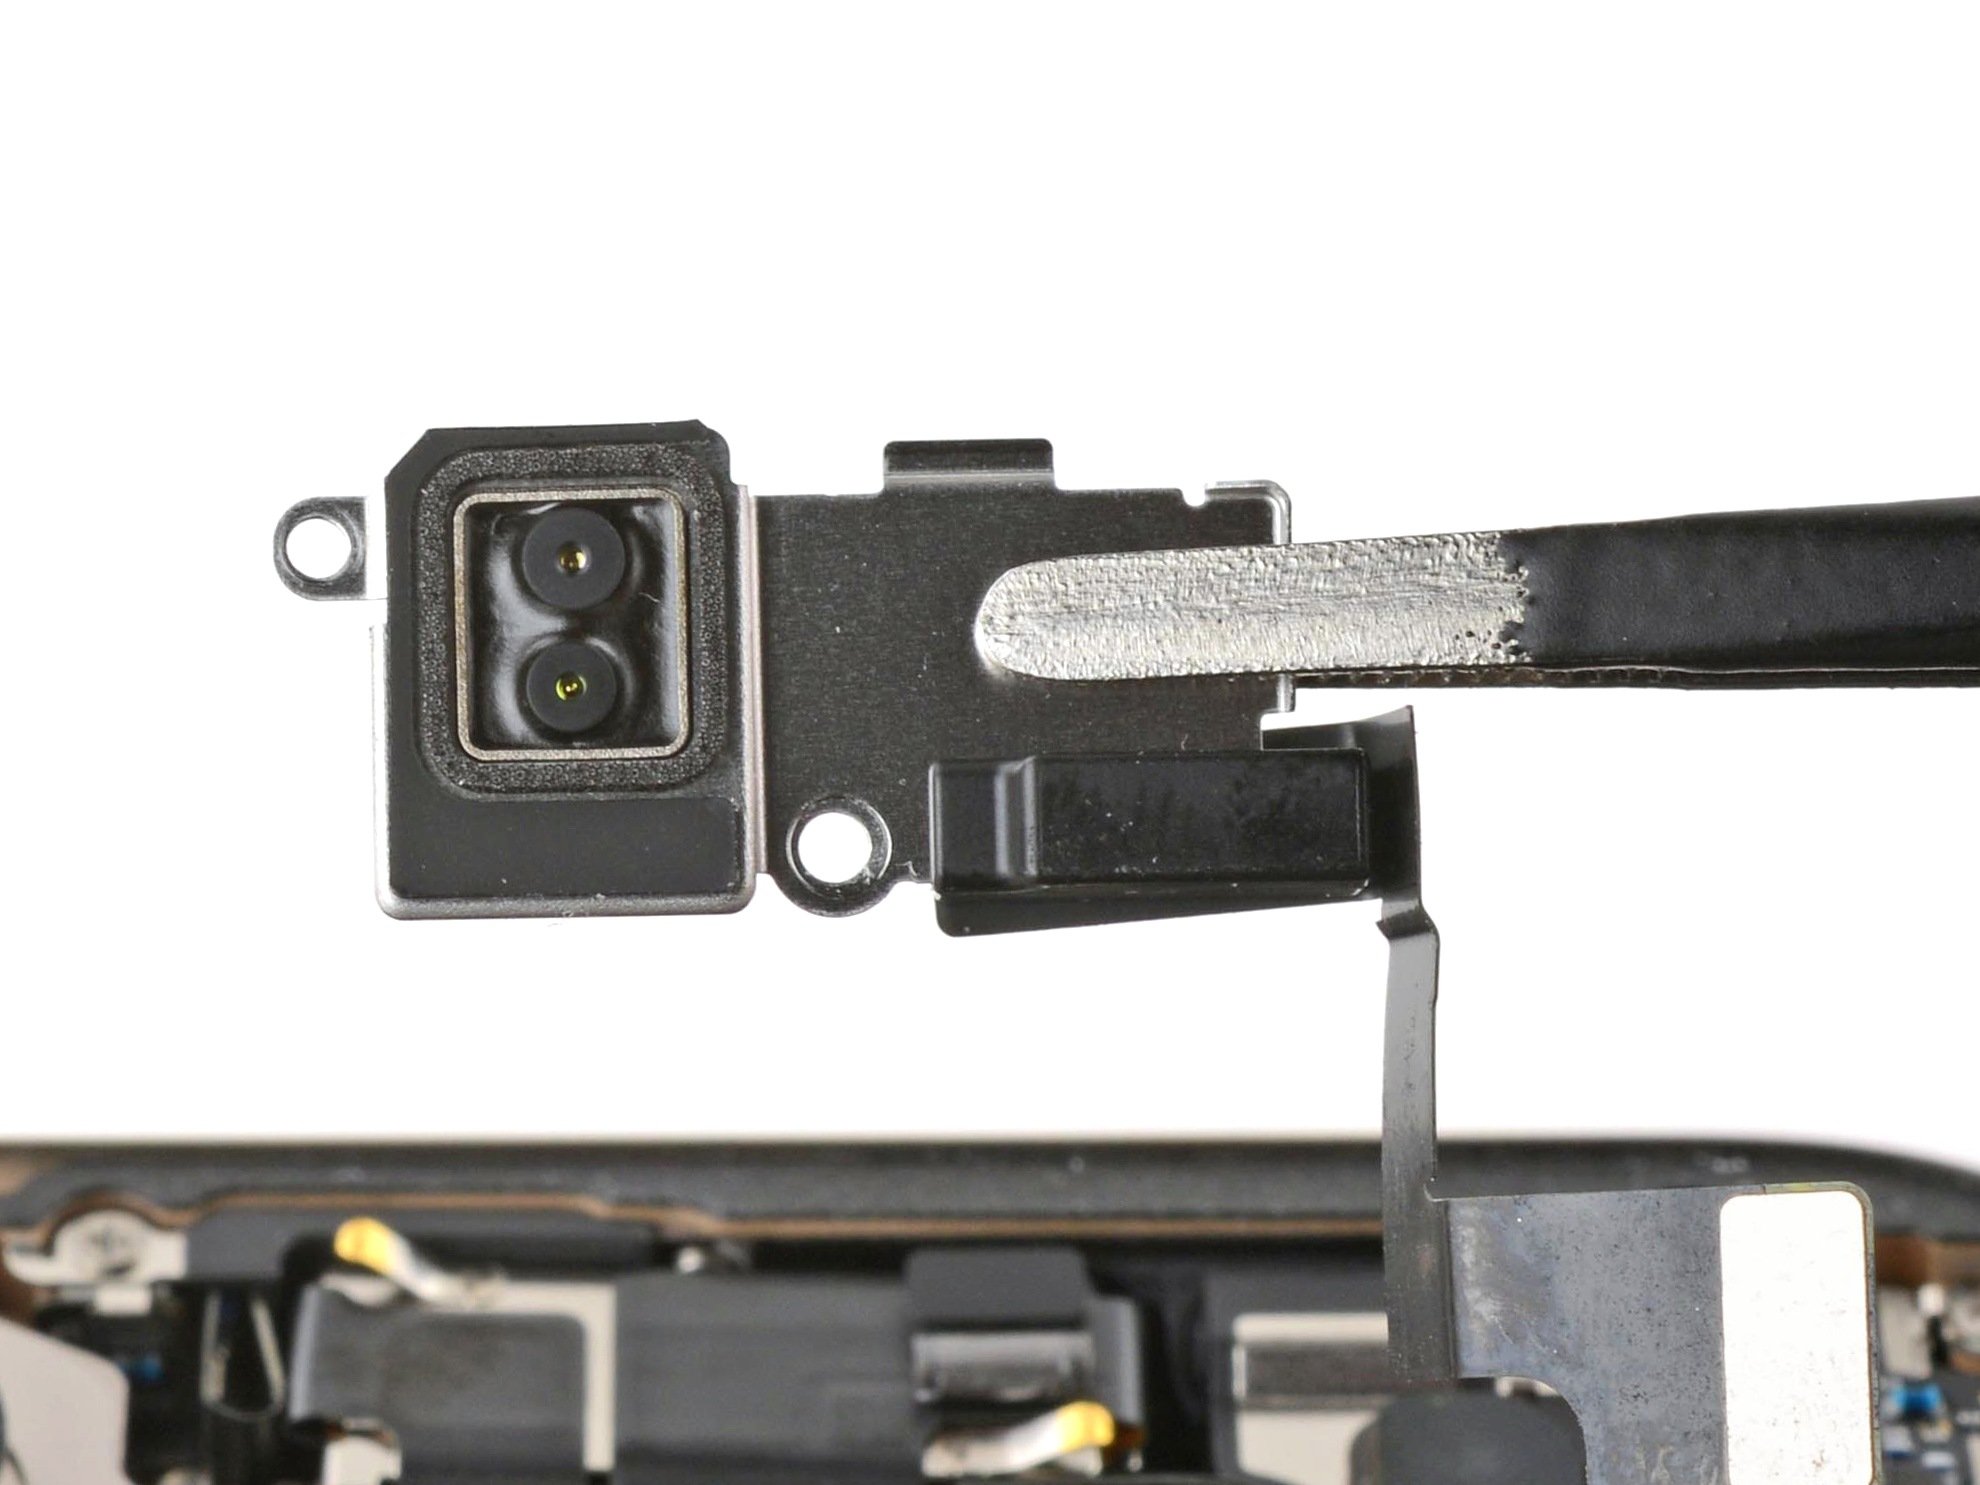
- Grab your fingers or a pair of tweezers and gently lift out the LiDAR sensor. Keep it careful and steady—you're almost there! If you need help, you can always schedule a repair.
Tools Used

Step 26

Well done on getting through the disassembly! Now, let’s dive into the fun part—putting your iPhone back together!
Keep in mind, depending on your iPhone model, some of the reassembly images might look a tad different. No worries though—the steps will still guide you correctly for your iPhone!
Step 27
- Gently place the LiDAR sensor back into its designated slot, making sure it sits snugly and correctly. If you need assistance along the way, don’t hesitate to schedule a repair for extra help.
Step 28
- Grab your trusty Phillips screwdriver and let's get those screws in place for the LiDAR sensor! You'll need one screw that's 1.6 mm long and another that's 2.9 mm long. Let's do this!
Step 29

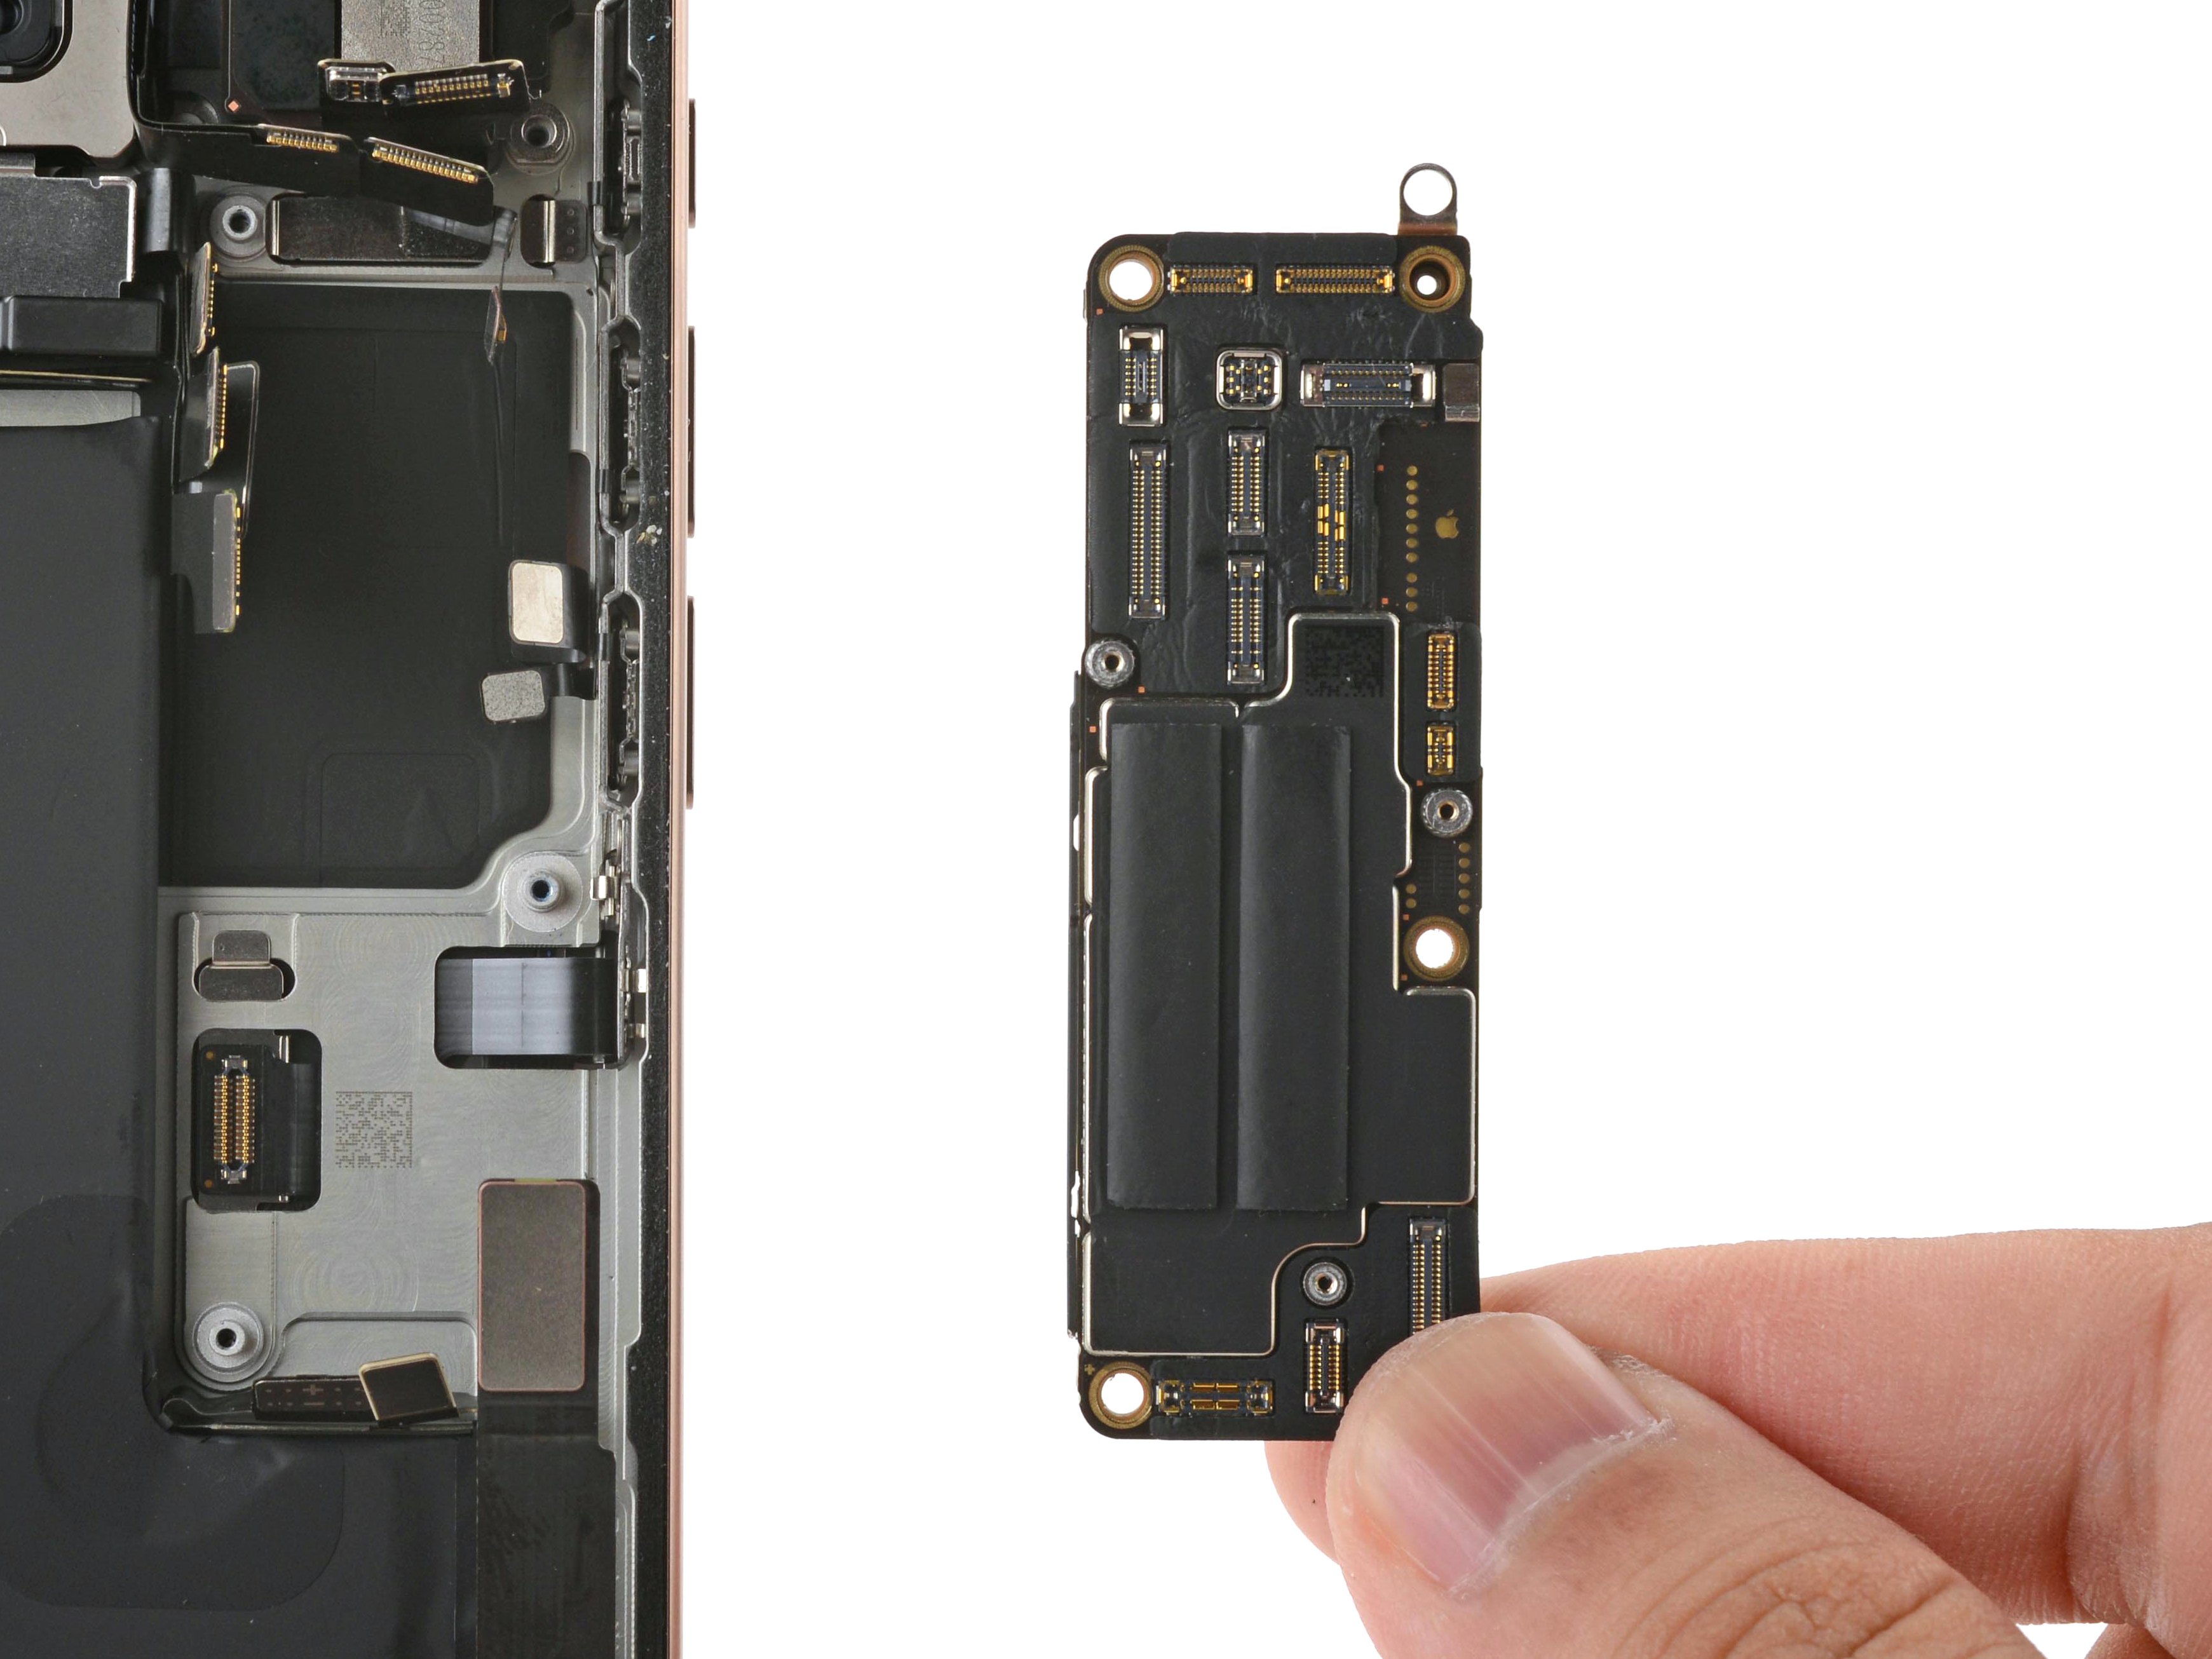
- Grab your finger or a spudger and give that LiDAR sensor connector a gentle push to snap it into place on the logic board. It should click right in!
To reconnect those connectors, start by giving them a gentle nudge. Align one side perfectly and press down until you hear that satisfying click. Then, do the same for the other side—no middle pressing, please! If things get a bit wonky, it might bend the pins, and we definitely don’t want that! Remember, if you need assistance, you can always schedule a repair.
Tools Used
Step 30


Take care around the delicate grounding clips while cleaning the frame. If one gets bent out of place, no worries—just nudge it back gently with your fingers or tweezers.
- Grab some blunt-nosed tweezers or just your fingers and gently lift away big chunks of adhesive around the frame. No need to be too delicate here—just enough to get the job done.
- Next, take a spudger and carefully scrape off any leftover adhesive residue from the frame. Think of it as giving your device a little clean-up hug.
- If the adhesive is being stubborn and won’t budge, a little heat might do the trick. Warm up the area with a hair dryer or heat gun, then give it another go. Sometimes a little warmth makes all the difference.
Tools Used
Step 31


- Got some back glass to reuse? Awesome! Just grab a microfiber or lint-free cloth and put a few drops of highly-concentrated isopropyl alcohol (over 90%) on it. Give the edges a nice wipe to get that surface all prepped for the new adhesive. You're doing great!
Step 32

Take your time with this step. A tidy frame helps the replacement adhesive spread out evenly, giving you a stronger, more reliable bond. Patience now means fewer headaches later—so go slow and steady.
- Wrap a lint-free cloth or a coffee filter around the tip of a spudger, then add a few drops of highly-concentrated isopropyl alcohol (over 90%).
- Gently wipe along the edge of the frame in one smooth direction to lift off any sticky adhesive residue.
Tools Used
Step 33

Take a moment to check out the camera cutout and the notches along the top and bottom edges. These little features will help you visualize exactly where the adhesive will sit in the frame. It's like the frame's way of saying, 'Here’s where the magic happens!'
- Place the adhesive sheet over the frame to see which side lines up best. Make sure it’s oriented correctly before sticking it down. If you need help, you can always schedule a repair.
Step 34


Heads up! The adhesive is super sticky—keep it from touching anything until you’re ready to press it onto the frame.
If your adhesive has multiple layers, just peel off the liner that reveals the sticky side meant to attach to the frame. Easy peasy—peel and stick to keep things in place. If you need help, you can always schedule a repair.
- Grab the corner tab of the adhesive sheet and peel back the liner to reveal about a third of the sticky stuff underneath.
Step 35


Once you press the adhesive down, it’s set in stone—no moving it around. If it’s not quite right, you’ll need to peel it off and start fresh with new adhesive.
- Take a moment to line up the sticky side of the adhesive strip with the edge of your iPhone's frame – make it a perfect match!
- Once it's all lined up just right, give that exposed adhesive a gentle press onto the frame. You're doing awesome!
Step 36


No spare adhesive strips? No worries! You can put your iPhone back together and use it for now without any adhesive. Just remember, your iPhone won’t be water-resistant until you swap in new adhesive.
When the adhesive is lined up just right, the edges will snap perfectly into place.
If the adhesive is a little off, gently tug the long edges to line it up neatly with the frame.
If the adhesive starts to crease or wrinkle, peel it off and start fresh with a new strip.
- Keep peeling back the liner from the adhesive, and as you do, gently press the adhesive into position. You're doing great!
Step 37


Handle those delicate grounding clips with care. If one gets bent out of shape, gently coax it back into position using your fingers or a pair of tweezers. Take it slow and steady—patience pays off in repairs!
Be gentle with your touch! Pressing too hard might stretch and mess up the adhesive.
- Grab a spudger and gently work around the entire edge of your iPhone to press down the adhesive seal. Keep at it until it's nicely loosened and ready for the next step. If you need help, you can always schedule a repair.
Step 38


You might still see some liner hanging around the edges—this little guy keeps the adhesive from sticking to anything it shouldn’t while you put your iPhone back together. Hold off on peeling these tiny release liners just yet!
- Grab a spudger or your trusty fingers and gently lift that pull tab attached to the large front liner. It's usually hanging out in one of the corners, just waiting for you!
- Now, go ahead and use that pull tab to peel away the large front liner from the sticky adhesive. Easy peasy!
Tools Used
Step 39

- Gently prop up the back glass along the right edge of your iPhone to get ready for the next step in the repair. If you need help, you can always schedule a repair.
Step 40

- Give that back glass connector a gentle nudge with your finger or the flat end of a spudger to snug it up against the logic board. You're doing great!
Tools Used
Step 41

Time to give your iPhone a quick power-up test before sealing everything shut. Turn it on and check that it’s behaving normally. If all looks good, power it down and keep going with the reassembly.
If your iPhone refuses to turn on, try plugging it into a charger and give it another shot.
Just a heads-up: if you've swapped out the logic board and the display isn't lighting up, you'll want to follow the screen connection steps carefully to manually hook up the display connector. Need a hand? You can always schedule a repair.
- Get ready to work your magic! Gently press down with your finger or grab a trusty spudger to connect that battery press connector onto the logic board. You're doing great!
Tools Used
Step 42

- Carefully line up the back glass connector cover with its screw holes and gently set it in position.
Step 43

- Grab your trusty tri-point Y000 driver and let's get those screws in place for the back glass connector cover:
- Start with two screws that are 1.3 mm long, nice and snug.
- Now, add two more screws, but this time they're a bit shorter at 1.0 mm long.
Step 44

- Get that battery connector cover lined up with its screw holes and gently place it right where it belongs. You're doing great!
Step 45

- Grab a tri-point Y000 driver and carefully remove the three screws holding down the battery connector cover. You'll find two screws that are 1.3 mm long and one that's 1.0 mm long. Take your time and keep track of each screw as you go. If you need help, you can always schedule a repair.
Step 46


As you peel away those liners, be super careful not to let anything touch that sticky adhesive. Keep it clean and clear for a smooth repair journey!
- Gently use your fingers or a spudger to lift and peel away all the liners around the edges, revealing the adhesive underneath.
- Give the frame and back glass a once-over to spot any sneaky liner bits and remove them. There shouldn’t be any liners left hiding around.
Tools Used
Step 47


If you feel some resistance, it might be a bent perimeter clip that's getting squished by the frame. Take a close look at where it's catching and gently bend it back into shape. If you need extra hands, you can always schedule a repair.
- Gently lower the back glass onto the frame, starting with the top edge.
- Give those edges a little press until the back glass is snugly fitted against the frame.
Step 48

The warmth helps loosen up the adhesive, making it easier to form a solid connection.
- Grab your hair dryer, heat gun, or an iOpener and give the back glass perimeter a warm hug until it's just a tad too hot to touch. You got this!
Tools Used
Step 49


- Grab your fingers and give the edges of the iPhone a good, steady squeeze to loosen things up. Keep it firm but gentle—you're just encouraging the device to open up for the next steps. If you need help along the way, you can always schedule a repair.
Step 50


Alternatively, try using some trusty vise clamps around the edges of your device to keep that new adhesive in place. It'll make things a lot easier and help the adhesive set evenly.
- Set your iPhone down screen-side on a clean, flat surface—think of it as giving your phone a little rest.
- Wrap a strip of tape around the edges of the back glass to keep that sleek finish safe and sound.
- Place coins all around the back glass edge to build a little wall that matches the height of the rear camera bumps.
Tools Used
Step 51


- Stack 3-4 hefty books right on top of your iPhone, making sure they sit nice and even.
- Let the books hang out there for about 30 minutes while your phone gets some weighty TLC.
Keep in mind, the coins might leave a tiny impression on the bottom cover—so skip using anything super valuable during the process.
Applying gentle pressure helps to get the adhesive working and sticking properly. Keep at it, and you’ll get that bond secured in no time. If you need help, you can always schedule a repair.
Tools Used

Step 52
- Got some e-waste piling up? Time to drop it off at an R2 or e-Stewards certified recycler!
- Repair didn’t go as planned? No worries! Try some basic troubleshooting, or swing by our Answers community for some extra tips.
-