iPhone 16 Pro Max Logic Board Replacement
Duration: 45 minutes
Steps: 65 Steps
Time to tackle that logic board replacement on your iPhone 16 Pro Max! It's got connectors on both the top and bottom, so you may want to consider removing the screen for a smoother process. But if you're feeling bold and want to give it a go without taking off the screen, go ahead! Just keep in mind, removing the screen? You'll need some screen adhesive for that. Oh, and don’t forget about the back glass adhesive to wrap things up properly. After you're done, don’t forget to calibrate those authentic Apple components with Repair Assistant to make sure everything's running smoothly. If you're feeling stuck, you can always schedule a repair.
Step 1


Let your iPhone’s battery drop below 25% before starting—charged lithium-ion batteries can be a bit tricky, so better safe than sorry!
- First things first, let's disconnect all those pesky cables from your iPhone.
- Now, give a gentle press on both the power button and one of the volume buttons, then slide to power off your iPhone. Easy peasy!
Step 2


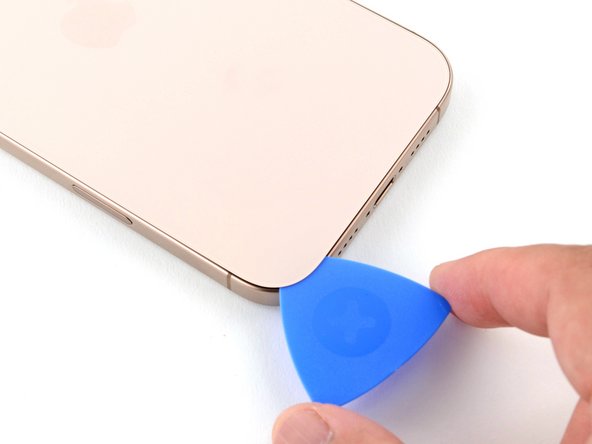
Find a flat spot near the bottom edge that’s large enough for your suction cup to get a solid grip. You got this!
- If your screen or back glass is seriously cracked, grab some packing tape and lay a few strips over the glass. It'll help keep you safe and make taking things apart a lot smoother. No worries, you’ve got this!
Tools Used

Step 3


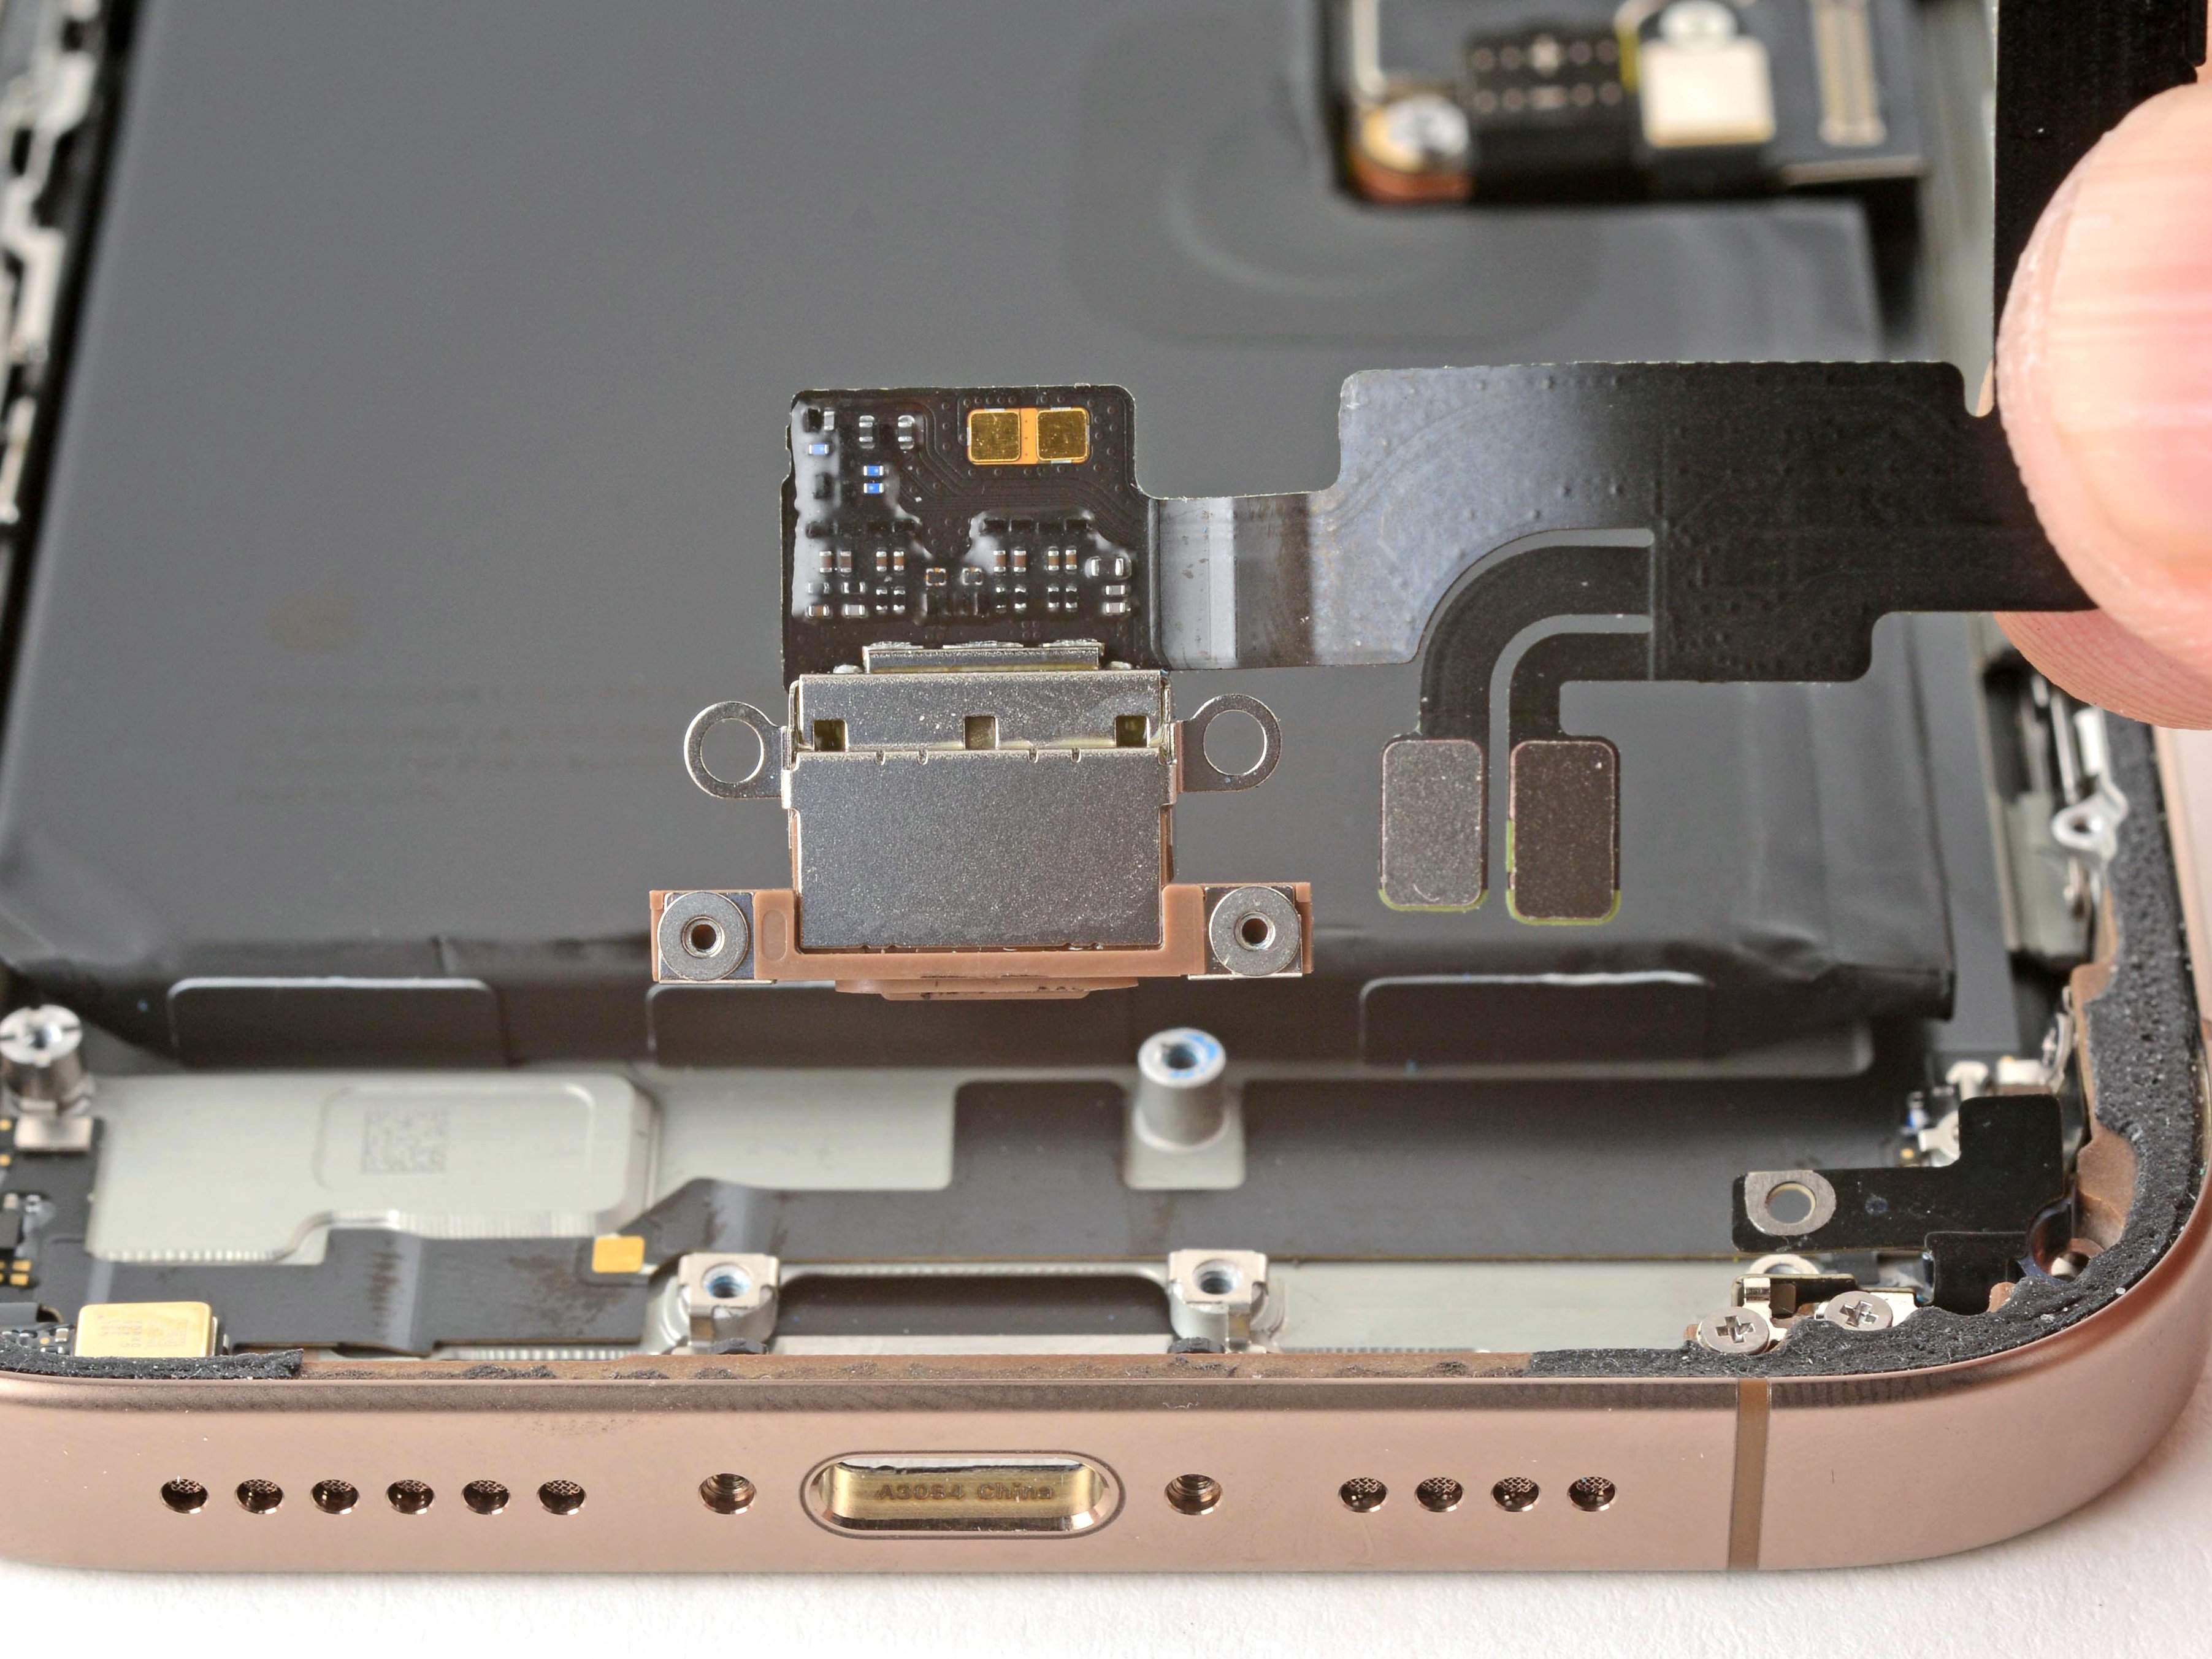
- Grab a P2 pentalobe screwdriver and gently remove the two 7.4 mm screws on each side of the charge port. If you need a hand, you can always schedule a repair.
Step 4


Be careful not to shove that opening pick in too deep, or you might end up giving your device a little love tap it doesn't need. Mark your pick to keep things safe and sound!
Feel free to get creative and mark the other corners of your pick with your own unique measurements.
Alternatively, you can stick a coin to your pick, about 3 mm from the tip, for a handy guide!
- Grab your trusty permanent marker and measure about 3 mm from the tip. Make a little mark on the opening pick to guide your way. You're on the right track!
Tools Used

Step 5

The next couple of steps will guide you on how to create a sweet little gap using a suction handle. It's easier than it sounds!
If you're feeling a bit chilly, grab an iOpener to warm up that back glass. Just follow these steps to heat it up and apply the iOpener like a pro.
- Warm up the bottom edge of the back glass gently with a hair dryer or heat gun until it feels nice and warm to the touch.
Tools Used


Step 6


If you don’t see a gap, give the edge a little more heat and give it another shot. Keep at it, and soon enough, it’ll be coming apart like a charm.
- Place a suction handle on the bottom edge of the back glass.
- Gently but firmly pull up on the handle to create a small gap between the back glass and the frame.
- Carefully slide the tip of an opening pick into the gap.
Tools Used
Step 7

When slicing through the adhesive holding the back glass, keep your pick no deeper than 3 mm to steer clear of causing any accidental damage to the nearby parts.
- Here's a pro tip: The tiny cable connecting the back glass to your iPhone runs right next to the volume up button. Be gentle around that area—avoid sticking your pick there so you don't slice the cable. Think of it as giving your phone a little spa treatment! Now, around the edges of the iPhone, you'll find several spring contacts—these are just tiny connectors that keep everything in sync. Stay calm and work carefully; you've got this. If you need help along the way, you can always schedule a repair.
Step 8

If the adhesive seems stubborn, give the edge a quick reheat for about a minute and then try again. A little warmth can make slicing through the glue a lot easier, so don’t be shy about giving it another go. If you need help, you can always schedule a repair.
- Gently glide that opening pick along the bottom edge to cut through the adhesive like a pro.
- Keep the pick snugly in the bottom-left corner to stop the adhesive from making a comeback.
Step 9

- Grab a hair dryer or a heat gun and gently warm up the left edge of the back glass until it feels comfortably warm to the touch.
Tools Used
Step 10


Be gentle when inserting your pick—no more than 3 mm deep—to keep those spring contacts happy and intact. Going too deep might cause trouble, so take it slow and steady.
You'll notice and hear the metal clips pop free as you slide past them.
- Pop a second opening pick into the bottom-left corner, right next to the one you already have in there.
- Gently slide your pick up along the left side to loosen the adhesive and free those metal clips.
- Keep that pick nestled in the top-left corner so the adhesive doesn’t sneak back together.
Step 11

- Get your trusty hair dryer or heat gun ready and warm up the top edge and top-right corner of that back glass until it's nice and toasty!
Tools Used
Step 12


Be gentle with that pick—no more than 3 mm deep—to keep those spring contacts happy and intact. Pushing too hard can cause damage, so take it easy and stay within the safe zone!
- Gently slot a third opening pick into the top-left corner of the device.
- Carefully slide this pick along the top edge and around the top-right corner, stopping just above the volume up button.
- Keep this pick in place to prevent the adhesive from sealing back up as you work.
Step 13

- Grab a hair dryer or heat gun and gently warm up the right edge of the back glass until it feels comfortably warm to the touch. Keep the heat moving to avoid overheating.
Tools Used
Step 14


Be gentle when inserting your pick—no more than 3 mm deep—to keep those spring contacts happy and intact.
- Pop a fourth opening pick into the bottom-right corner like a pro.
- Carefully slide that pick around the corner and up the right edge, stopping just below the volume down button.
- Keep this pick in place to stop the adhesive from snapping back together.
Step 15


At this stage, the back glass should pop free from the frame. If it’s feeling a bit clingy, take your pick and run it gently around the edges to hunt down any missed adhesive spots or stubborn clips holding on for dear life.
- Gently swing the back glass open towards the right side of the iPhone to break through the last bits of adhesive.
- Prop up the back glass using a clean, sturdy object to keep it steady.
Step 16

- Grab your trusty tri-point Y000 driver and unscrew the three little screws holding down the battery connector cover:
- Two screws, each 1.3 mm long
- One screw, 1.0 mm long
Step 17


- Gently lift off the battery connector cover and set it aside like a pro.
Step 18


- Carefully use the tip of a spudger to gently pry up and disconnect the battery press connector. You've got this!
Tools Used

Step 19

- Grab your tri-point Y000 driver and let’s get to work! First up, we need to take off the four screws holding that back glass connector cover in place:
- We'll tackle two tiny 1.3 mm-long screws – they’re like the little stars of this show!
- Then, let’s not forget about the two 1.0 mm-long screws – they may be small, but they pack a punch!
Step 20


- Carefully lift the back glass connector cover straight up and set it aside.
Step 21


- Gently use the pointy end of a spudger to lift and unplug the back glass connector.
Tools Used
Step 22

- Gently lift off the back glass to get started.
Step 23


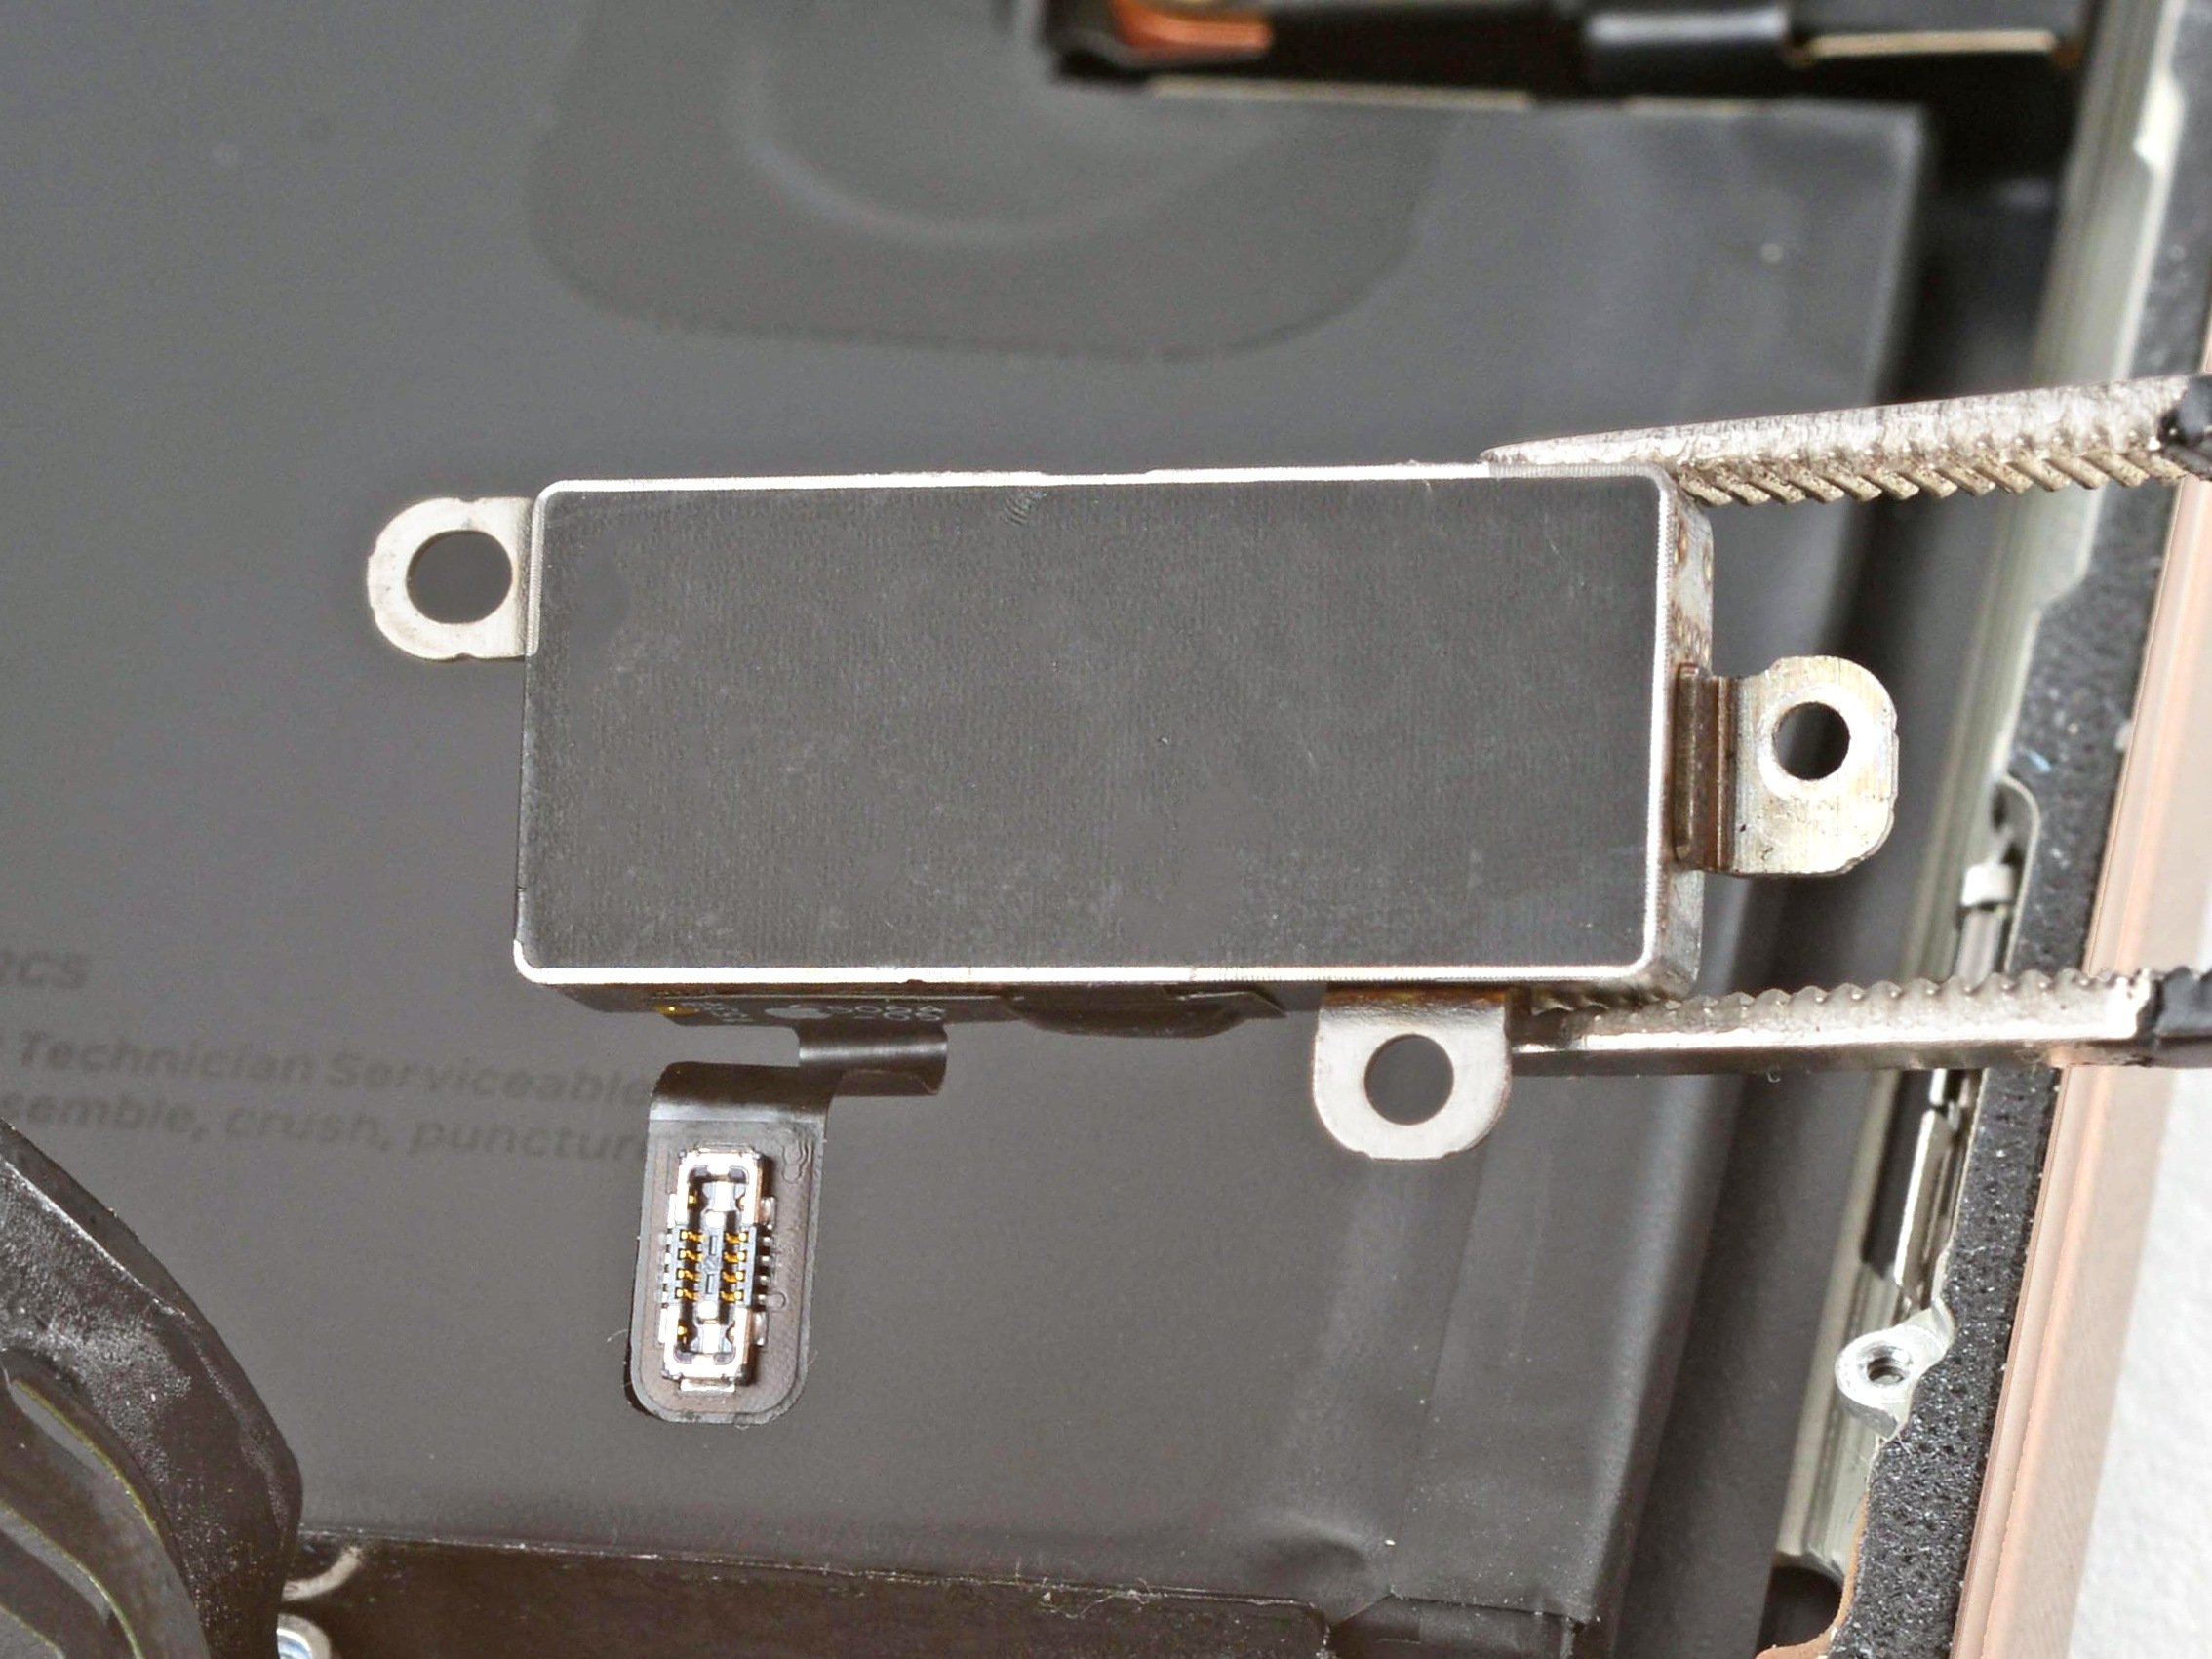
- Gently use the tip of a spudger to lift and disconnect those earpiece speaker and 5G mmWave antenna press connectors with care! You've got this!
Tools Used
Step 24


When tackling those standoff screws, the best approach is to use a standoff driver or driver bit. If you’re in a pinch, a small flathead screwdriver can step in—but be extra careful to avoid slipping and accidentally damaging the surrounding components.
- Start by unscrewing the six screws holding down the earpiece speaker: a 2.4 mm Phillips screw, three 1.3 mm Phillips screws, a 1.6 mm Phillips screw, and a 3.3 mm standoff screw. Keep them handy for reassembly!
Step 25


You might feel a bit of resistance near the top edge where the speaker gasket meets the frame. Just gently pull the speaker out to break the seal—no need to force it. If you need a hand, remember you can always schedule a repair with Salvation Repair.
- Grab your tweezers and gently lift out the earpiece speaker like a pro.
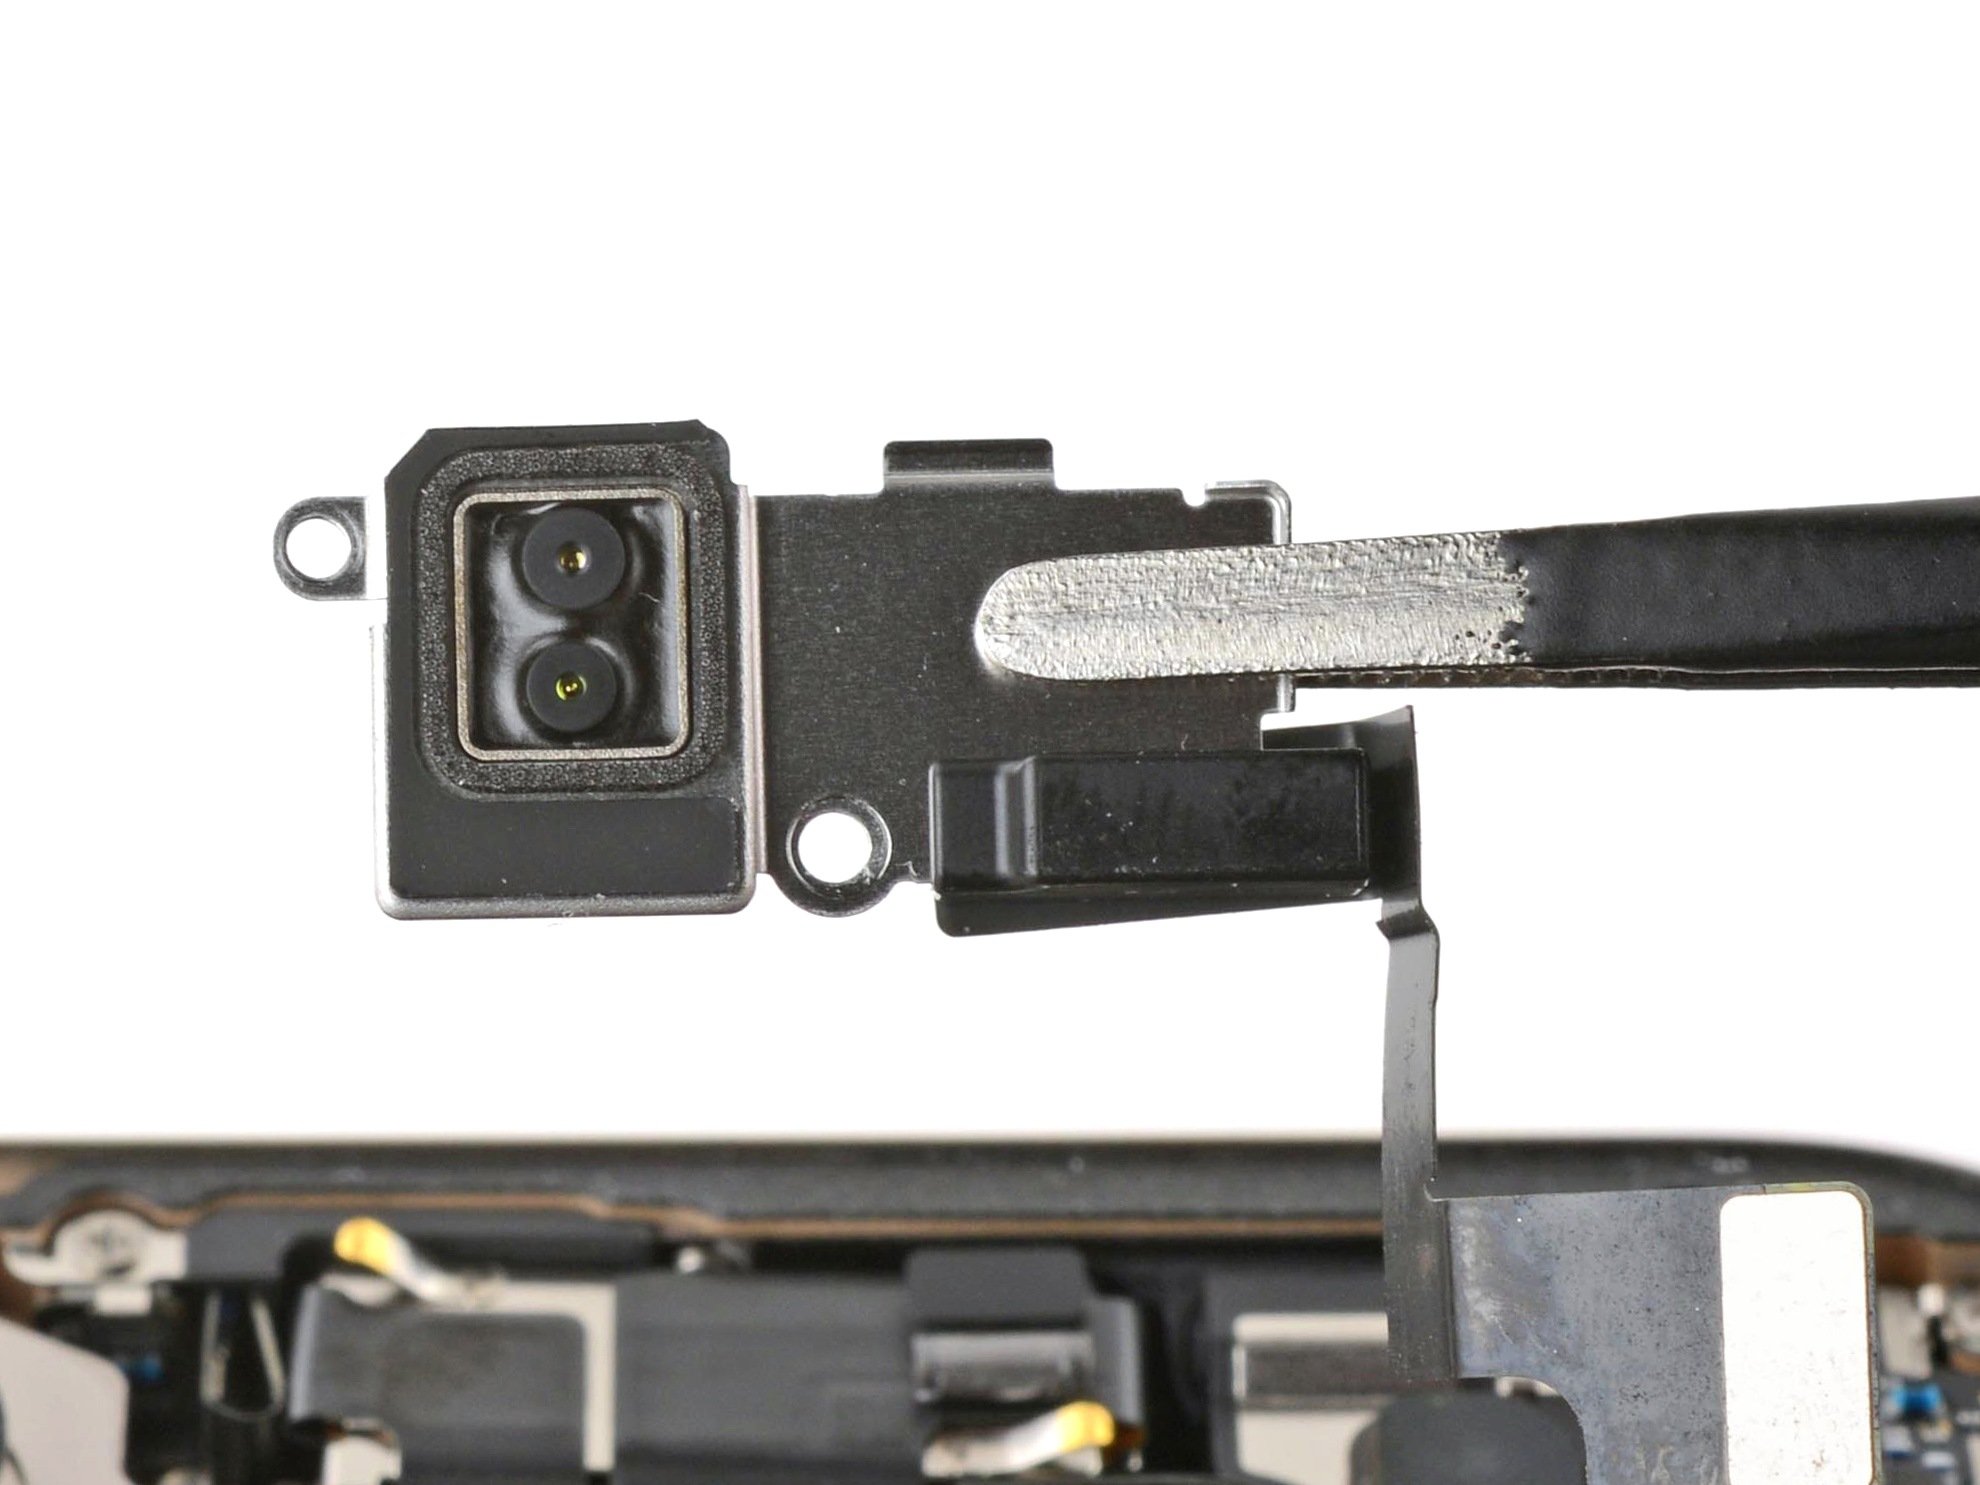
Step 26


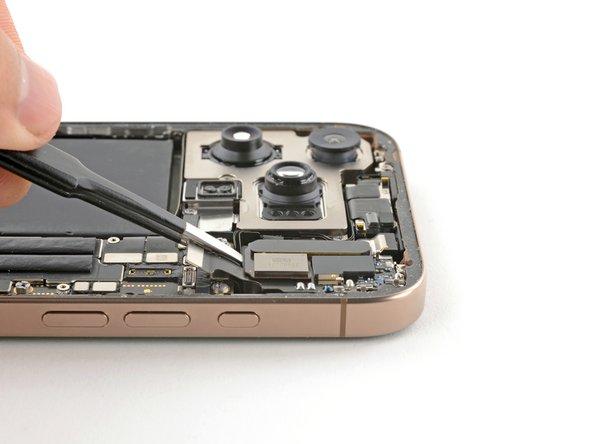
- Grab a spudger and gently pry up the seven shiny silver press connectors from the top of the logic board. Take your time—it's all about patience and finesse. If you need a hand, you can always schedule a repair.
Tools Used
Step 27


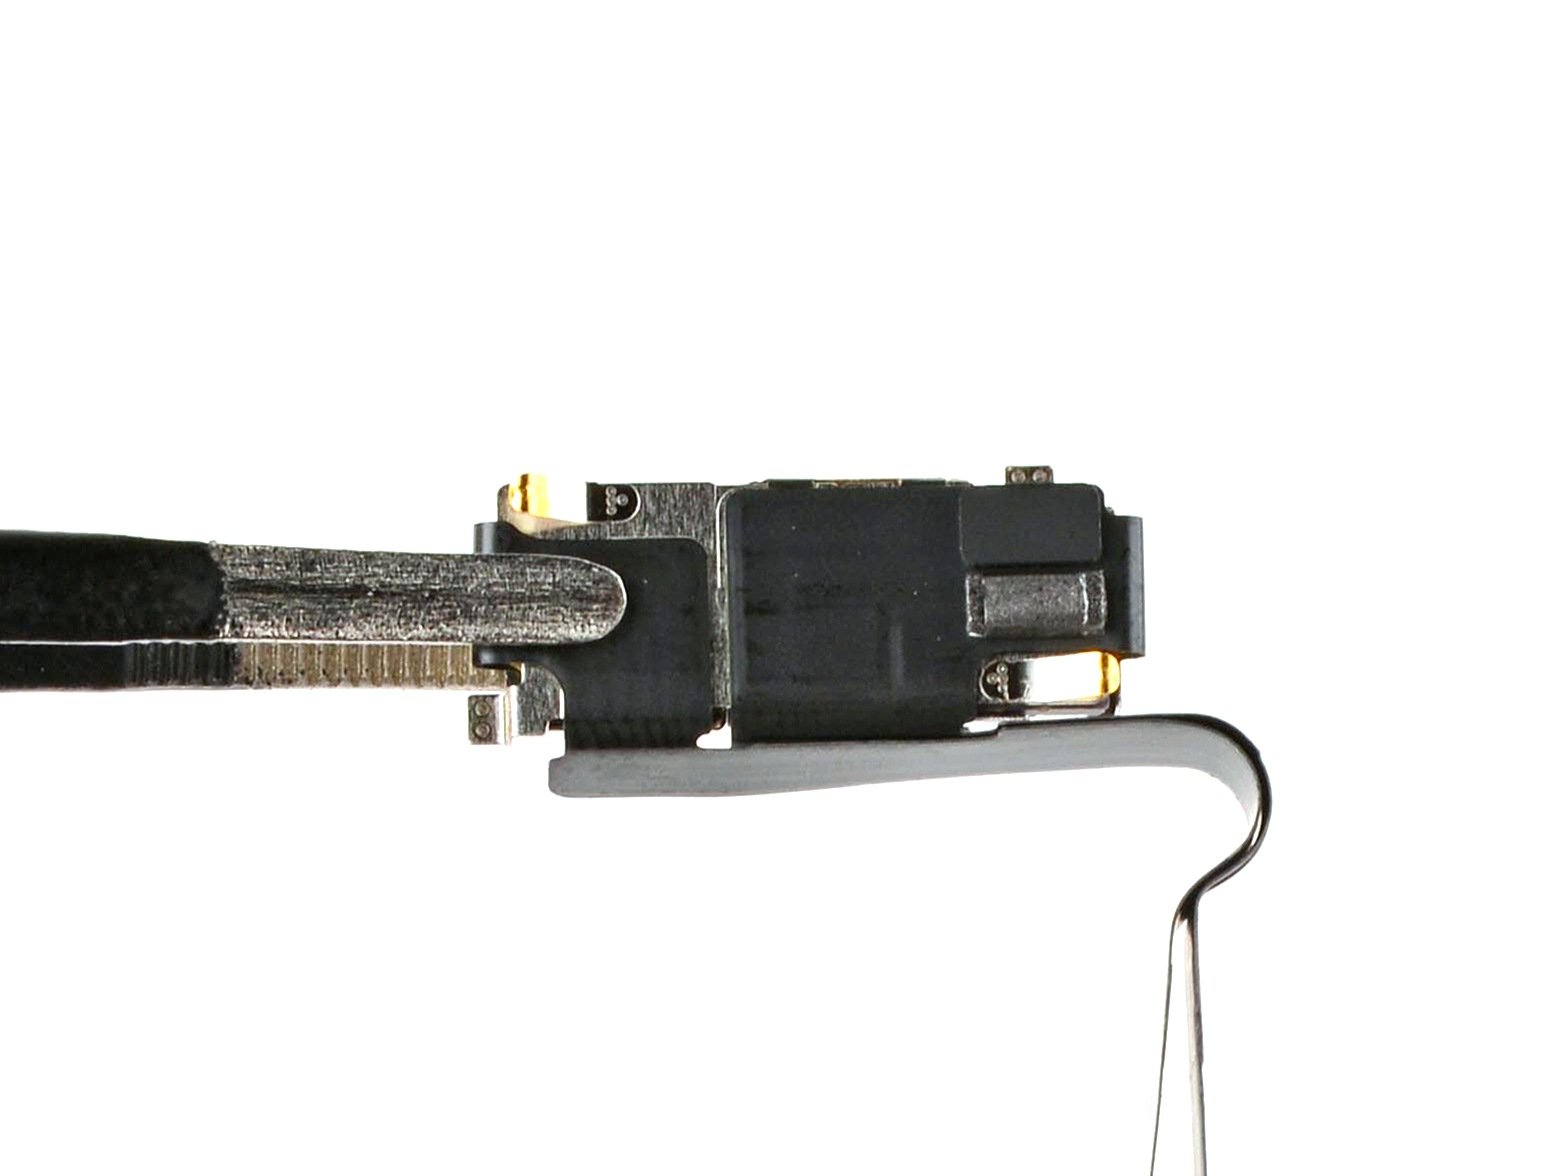
- Grab your trusty spudger and gently nudge it to pop off those three black press connectors from the logic board. You've got this!
Tools Used
Step 28


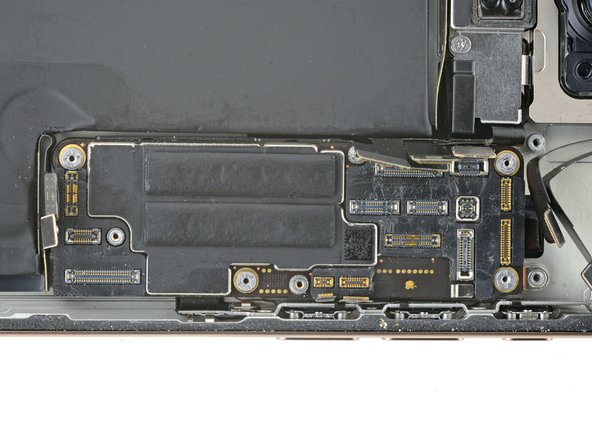
- Grab a standoff driver and get ready to unscrew the four fasteners holding down the logic board:
- Two of these are 4.5 mm long screws
- One is a 3.4 mm long screw
- And the last one is a 4.2 mm long screw
Step 29

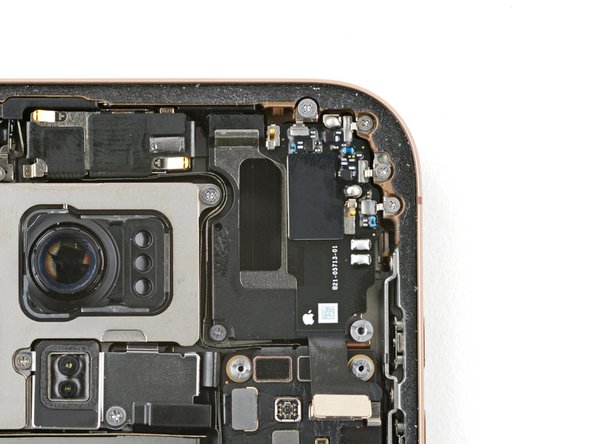
- This image points out the display connector tucked under the logic board. The next couple of steps will guide you through disconnecting this connector from the bottom of the logic board. Take your time, stay patient, and if you run into trouble, you can always schedule a repair.
Step 30


If your iPhone has a physical SIM tray, pop it out before moving forward.
Double-check that all connectors on top of the logic board are unplugged.
Hold up on pulling the logic board out just yet—there’s still a cable attached underneath.
- Slide the flat edge of an opening pick in between the battery and the left side of the logic board. Hold that pick steady with your fingers.
- Carefully tuck the flat end of a spudger under the right edge of the logic board.
- Gently pry upward with the spudger to lift the logic board just enough to unplug the display connector.
Tools Used
Step 31


- Flip the logic board over carefully, making sure not to tug on any cables attached to it.
- Gently pry up the front sensor connector from the bottom side of the logic board using the tip of a spudger, then disconnect it.
Tools Used
Step 32

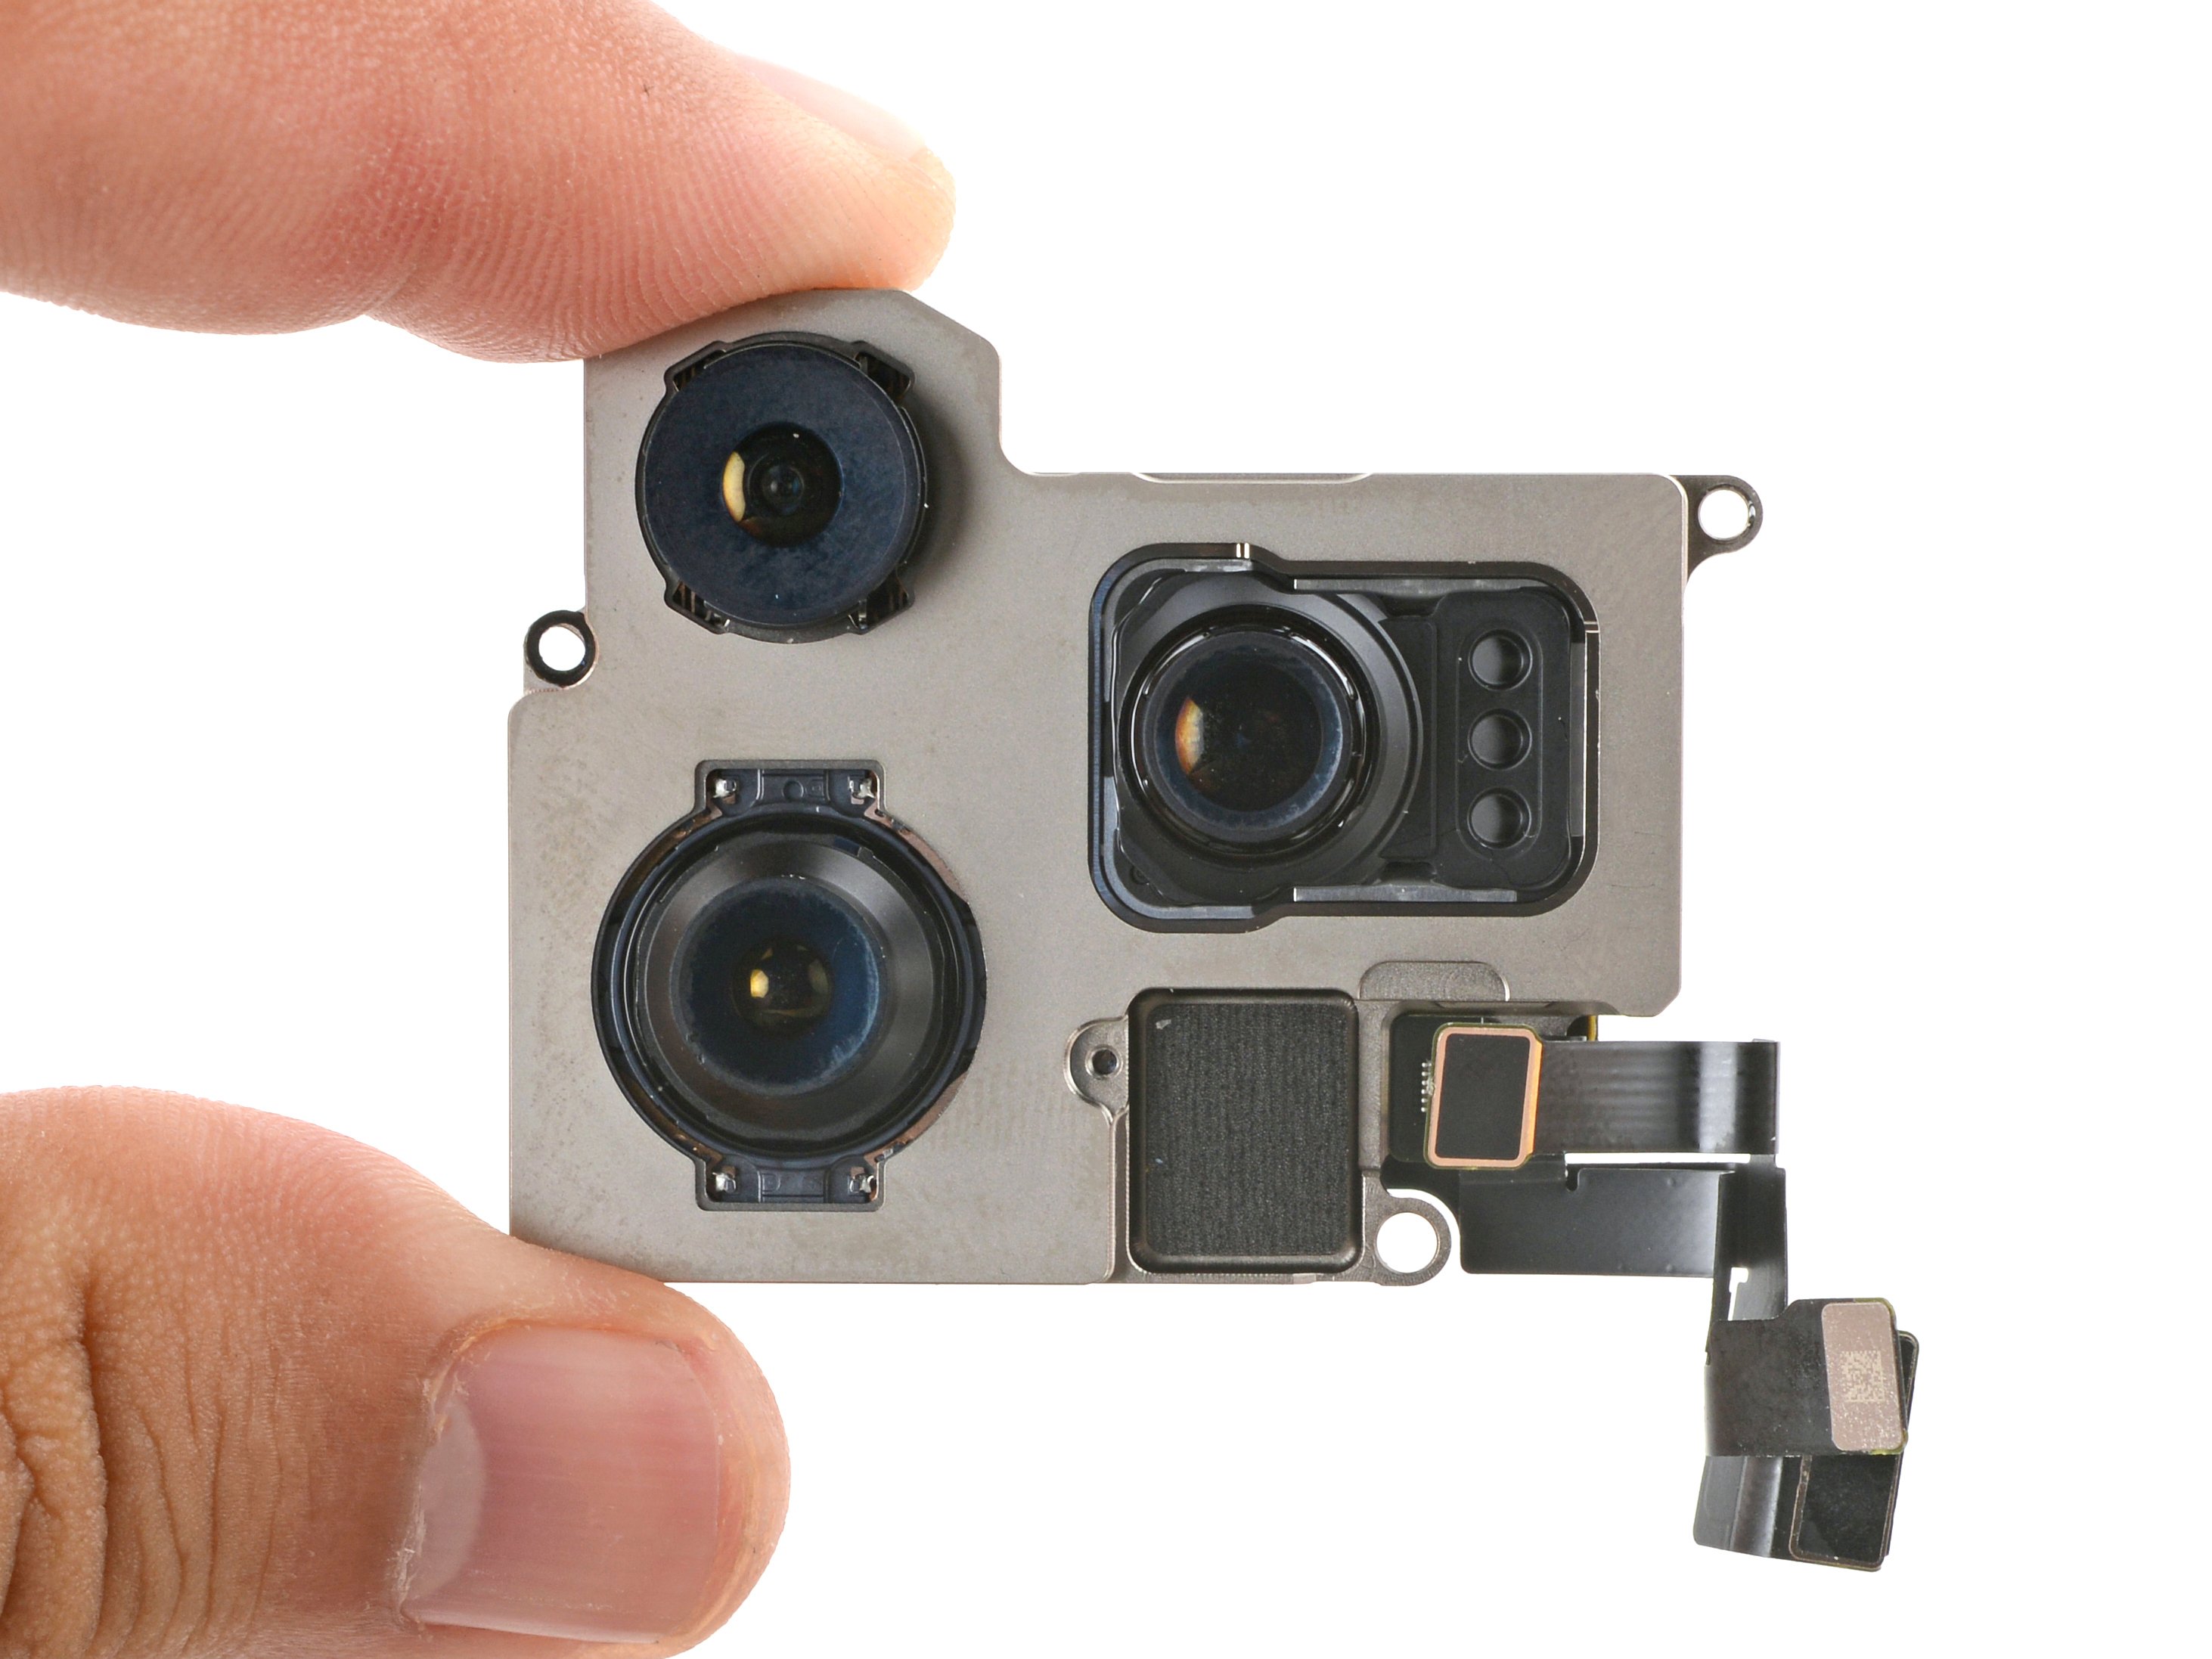
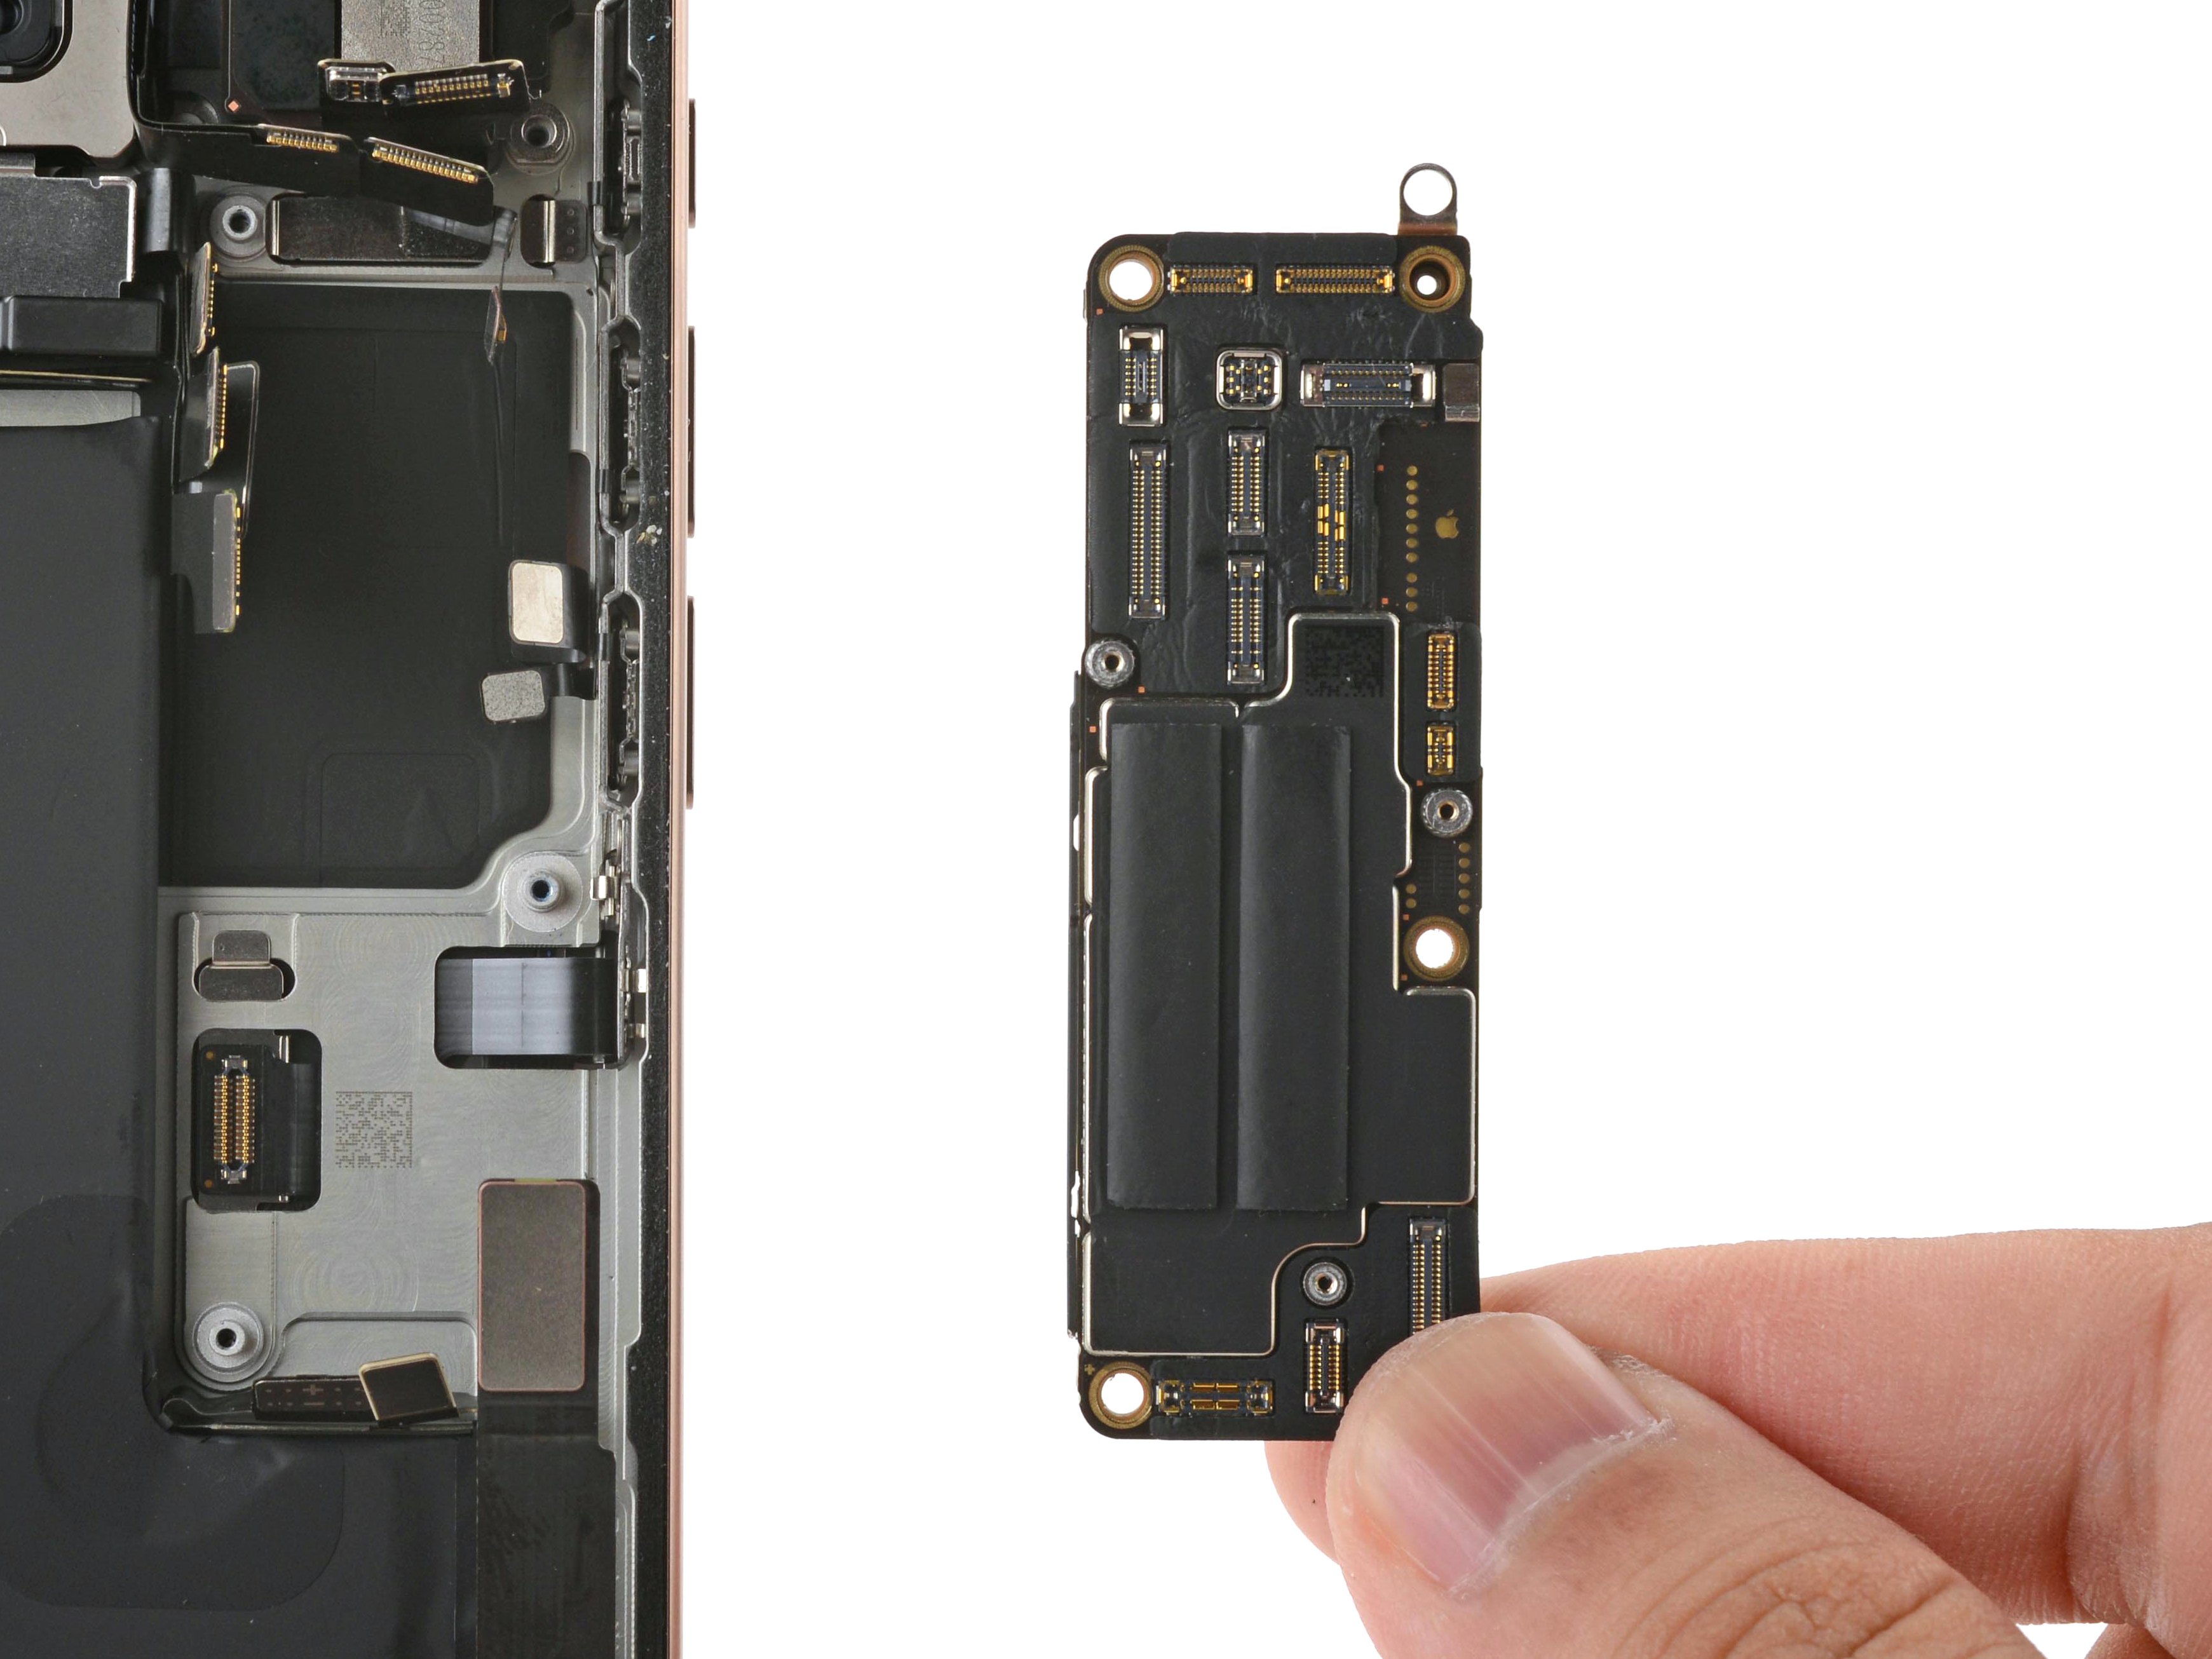
- Carefully lift out the logic board from its spot—it's like removing a delicate puzzle piece. If you need a hand, you can always schedule a repair.
Step 33

Nice work on taking your device apart! Now let's walk through the steps to put your iPhone back together.
Keep in mind, depending on your iPhone model, some photos of the reassembly might look a little different. Don't worry, though—you're on the right track, and the procedure is still spot on for your iPhone.
Step 34

Don’t force that connector into place—if it’s giving you a hard time, just reposition it and give it another shot. Patience is key, and a gentle touch keeps everything happy and working smoothly. If you need a hand, you can always schedule a repair.
- Hold the logic board with the front sensor cable aimed toward its connector, keeping things aligned.
- Gently guide the front sensor cable connector onto its socket on the logic board, making sure it lines up perfectly.
- Use the tip of a spudger or your finger to press down on the connector until you hear a click—indicating it's securely connected.
Tools Used
Step 35

- With a gentle touch, guide all those pesky loose press connectors out of your way so you can smoothly place the logic board right where it belongs.
- Nestle the logic board into its cozy little recess, making sure it feels right at home.
Step 36

Connecting the display connector directly to the bottom of the logic board without removing the screen is a no-go. But hey, if you screw the logic board in place, you might just make it work! Remember to give your iPhone a little test run before sealing it up tight.
- Ensure that the logic board is snugly positioned against its screw posts. These posts are your best pals in perfectly aligning the board with the display connector right below it. You're doing great!
Step 37

- Grab your standoff driver and get ready to secure the logic board with four screws:
- Two screws measuring 4.5 mm in length
- One screw measuring 3.4 mm in length
- One screw measuring 4.2 mm in length
Step 38


To reconnect press connectors like these, gently line them up and press down on one side until you hear a click, then do the same on the other side. Avoid pressing in the middle to prevent bending the pins and causing permanent damage. If you need help, you can always schedule a repair.
- Give those three black press connectors a friendly nudge with your finger or a spudger, and watch them click into place on the logic board. You've got this!
Tools Used
Step 39


- Gently use your fingertip or a spudger to press down and secure all seven shiny silver connectors onto the logic board.
Tools Used
Step 40

Give the speaker a little nudge toward the top edge of the frame to make sure it sits just right.
- Line up the top edge of the earpiece speaker with the top of the frame like a perfect puzzle piece.
- Gently place the earpiece speaker into its cozy little home in the frame.
Step 41

- Pop in the six screws to lock down the earpiece speaker:
- One 2.4 mm Phillips screw (the big boss)
- Three 1.3 mm Phillips screws (the steady trio)
- One 1.6 mm Phillips screw (the smooth operator)
- One 3.3 mm standoff screw (the spacer with swagger)
Step 42

- Gently press the earpiece speaker and the mmWave connectors onto the logic board using your finger or a spudger. Take your time to ensure they're seated properly. If you need a hand, you can always schedule a repair.
Tools Used
Step 43


Be gentle with those delicate grounding clips while cleaning the frame. If one gets bent out of shape, just carefully bend it back into place using your fingers or a pair of tweezers. Staying patient helps keep everything in good working order. Need a hand? You can always schedule a repair.
- Grab some blunt nose tweezers or just use your fingers to gently peel away those stubborn chunks of adhesive around the frame. Think of it as peeling a sticker but a little more delicate.
- Next, take a spudger and carefully scrape away any leftover adhesive residue from the frame. Patience is key—think of it as tidying up after a messy art project.
- If the adhesive isn’t giving up easily and still feels stubborn, warm things up a bit with a hair dryer or heat gun. A little heat softens the adhesive, making it easier to remove. Once warmed, give it another try—your device will thank you.
Tools Used
Step 44


- Before you dive in, if you're planning to reuse that back glass, grab a few drops of some potent isopropyl alcohol (over 90% is the magic number) and dab it on a microfiber or lint-free cloth. Give the edges a good wipe down to prep that surface for some fresh adhesive action!
Step 45

Take your time with this step. A tidy, well-prepared frame helps the new adhesive spread out smoothly, making sure everything sticks nicely and securely.
- Cover the tip of a spudger with a lint-free cloth or a coffee filter, then add a few drops of highly-concentrated isopropyl alcohol (over 90%) onto it.
- Gently wipe along the edge of the frame in a single direction to lift away any sticky residue.
Tools Used
Step 46

Check out the camera cutout and those notches at the top and bottom edges to get a clear idea of exactly how the adhesive will fit into the frame.
- Place the adhesive sheet on the frame and check to see which way it fits best.
Step 47


Heads up! This sticky adhesive means business—keep it away from anything until you're ready to stick it onto the frame.
If your adhesive comes with a bunch of liners, make sure to peel back the one that reveals the sticky side ready to attach to the frame. Keep it smooth and steady!
- Grab the corner tab of the adhesive sheet and peel back the liner to reveal about a third of the sticky part. Keep it gentle and steady — you're just getting started!
Step 48


Once the adhesive is set, it's game over for repositioning. If it's not right, you'll need to start fresh with new adhesive.
- Line up the sticky edge of the adhesive strip with the matching edge of your iPhone’s frame like a pro.
- Once it’s perfectly in place, give that adhesive a gentle press so it sticks just right.
Step 49


- Keep peeling the liner off the adhesive, and gently press it down into place like you're giving it a warm hug.
No adhesive strips on hand? No worries—just put your iPhone back together temporarily and use it as usual. Keep in mind, water resistance won't be at its best until you swap out the adhesive. If your adhesive lines up correctly, the edges will fit smoothly into place. If it's a little off, gently tug the long edges to align them with the frame. And if the adhesive starts to crease or wrinkle, don't hesitate to peel it off and start fresh with new adhesive. For best results, take your time and follow each step carefully. If you need a hand, you can always schedule a repair.
Step 50


- Grab your trusty spudger and gently press along the adhesive all around the edges of your iPhone. You've got this!
Handle those delicate grounding clips with care. If one gets bent out of shape, just gently bend it back into place using your fingers or a pair of tweezers. Take your time—patience makes perfect. If you need extra help, you can always schedule a repair.
Be gentle—pressing too hard can stretch out and warp the adhesive. Treat it with care to keep everything in perfect shape.
Tools Used
Step 51


Right now, you might still see those little liners around the edges. They're like your phone's protective shield, keeping the adhesive from getting all sticky-fingered while you piece your iPhone back together. So, hold off on peeling those tiny release liners just yet!
- Grab a spudger or use your fingers to gently lift the pull tab attached to the large front liner. Usually, the pull tab sits in a corner of the liner.
- Once you've got the pull tab, carefully peel back the large front liner from its adhesive holding. Take your time and keep it smooth.
Tools Used
Step 52

- Gently prop up the back glass along the right edge of your iPhone to get started. Keep it steady as you work your way through the repair. If you need a hand, you can always schedule a repair.
Step 53

- Give the back glass connector a gentle nudge with your finger or the flat end of a spudger to make sure it's snugly connected to the logic board. A little press goes a long way!
Tools Used
Step 54

Here's a great moment to give your repair a quick test run before closing up your iPhone. Power it on and make sure everything is working as expected. Once you confirm it's all good, power it back off and continue with the reassembly.
If your iPhone refuses to power on, plug it into a charger and give it another go. Hopefully, it's just a little low on juice!
If you swapped out the logic board and the screen is still not turning on, no worries! Just follow the screen guide to manually reconnect the display connector and try again.
- Grab your finger or a spudger and gently press the battery press connector back onto the logic board. Keep it steady until it clicks into place. If you need a hand, you can always schedule a repair for assistance.
Tools Used
Step 55

- Gently align that back glass connector cover over its screw holes and lay it flat and snug into place. Easy does it—just make sure everything lines up before you press it down. If you need a hand, you can always schedule a repair.
Step 56

- Grab a tri-point Y000 screwdriver and gently remove the four screws holding the back glass connector cover in place: two are 1.3 mm long, and two are 1.0 mm long. Keep the screws safe—you'll need them to reassemble later. If you need help, you can always schedule a repair to get it done.
Step 57

- Line up the battery connector cover with its screw holes and gently set it down into place.
Step 58

- Grab a tri-point Y000 screwdriver to unscrew the trio of screws holding down the battery connector cover. You'll find two screws that are 1.3mm long and one that measures 1.0mm. Keep those screw sizes in mind as you work through this step. If you need help, you can always schedule a repair.
Step 59


As you peel back those liners, be sure to keep anything from touching the sticky stuff underneath. Keep it clean and avoid sticking your fingers or tools to the adhesive—stay neat and tidy for a smooth repair process. If you need help, you can always schedule a repair.
- Grab your fingers or a trusty spudger and start peeling away those perimeter liners! Let's uncover that adhesive goodness underneath.
- Take a moment to inspect the frame and back glass for any sneaky stray liners and give them the boot. We want a clean slate, so make sure there are no liners left behind!
Tools Used
Step 60


If you feel some resistance, it might be that a perimeter clip has decided to bend out of shape and is getting a bit squished by the frame. Take a moment to check where the resistance is, and gently straighten out any clips that seem a bit off-kilter.
- Set the back glass down onto the frame, starting from the top edge.
- Gently press around the edges of the iPhone until the back glass sits snug and flush with the frame.
Step 61

Heating things up loosens the adhesive, making it stick better when you press it down.
- Grab your trusty hair dryer, heat gun, or even an iOpener, and give that back glass perimeter a nice warm-up until it's just about too hot to handle. You're doing great!
Tools Used
Step 62


- Grab your fingers and give the edges of the iPhone a good, firm squeeze all around. Keep it gentle but confident—you're just loosening things up for the next step. If you need a hand, you can always schedule a repair.
Step 63


On the flip side, you can grab some vise clamps and wrap them around the edge of your device to help set that new adhesive in place.
- Gently place your iPhone face down on a clean, flat surface to get ready for the repair.
- Lay down a strip of tape all around the edges of the back glass to keep everything protected and tidy.
- Stack some coins around the edges of the back glass, building a little barrier that's as tall as the rear camera bumps to keep everything stable.
Tools Used
Step 64


A quick heads-up: the coins might leave a tiny impression on the bottom cover, so steer clear of using anything valuable during this step.
Applying some pressure will do wonders to get that adhesive to wake up and stick like it's meant to!
- Grab 3-4 heavy books and stack them right on top of your iPhone like it's a little bookworm!
- Let those literary giants sit there for about 30 minutes while you relax and give your phone some time to chill.
Tools Used

Step 65
- Grab a P2 pentalobe screwdriver and secure those two 7.4 mm screws on each side of the charge port. Keep at it, and if you need a hand, you can always schedule a repair.