iPhone 16 Pro Repair Guide: Step-by-Step Tutorial
Duration: 45 minutes
Steps: 11 Steps
These images of the circuit board were captured using a US iPhone 16 Pro
These fantastic shots of the board were captured using a US iPhone 16 Pro. This snazzy model has waved goodbye to the physical SIM tray, but it’s packing some serious tech with support for 5G mmWave bands and satellite communication. For a deeper dive, check out our iPhone 16 Pro teardown for all the juicy details. A big shoutout to our awesome community member Chunglin Chin for their contribution!
Step 1

The iPhone 16 Pro’s logic board is made up of two double-sided PCBs:
– First up, let’s tackle the RF board from the top. It’s like giving your device a nice little hat!
– Now, flip it over and show some love to the RF board bottom. It’s like the cozy shoes for your gadget!
– Next, we move on to the main board top. Give it a gentle pat and check for any pesky issues lurking about.
– Finally, flip that beauty over and give the main board bottom some attention. It’s the foundation that keeps everything running smoothly!
Step 2


– Let’s dive into the world of tech with the STMicroelectronics ST33J eSIM/secure element! It’s a nifty little component that keeps your device connected and secure.
– Next up is the Qualcomm PMX65-000 power management. This powerhouse ensures that your device has the energy it needs to keep running smoothly.
– Don’t forget the Cirrus Logic 338S01087 audio amplifier! It’s responsible for delivering those sweet sounds that make your device a joy to use.
– We’re also working with the Qualcomm clock generator, which keeps everything in sync and running like a well-oiled machine.
– And last but not least, we have the Analog Devices MAX11390A analog to digital converter, bridging the gap between the analog world and the digital universe.
Step 3

– Grab your trusty Qualcomm SDR735-001 RF transceiver, because it’s time to get the signal flowing like a pro!
– Next up, you’ll want to bring in the Qualcomm SMR546-002 IF transceiver to keep everything tuned just right.
– Don’t forget the Broadcom AFEM-8234 front-end module – it’s essential for that sweet, sweet front-end action.
– Now, let’s not skip over the Skyworks SKY58440-11 front-end module; it’s like the cherry on top of your repair sundae!
– Finally, make sure you’ve got the Qorvo QM76307 front-end module ready to go – it’s the perfect finishing touch for your setup!
Step 4


– Texas Instruments LM3567A1 LED flash driver: Let’s light things up! This driver is your LED’s best buddy. If you need help, you can always schedule a repair.
– Broadcom BCM59367A1 wireless charging controller: Power up wirelessly with this controller. It’s like magic! If you need help, you can always schedule a repair.
– Qualcomm QET7100-001 wideband envelope tracker: Track that power usage like a pro. This tracker keeps everything in check! If you need help, you can always schedule a repair.
– Qorvo envelope tracker power supply: Give your device the steady power it deserves. This supply keeps things smooth and steady. If you need help, you can always schedule a repair.
– Apple 338S00616 DC-DC converter: Convert and conquer! This converter ensures your device runs efficiently. If you need help, you can always schedule a repair.
Step 5

– Qualcomm SDX71M-000 modem: This is where the magic of connectivity happens! Handle it with care.
– Skyworks front-end module: The performance powerhouse—make sure it’s snugly fitted.
– Qorvo QM76306 front-end module: Key player alert! Ensure it’s properly aligned for optimal function.
– Possibly NXP Semiconductors NFC controller: The enabler of smooth interactions—mount it perfectly. If you need help, you can always schedule a repair.
Step 6
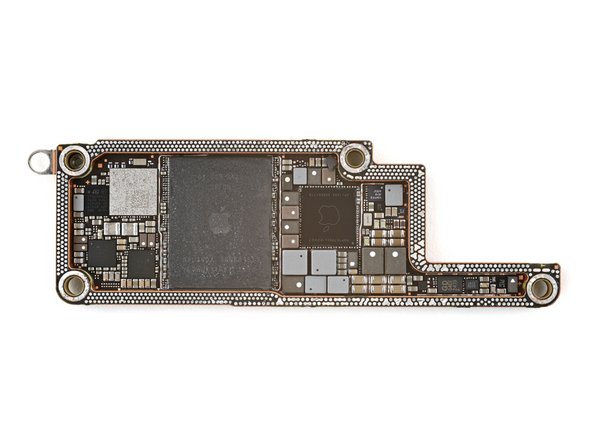

– Micron MT62F1G64D4AQ-031 XT:C LPDDR5X SDRAM layered over an Apple APL1V07 / 339S01527 A18 Pro hexa-core applications processor w/ GPU & Neural Engine
– Apple APL109A / 338S01119 power management
– STMicroelectronics STPMIA3C power management
– GigaDevice GD25Q80E 1 MB serial NOR flash memory
Step 7

– Alright, let’s dive into the world of tech repair! First up, grab that USI 339M00326 UWB module. It’s time to give your device the TLC it deserves. If you run into any bumps along the way, just remember, you’re not alone—if you need help, you can always schedule a repair. Let’s get to it and make your device shine again!
Step 8


– Grab your Kioxia K5A3RF9864 128 GB NAND flash memory and get ready to make some magic happen!
– Next up, we’ve got the Texas Instruments SN2012027 USB type-C controller. It’s a real gem for powering up those connections.
– Don’t forget about the Texas Instruments CP3200B1G0 battery charger. This little guy is crucial for keeping your device energized and happy!
– Time to tune in with the Cirrus Logic 338S00967 audio codec. It’s all about bringing the sound to life!
– And we can’t overlook the Cirrus Logic 338S01087 audio amplifier. It’s here to boost those beats and make your audio experience pop!
– Now, let’s power up that display with the Texas Instruments TPS65657B0 display power supply. Your screen will thank you!
– Last but not least, meet the Cirrus Logic 338S00843 power management. It’s the mastermind behind keeping everything running smoothly.
Step 9

– Probably rocking the Texas Instruments TPS61280H battery front-end DC-DC converter
– Apple 338S01026-B1 power management
Step 10

– Introducing the likely USI 339S01464 Bluetooth & WiFi Module, along with the NXP Semiconductors NFC controller. They’re here to help your device connect and communicate like a pro!
Step 11

– Grab your Bosch Sensortec accelerometer & gyroscope, and let’s get to work! With a little care and precision, you’ll have everything back in tip-top shape in no time. Remember, if you hit a snag, don’t hesitate to schedule a repair for some expert help!