
iPhone 8 Plus Lightning Connector Assembly Replacement
Duration: 45 minutes
Steps: 79 Steps
If your attempts to clean out the lightning port haven't worked, don't fret! This guide will walk you through replacing the Lightning connector assembly in your iPhone 8 Plus. It's a great way to tackle those pesky charging and connectivity issues head-on!
Step 1

Before you dive in, make sure your iPhone battery is below 25%. Trust us, you really don’t want a lively lithium-ion surprise—those things can get wild if punctured.
Cracking open your iPhone’s display means the waterproof seals are taking a vacation. If you want to keep things splash-proof, have some new seals handy before you move on. If you skip the seals, just keep your device away from any pool parties or rainstorms.
- Before you dive in, shut down your iPhone completely. We don’t want any surprise buzzes mid-repair!
- Take out the two 3.5 mm pentalobe screws sitting at the bottom edge of your iPhone. It’s like opening the door to your phone’s secret world.
Step 2


Pushing that pick in too far is like trying to fit a couch through a doggy door—just doesn’t end well. Mark your pick so you don’t accidentally poke something you shouldn’t.
Want extra precision? Mark the other corners of your pick with different measurements and become the ruler of repairs.
Or, if you’re feeling crafty, tape a coin 3 mm from the tip. Instant depth control!
- Grab your opening pick and measure out 3 mm from the tip—then give it a stylish mark with a permanent marker.
Step 3


Don your safety glasses to keep those peepers safe from any sneaky glass shards that might escape during the repair adventure.
If your iPhone screen is cracked, no need to panic! Just tape over the glass to prevent any further damage or accidental injury while you handle the repair.
If you're in a real pinch, you can even superglue the suction cup to the screen for that extra grip.
- Grab some clear packing tape and lay overlapping strips over your iPhone's screen until the entire face is covered up. It's like giving your phone a cozy blanket!
- If that suction cup isn't sticking like you hoped, no problem! Just fold a sturdy piece of tape (duct tape works great) into a handle and lift the screen with that instead. You've got this!
Step 4


Ready to see the Anti-Clamp in action? These next three steps show off how this tool makes opening your device a breeze. If you don’t have the Anti-Clamp, just jump ahead three steps for another way to get the job done.
Need the full rundown on using the Anti-Clamp? Check out the dedicated guide for all the details.
If your iPhone feels like a slip-n-slide and the Anti-Clamp can’t get a grip, a little tape can make things stickier and much easier to handle.
- Grab the blue handle and pull it back to release the Anti-Clamp's arms.
- Slide those arms carefully over either the left or right side of your iPhone.
- Place the suction cups near the bottom edge of the iPhone, just above the home button—one on the front, the other on the back.
- Press the cups together to create a solid suction grip on the spot you want.
Step 5


- Give that blue handle a nice pull forward to lock the arms in place. You got this!
- Now, twist the handle clockwise a full 360 degrees, or until those suction cups start to stretch out. Keep it smooth!
- Double-check that the suction cups are still lined up like best buddies. If they start to drift apart, just loosen them a tad and get those arms back in sync.
Step 6


Take it easy—give the clamp just a quarter turn at a time, then kick back for a minute before the next twist. Patience is your friend here!
You can also try using a hair dryer, heat gun, or hot plate—just be careful not to crank up the heat too much, as that can mess with the display or battery. Take it slow and steady!
If the Anti-Clamp isn't making enough space, give the area a bit more warmth and twist the handle a quarter turn to help things along.
- Warm up your iOpener and slip it between the Anti-Clamp's arms—like threading a needle, but more high-tech.
- Fold the iOpener so it lounges comfortably along the bottom edge of your iPhone.
- Give it a minute—let the heat do its thing and loosen up that stubborn adhesive. You’ll spot a gap soon.
- Once the Anti-Clamp has worked its magic and made a nice opening, slide an opening pick under the screen.
- Feel free to skip the next three steps. Yes, you’re just that smooth.
Tools Used

Step 7

Alright, let's get that screen off! The next three steps are all about using a suction cup to pop it loose.
Warming up the bottom edge of your iPhone helps soften the sticky stuff holding the display, so it comes off with way less fuss.
- Grab a hairdryer or heat up an iOpener and gently warm the lower edge of your iPhone for about 90 seconds to loosen the adhesive underneath. Time to soften things up!
Tools Used
Step 8


Make sure your suction cup isn’t hanging out over the home button—it needs to stick to the glass, not catch on the button, or you’ll lose your grip!
- Place a suction cup firmly on the lower half of the front panel, right above the home button, and get ready to lift!
Step 9


The adhesive that's sealing your display is super strong, so getting that first gap is going to take some serious effort. If you're struggling to pry it open, don’t worry! Just apply a bit more heat and gently wiggle the screen up and down to loosen that sticky stuff until you can slide your tool in. You've got this!
- Gently pull up on the suction cup, applying steady and even pressure to open up a tiny gap between the front panel and the back case.
- Carefully slide an opening pick or any thin pry tool just a few millimeters into the gap you've created.
Step 10


- Gently slide your pick around the corner and up the left edge of your phone, making your way toward the volume controls and the silent switch. You're breaking the adhesive seal that's keeping the display snugly in place.
- Pause just shy of the top left corner of the display. You've got this!
Step 11

Careful now! There's a fragile cable hanging out on the right edge of your iPhone. Avoid sticking your pick in this area, or you might just give that cable an unwanted vacation.
Step 12


Be careful not to shove your pick in more than 3 mm, or you might accidentally mess with the display cables. Let's keep those cables happy!
- Slip your tool back in at the lower right corner of the iPhone, then glide it smoothly around the corner and up the right side to gently loosen that adhesive holding things together.
Step 13

Keep your display angle in check! Raising it beyond 15º could lead to some unfortunate ribbon cable drama. Let's avoid any tearing or straining, shall we?
- Take the suction cup and gently lift from the bottom edge of the display. Give it a little tug to start separating things, but don't overdo it!
Step 14

- Give that little nub on the suction cup a gentle pull to detach it from the front panel.
Step 15


- Gently slide an opening pick under the top edge of the display to carefully break through the last bit of adhesive holding it in place.
Step 16


- Give the display assembly a gentle slide downwards—away from the top edge of your phone—to pop those sneaky little clips loose from the rear case.
Step 17


Hold off on peeling the display all the way off just yet—there are still some delicate ribbon cables hooking it up to the iPhone's logic board.
- Pop that iPhone open by lifting the display up from the left side, just like you would with the cover of a book.
- Prop the display up against something sturdy to keep it out of your way while you tackle the phone repair.
Step 18


- Unscrew the four Phillips (JIS) screws that are holding the lower display cable bracket to the logic board. Here's the breakdown of the screw sizes:
- Keep those screws close and organized—it's super important that each one goes back to its original spot when you're putting things back together. Mixing up screws can lead to serious issues!
- Two 1.3 mm screws
- One 1.4 mm screw
- One 2.7 mm screw
Step 19

- Take off the bracket that holds the lower display cable in place.
Step 20


- Gently use the pointy end of a spudger to lift the battery connector out of its socket on the logic board.
- Give the connector cable a little bend upwards to keep it from accidentally touching the socket and powering up the phone while you work.
Tools Used

Step 21


- Grab your trusty spudger or just your fingernail and gently pry that big lower display connector straight up from its socket. You've got this!
- When it's time to reconnect, simply press down on one side of the connector until you hear that satisfying click, then do the same on the other side. Just a heads up, avoid pressing down in the middle! If it’s even a tad misaligned, it could bend and lead to some unwanted drama. Stay sharp!
Tools Used
Step 22


- Unplug the second lower display cable connector, the one sitting right behind the connector you just handled.
Step 23


- Let's get those pesky screws out! First up, grab your trusty tool and remove the two tri-point Y000 screws that are keeping the bracket snugly in place over the front panel sensor assembly connector:
- One 1.0 mm screw
- One 1.2 mm screw
Step 24

- Time to free up that front panel sensor connector! Just pop off the bracket covering it.
Step 25


- Gently use the tip of a spudger or your fingernail to pop the front panel sensor assembly connector out of its socket.
Tools Used
Step 26

- Gently take off the display assembly. Don't rush, take your time with it.
- When you're putting things back together, pause here if you'd like to swap out the adhesive around the display's edges. It's a nice touch for a clean finish!
Step 27


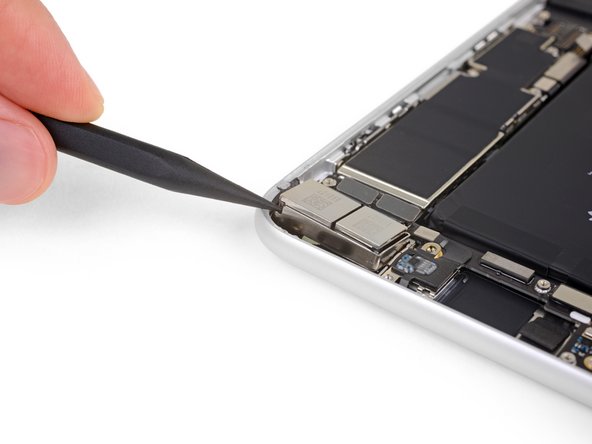
- Take out the two Y000 screws holding down the rear camera connector cover bracket:
- One 1.4 mm screw
- One 1.4 mm (nonferrous) screw
- Heads up: this screw isn’t attracted to magnetized screwdrivers. Make sure to put it back in the right spot—using a magnetized screw here could mess with the compass.
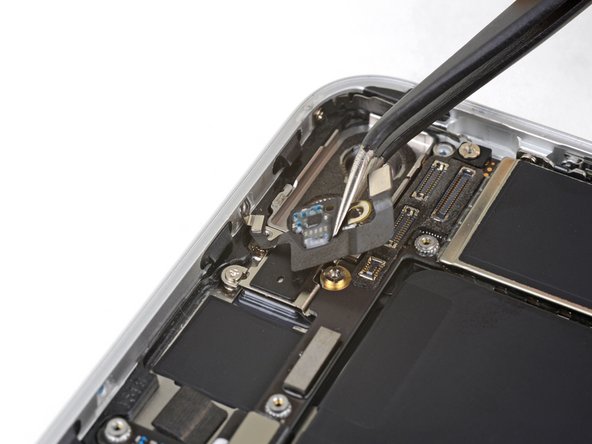
Step 28

- Pop that bracket off—easy does it!
Step 29


If you don’t have the right tool handy, a small flathead screwdriver can step in—just be extra careful it doesn’t slip and mess with the nearby parts.
Standoff screws spin out smoothest with a standoff screwdriver or bit.
- Unscrew the two fasteners that are holding down the rear camera module cover plate:
- One is a 1.8 mm Phillips screw
- And the other is a 2.7 mm standoff screw—it's nonferrous, so no magnetic drama here
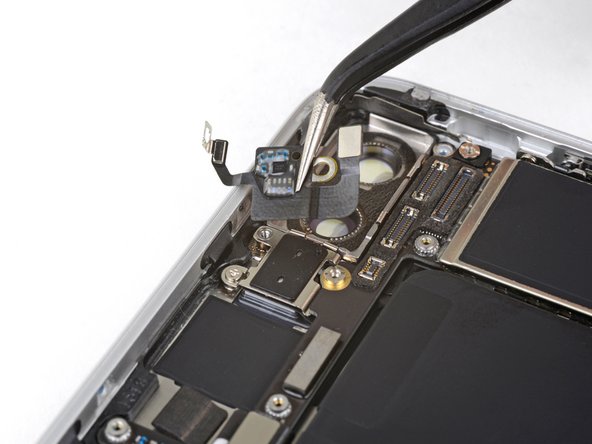
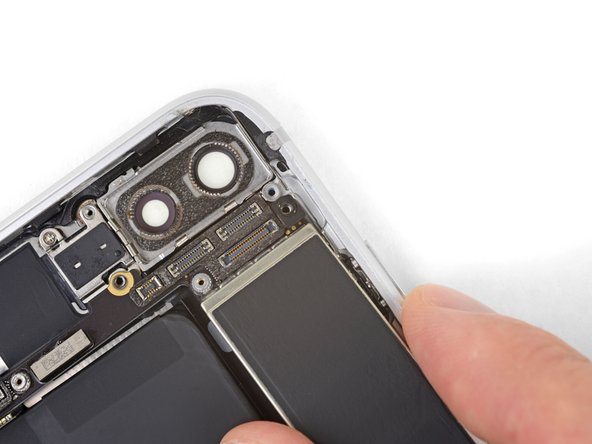
Step 30

- Carefully pop off the cover plate hiding the rear camera module.
Step 31


- Grab your trusty iFixit opening tool or use your fingernail to gently pop those two camera cable connectors up from their sockets. It's easier than it sounds, so go ahead and give it a go!
Tools Used

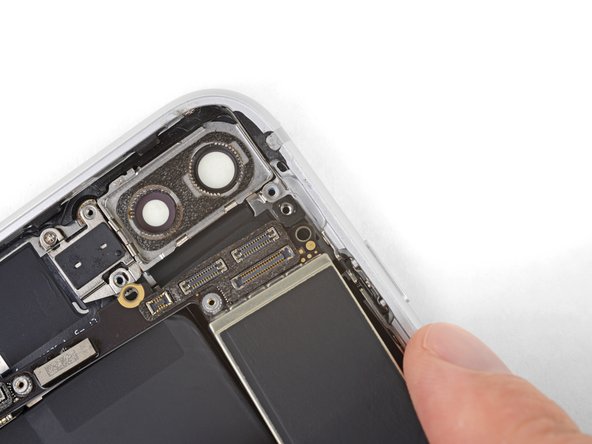
Step 32


If you're having a tough time, flip your spudger and gently pry the camera out starting at its top right corner.
- Grab your spudger and gently lift the rear-facing camera assembly from the top edge of your iPhone. Take it slow, and let that camera pop out like it’s ready for its close-up!
Tools Used
Step 33

- Take out the rear camera assembly. It’s time to give that camera some breathing room!
Step 34

- Time to tackle the upper left antenna! Grab your Phillips screwdriver and remove these three screws:
- Two that measure 1.3 mm
- One that's a bit longer at 3.1 mm
Step 35

- Bust out your Phillips screwdriver and remove the 1.3 mm screw holding the antenna at the top edge of the rear case. Easy does it!
Step 36


The screw boss at the top of the antenna component snugly fits into a tiny notch along the top edge of the iPhone.
- Gently lift the antenna piece upwards toward the top edge of your phone.
- Carefully slide the screw boss downward and out from its slot.
Step 37

- Carefully pop off the antenna part located at the top left corner.
Step 38


- Time to loosen the three screws holding down that L-shaped bracket beside the Taptic Engine:
- One tiny 1.3 mm Y000 screw
- One 2.6 mm Phillips screw, ready to twist out
- One 3.5 mm Phillips screw to free up
Step 39

- Take off the bracket carefully.
Step 40


This part of the flex cable is just a bit stuck. If you find it tricky, a gentle blast of heat from an iOpener or hairdryer can help loosen the adhesive. This little tip will make it smoother to separate and later stick the flex cable back in place safely.
- Grab an opening pick and gently pry away the stuck part of the antenna flex cable from the top of the speaker. You've got this!
Tools Used
Step 41


- Grab your trusty spudger and gently nudge the antenna flex cable away from the logic board. It's like giving it a friendly little high-five to disconnect!
Tools Used
Step 42


- Grab your trusty spudger and use its pointy end to gently lift and disconnect the other end of the antenna flex cable from its cozy socket right next to the Lightning Port. You've got this!
- Reconnecting this little guy can be a bit of a puzzle. Make it a breeze by using your tweezers to hold the flex cable in place while you line up the connector with its socket. Then, with a gentle touch, press down on the connector with the flat side of your spudger until you hear that satisfying click. It's all about teamwork!

Step 43

- Take out the Wi-Fi diversity antenna with care. You've got this!
Step 44


If you’re in a jam, a small flathead screwdriver can step up—but keep it steady to avoid any slip-ups that might mess with nearby parts.
Grab a standoff screwdriver or bit to tackle those standoff screws—they’re made for the job and make removal way smoother.
- Unscrew the trio holding down the Taptic Engine:
- Two 1.5 mm Phillips screws
- One 2.4 mm standoff screw
Step 45


- Gently use the tip of your spudger to lift and unplug the Taptic Engine flex cable.
Tools Used
Step 46

- Time to say goodbye to the Taptic Engine! Carefully lift it out and set it aside with a smile. You've got this!
Step 47


- Grab a SIM card eject tool or a paperclip and gently poke it into the tiny hole on the SIM card tray.
- Give it a little press, and watch that tray pop right out like magic.
Tools Used

Step 48


The SIM card will pop right out of the tray without any fuss.
- Pop out the SIM card tray from your iPhone with a little finesse!
- When you slide that SIM card back in, make sure it's cozy in the correct orientation with the tray.
- Remember, there's a sleek rubber gasket hugging the SIM tray for water and dust defense. If it's looking worse for wear or has gone missing, it's time to either swap out that gasket or get a whole new SIM tray to keep your iPhone's insides safe and sound!
Step 49


- Gently poke the point of your spudger to nudge that SIM card eject plunger out of the way of the logic board. You've got this!
Tools Used
Step 50

- Take out the two Phillips screws holding the bracket over the upper cable connector:
- One is a 3.1 mm screw
- One is a 1.3 mm screw
- Heads up: the longer screw goes on the left!
Step 51

- Take off the upper cable connector bracket with confidence! It's time to reveal the inner workings of your device.
Step 52


- Unscrew the two 1.2 mm Phillips screws holding the grounding clip in place at the top left corner of the logic board. A little twist, a little turn, and you're on your way!
Step 53

- Detach the grounding clip with care.
Step 54


- Unscrew the 1.2 mm Phillips screw that’s holding the antenna flex cable snugly against the top edge of the iPhone's rear case.
Step 55


- Grab your trusty fingernail or the pointy end of an opening tool and gently pop up that antenna flex cable connector from the logic board. A little wiggle, a little lift—just be cool and steady!
Tools Used
Step 56


- Gently slide the flat edge of a spudger under the antenna flex cable to break free the adhesive that's keeping it snug. You've got this!
Tools Used
Step 57

The screw boss at the top of the antenna flex cable is neatly nestled into a small recess at the top edge of the iPhone. It's like a cozy little spot, just waiting for you to gently guide it back into place.
- Gently lift the antenna flex cable up toward the top edge of the iPhone.
- Slide the screw boss downwards and out of its little hiding spot.
- Carefully take out the antenna flex cable.
Step 58


- Take out the three Phillips screws holding down the lower speaker. Time to show those screws who's boss!
- When putting everything back together, nudge the speaker toward the bottom edge of your iPhone until the screw holes line up perfectly. Hold it steady while you pop those screws back in.
- You've got two screws at 1.4 mm—short and sweet.
- And one screw at 2.4 mm—the tall one in the bunch.
Step 59

- Carefully take out the lower speaker to keep things grooving.
Step 60


- Starting at the top edge, gently use your fingernail or a spudger to lift and unplug the upper cable connector.
Tools Used
Step 61


- Grab your trusty spudger and gently nudge up that wireless charging coil's flex cable to disconnect it. You've got this!
Tools Used
Step 62


- Gently use the end of a spudger to lift and disconnect the flex cable of the Lightning connector assembly from the logic board with a bit of care.
Tools Used
Step 63


In a pinch, a small flathead screwdriver can save the day—but be extra careful! You don’t want it slipping and causing damage to nearby parts. Take it slow and steady!
Standoff screws love to hang out tight, so grab a precision driver and handle to send them packing.
- Time to loosen up those five screws holding the logic board in place:
- Two 1.8 mm Phillips screws
- One 2.3 mm standoff screw
- One 2.4 mm standoff screw
- One 2.7 mm standoff screw
Step 64

Watch out for those cables – we don’t want the logic board to play hide and seek!
- Gently lift the logic board by the bottom edges and slide it toward the bottom of the iPhone. It should come right out, no sweat.
- When putting things back together, keep an eye on the black grounding clip at the top right edge near the rear cameras. Make sure the logic board slides neatly underneath it as you reassemble.
Step 65


- Take out the two Phillips screws holding down the barometric vent in the bottom left corner of your iPhone:
- One is a 3.2 mm screw
- The other is a 1.8 mm screw
Step 66


- Carefully nudge the barometric vent toward the battery to loosen the glue holding it along the bottom edge of your iPhone.
Step 67

- Pop off that vent and set it aside like a pro.
Step 68

- Time to get our hands dirty! First, let's tackle those five Phillips screws holding the Lightning connector assembly snugly to the rear case:
- Start with the two 1.2 mm screws - they’re the little guys, but still mighty!
- Next up, grab the two 2.4 mm screws - a bit bigger but still easy to handle.
- Finally, don’t forget the one 2.5 mm screw - it’s the grand finale!
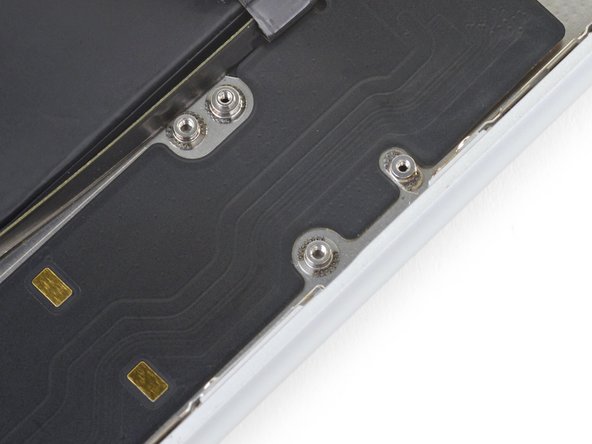
Step 69

- Unscrew those two 1.3 mm Phillips screws holding the Lightning port in place at the bottom edge of your iPhone. You've got this!
Step 70


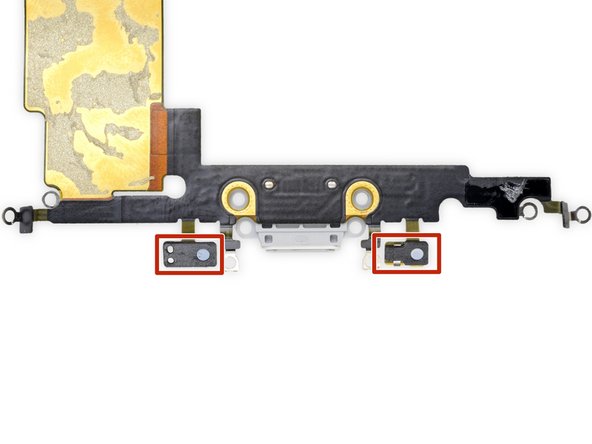
Hey there! Just a friendly reminder: there's no need to fully detach the microphones; simply peel back the adhesive as shown. You've got this!
- Carefully slide the sharp edge of an Opening Tool under the two microphones to gently pop them off the sticky adhesive holding them to the bottom edge of the iPhone.
Tools Used
Step 71

- Grab an iOpener or your trusty hair dryer and gently heat up the rear case behind the Lightning connector flex cable. This will help loosen up the adhesive holding the flex cable in place, making it easier to separate without any drama.
Tools Used
Step 72

As you gently work your way through the steps of separating the Lightning connector assembly, keep an eye out for that sneaky battery flex cable—let's avoid any unintentional mishaps with it!
- With a gentle touch, take the flat edge of your spudger and carefully nudge the battery flex cable connector away from the top part of the Lightning connector assembly. It's all about finesse here!
Tools Used
Step 73
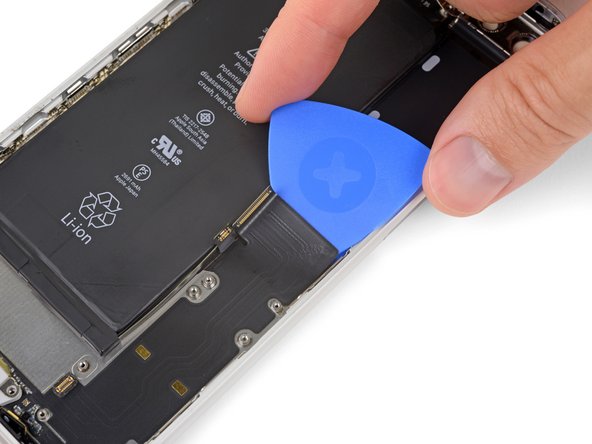

Heads up! A part of the wireless charging coil is chillin' right under this section of the Lightning connector flex cable. Be gentle with your prying moves to keep that coil safe and sound.
If necessary, warm up the area behind the Lightning connector assembly flex cable with your hair dryer or iOpener a few times. This little trick will help make separation a whole lot easier!
- Slip an opening pick or a slim pry tool under the top part of the Lightning connector assembly flex cable. Take it slow—no need to rush.
- Carefully glide the pick toward the outer edge of your iPhone, steering clear of the battery. Smooth moves only!
Tools Used
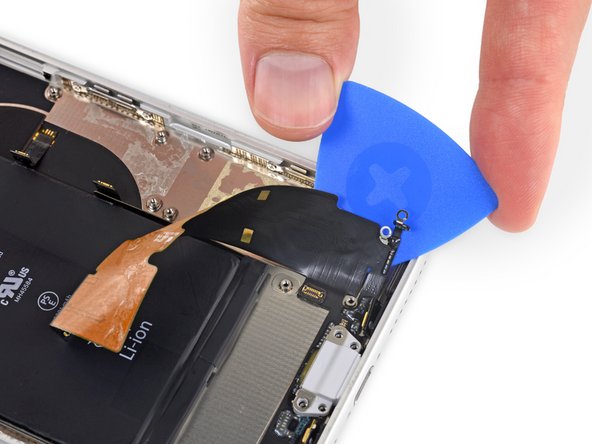
Step 74


Gently nudge the battery connector to the side—no need for a wrestling match here.
Treat that battery like you would a porcupine wearing a tuxedo: do not poke it. A punctured battery could turn your repair session into a chemistry experiment you definitely didn’t sign up for.
- Keep on gently peeling back the upper part of the Lightning connector flex cable, and remember to tread lightly around the other components to avoid any mishaps!
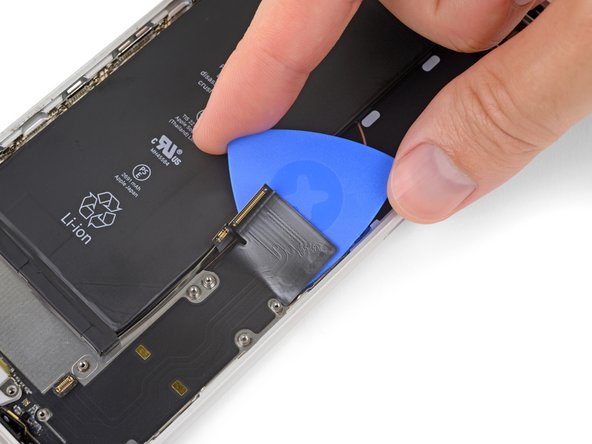
Step 75


- Keep gently peeling apart the Lightning connector assembly's flex cable as you glide past the bottom edge of the battery.
Step 76

- Gently ease your pick into the corner of the battery and glide it over to the iPhone's outer frame, carefully disconnecting the part of the flex cable that’s stuck. You've got this!
Step 77


- Glide your pick along the bottom edge of your iPhone to loosen up any stubborn spots around the Lightning connector assembly. Take it easy—just keep sliding until everything feels free and ready to move.
Step 78


- Take out the Lightning connector assembly.
- Before putting in the new Lightning connector assembly:
- Grab a plastic tool and scrape away any leftover adhesive from the back case. Go for a clean sweep!
- Wipe away any stubborn residue with isopropyl alcohol (90% or higher) and a lint-free cloth. One-way wipes only—no scrubbing back and forth.
Tools Used

Step 79

- Match up your new part with the old one—sometimes little bits or sticky stuff need to move over before the swap.
- Putting things back together? Just walk backward through the steps you just did.
- When it’s time to say goodbye to old parts, send them off to an R2 or e-Stewards certified recycler.
- Got stuck somewhere along the way? Our Answers community is ready to help out. If things still aren’t working, you can always schedule a repair.


