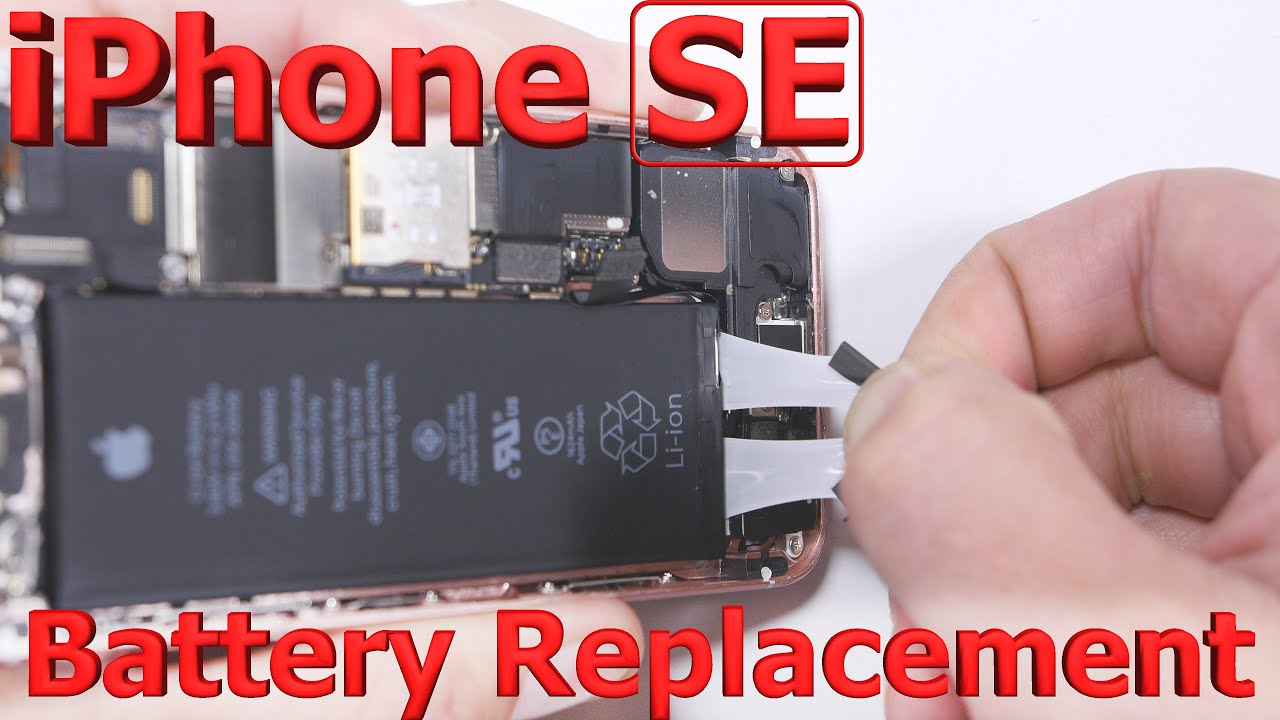
iPhone SE (1st generation) Battery Replacement Guide – DIY Tutorial
Duration: 45 minutes
Steps: 28 Steps
Hey there, repair champ! Just a friendly reminder to handle your device with care and take a moment to double-check everything before diving in. If you run into any bumps along the way, no worries—just schedule a repair and we’ll be happy to help you out!
Ready to revive your iPhone SE that’s playing hard to get with its battery life? Let’s swap out that old battery for a shiny new one! Just a heads-up, the SE battery isn’t a match for the iPhone 5s battery, so make sure you’ve got the right one. If your battery looks like it’s about to burst, please take the necessary precautions. Those adhesive strips holding the battery in place? Yeah, they’re one-time use only, so stock up on some replacements before diving in. If you’re in a pinch, a bit of double-sided tape works too! And, for your battery to perform at its best after the swap, remember to give it a little calibration love: charge it up to 100% and then keep it on the charger for an extra couple of hours. After that, use your iPhone until it decides to take a nap due to low battery. Finally, plug it back in and let it charge uninterrupted to 100%. Happy repairing!
Step 1

– First things first, let’s give your iPhone a little break – power it down before we dive in!
– Next up, grab your trusty Pentalobe screwdriver and carefully remove the two 3.9 mm screws flanking the Lightning connector. You’re doing great!
Step 2


Don’t forget to rock those cool safety glasses to shield your eyes from any glass bits that might decide to breakdance during the repair process.
– Got a cracked display glass? No worries! Let’s keep that breakage from spreading and avoid any accidental ouchies while you work your magic. Grab some tape and cover that glass up.
– Start by laying down overlapping strips of clear packing tape over the iPhone’s display until you’ve given the whole face a cozy, protective hug.
Step 3


– Hey there, no matter what tool you’re using, make sure to lift off the whole display carefully.
– If the glass starts to separate from the plastic like in the first picture, grab a plastic tool and gently slide it between the plastic frame and the metal phone body to pop out the metal clips from the case.
– In case you’re putting back together a phone with a detached display bezel, consider adding a thin adhesive strip between the plastic bezel and the glass to keep everything snug.
Step 4


In the following two steps, we’ll introduce you to the Anti-Clamp, a handy little tool created to make your opening journey a breeze. If you’re going au naturel and not using the Anti-Clamp, feel free to jump ahead two steps for another way to get started.
– Give that blue handle a gentle tug backwards to free the Anti-Clamp’s arms.
– Slide those arms over either the left or right edge of your iPhone with style.
– Place the suction cups just above the home button near the bottom edge of your iPhone—one on the front and one on the back.
– Squeeze those cups together to make a solid grip on the area you want to work on.
Step 5


– Give that blue handle a gentle tug forward to securely lock the arms in place.
– Twist the handle to the right a full 360 degrees or until you notice the cups starting to gently expand.
– When the Anti-Clamp has created a nice, roomy gap, slide an opening pick right beneath the screen.
– Feel free to skip the following two steps if you’re in a hurry.
Step 6

– If the Anti-Clamp is missing, just grab a single suction cup and lift the front panel like a pro:
Step 7

The front panel is snugly secured with clips and connected to the main part of the phone through several ribbon cables. Your mission? Gently release those clips and pop open the phone just enough to disconnect those cables. Take it easy and work carefully to keep everything safe and sound.
Patience is key! Apply steady, firm pressure. The front panel assembly fits quite tightly, even more so than on many other gadgets.
Ensure the suction cup is snugly secured to the front panel assembly close to the home button.
– Get a good grip on that iPhone using one hand, then give a gentle tug with the suction cup to create some space between the front panel and the rear case.
– Grab a plastic opening tool and start prying the edges of the rear case downward, away from the front panel assembly, all while keeping the suction cup game strong.
Step 8


Hey there, keep that front panel assembly snug with the rear case. They’re connected by some delicate ribbon cables, so take it easy!
– Give that plastic nub a gentle tug to break the vacuum seal on the suction cup.
– Carefully detach the suction cup from the screen.
Step 9


Be careful not to open the phone too wide, or you might end up putting a crimp in the home button cable or its socket. Keep that cable relaxed—if it’s pulled tight, you’ve gone a bit too far!
Alright, team! The upcoming two steps are for when we put it all back together. Let’s hop over them and slide right into Step 12, but only until it’s time to reassemble. Hang tight!
– Crack open your phone just a tad to peek at the shiny metal bracket hiding the home button cable.
– Grab your trusty spudger and gently nudge the bracket until it pops free. Snag it with your tweezers and lift it out.


Step 10


– As you put everything back together, don’t forget to reinstall the Touch ID cable bracket. Make sure the top slides in nicely between the battery and the Touch ID cable connector, right in front of that metal tab. The bottom should click down snugly over the connector.
– Gently slide the top of the bracket over the Touch ID cable connector from left to right and watch it fit like a glove!
Step 11


If the bracket doesn’t snap down smoothly, no worries! Just give it another go by removing it and sliding it back over the cable connector for a snug fit.
– When putting things back together, grab a spudger and gently snap the front part of the Touch ID cable bracket over the connector. Hooray for progress!
Tools Used
Step 12


Remember, gently separate the cable connector from its socket, making sure not to accidentally lift the whole socket. The socket is attached to its own neatly glued-down cable, so be mindful as you detach it.
– Gently use the tip of a spudger to lift the home button cable connector out of its cozy little socket. You’ve got this!
Tools Used
Step 13


– Now that you’ve freed the connector, gently pull the home button side of the assembly away from the rear case, using the top of the phone as your trusty hinge.
– Open the display to about a 90º angle, and lean it against something solid to keep it steady while you tackle your phone repair.
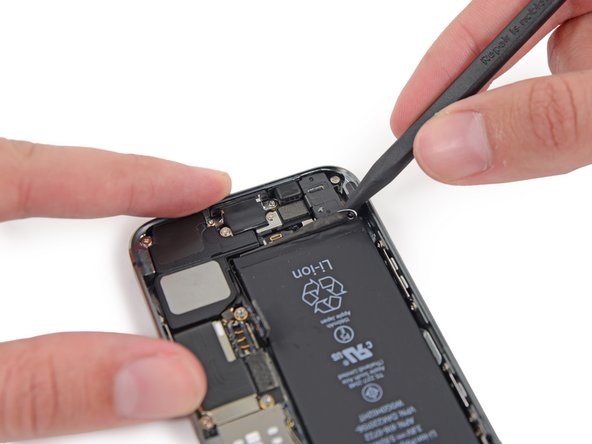
Step 14

– Gently remove the two tiny 1.6 mm Phillips #000 screws that are holding the metal battery connector bracket snugly in place on the logic board.
Step 15

– Let’s kick things off by pulling out that metal battery connector bracket from your trusty iPhone!
Step 16


Hey there! When prying up the battery connector, make sure to be as gentle as a kitten. Avoid touching the logic board socket and surrounding components. We want those little guys to stay happy and intact!
– Gently nudge the battery connector up from its cozy spot on the logic board using the flat end of a spudger. It’s like giving it a little high five to let it know it’s time to come out!
Tools Used
Step 17

– Time to say bye-bye to the screws holding the front panel assembly cable bracket to the logic board!
Step 18

– Gently detach the front panel assembly cable bracket from the logic board. You’re doing great!


Step 20


Don’t forget to unplug that battery before you start messing with the cable in this step! Safety first, folks!
– Hey there! Time to work some magic. First off, gently disconnect the fancy LCD cable connector.
– If your phone decides to throw a little tantrum and the cable pops off – no worries! You might see some funky white lines or a blank screen, but fear not! Just reconnect the cable and give your phone a little power nap. The cool trick here is to power cycle your phone by saying nighty-night to the battery and then waking it back up.


Step 22

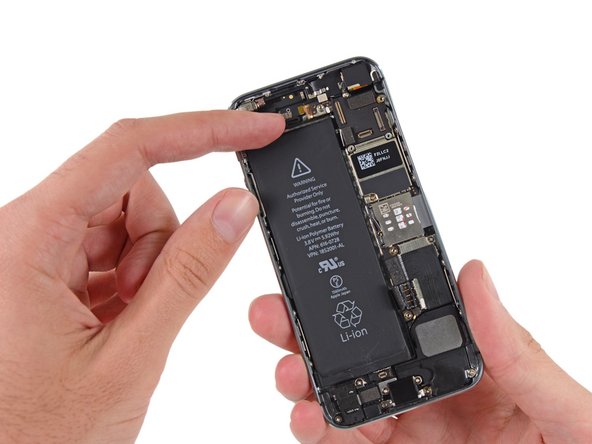
– Gently detach the front panel assembly from the rear case. Just a little wiggle and it should come off smoothly!
Step 23


– Slide the tip of a spudger gently between the battery and the headphone jack to release the battery adhesive tab.
Tools Used
Step 24


– Gently persuade the battery adhesive tab to take a small vacation away from the phone.
– Trim the black battery adhesive tab right between the two white adhesive strips, setting them free from each other.
Step 25


– Gently tug one of the battery adhesive strips down towards the bottom of the iPhone. If you can, grab the white part of the strip—just a heads up, the black tab might take a little vacation.
– Keep a steady pull going, making sure to maintain tension on that strip as it wiggles out from between the battery and the rear case. For the best results, aim for a pull at a 60º angle or less.
– Watch out for those other internal iPhone components; we don’t want them getting snagged!
Hey there, let’s keep those strips nice and flat, no wrinkles allowed! Wrinkled strips are just troublemakers waiting to stick together and cause a commotion instead of gracefully exiting. You got this! 🛠️
Ready to stretch your repair skills? Start pulling that strip like a champ, grabbing near the battery if needed, until it pops free. You’ve got this!
Step 26


– Now it’s time to repeat the process for the second strip – you’ve got this!
– If you successfully removed both strips, you can skip ahead to the next step. Nice work! If you need help, you can always schedule a repair
Tools Used

Step 27

If the battery is really sticking to the case, it’s time to bring in the big guns! Grab an iOpener or maybe even a hair dryer to warm up the case behind the battery.
For a smooth separation, think outside the box. Dental floss works like a charm, but for some real power, consider an unwound guitar string – like a 0.009 E string from a 12-string set.
Tools Used

Step 28


Before you dive into the installation, give that replacement battery a little love! If it arrived in a plastic sleeve, just slide it off gently, keeping it away from the ribbon cable. You’re doing great!
– Alrighty, you’re rocking this repair action, buddy! Yank that battery out from the back casing. If there’s any leftover alcohol solution, make sure you give that phone a little scrub or let it dry out before sticking in that new battery. Now, give that new battery a squish-faced smile and make sure it’s nicely snuggled in. And if it ain’t already got those sticky strips, let’s get those bad boys in place to keep things bondin’. Finally, do a battery dance and give your device a good hard reset. That’ll keep things running smooth and make life easier if you ever need to bring it back for another dance with us, so hit the schedule a repair button if you need some help!