
iPhone SE 2022 Logic Board Replacement
Duration: 45 minutes
Steps: 48 Steps
Ready to swap out the logic board on your iPhone SE 2022? You’re in the right place! This guide walks you through removing and replacing the logic board in the A2783 (international) model. Quick heads up: each iPhone’s logic board is paired with the Touch ID sensor from the factory, so swapping out the logic board will disable Touch ID—unless you also install a replacement home button that’s been correctly paired with your new board. We'll also show you how to remove the Wi-Fi Diversity Antenna to make the job smoother, but if you’re feeling confident, you can skip these steps and just disconnect the antenna. One more thing: if you don’t replace the adhesive seals during reassembly, your device will still work, but it might lose its water protection. Don’t worry though—you’ll need some fresh adhesive to get everything back together securely.
Step 1


- Grab your SIM card eject tool, a SIM eject bit, or even a straightened paper clip, and gently insert it into the tiny hole on the SIM tray at the right edge of your phone.
- Push gently to pop the SIM card tray out.
- Now, carefully remove the SIM card tray and you’re good to go!
Tools Used

Step 2


- Make sure to power off your phone before you start taking it apart.
- Unscrew the two 3.4 mm P2 pentalobe screws located along the bottom edge of your iPhone.
Step 3


Be careful not to insert your opening pick too deep, as it could harm your device. To avoid any mishaps, take a moment to mark your pick for safe usage.
Feel free to add different measurements to the other corners of the pick for extra precision.
Another fun option is to attach a coin to the pick about 3 mm from the tip using some tape.
- Grab your measuring tool and mark a spot 3 mm from the tip. Use a permanent marker to make a clear mark on the opening pick – precision is key here, so take your time. Trust us, this little step makes a big difference later on.
Step 4


Pop on some safety glasses to keep your eyes safe from any sneaky glass bits that might fly around while you work your magic.
Got a cracked iPhone screen? Keep those shards in check and avoid any ouch moments by taping over the glass before you start your repair.
If the suction cup just won’t stick, a little superglue can help it grip the screen better.
- Cover the iPhone screen with overlapping strips of clear packing tape so the whole front is protected. Think of it as giving your phone a shiny armor before battle.
- If the suction cup refuses to stick in the next steps, grab some duct tape, fold it into a sturdy handle, and use that to lift the screen. Sometimes, tape makes the best sidekick.
Step 5


In the next three steps, we're going to introduce you to the Anti-Clamp, our nifty little tool designed to make opening your device a breeze. If you decide to go without the Anti-Clamp, no worries! Just skip ahead three steps for an alternative approach.
Want to master the Anti-Clamp? Check out this handy guide for full instructions.
If your iPhone's surface is a bit too slick for the Anti-Clamp to grab onto, a little tape can work wonders to give it a better grip!
- Pull that bold blue handle back to let the Anti-Clamp’s arms loose.
- Swing the arms over to hug either the left or right edge of your iPhone.
- Line up those suction cups just above the home button—one on the front, one on the back—keeping them close to the bottom edge.
- Give the cups a squeeze so they grab on tight where you need them.
Step 6


- Give that blue handle a little nudge forward to secure those arms in place.
- Now, twist that handle a full 360 degrees or until you see those suction cups starting to stretch.
- Keep an eye on those suction cups to make sure they stay aligned. If they start to wander off, just loosen them up a bit and realign the arms. You've got this!
Step 7


Take it easy and only turn a quarter of a twist at a time. Give it a minute to breathe between each turn. Let the Anti-Clamp take care of business while you kick back and relax.
A hair dryer, heat gun, or hot plate will do the trick too—but watch out, cranking up the heat too much can mess with your screen or battery. So, take it easy.
If the Anti-Clamp isn’t giving you enough room, warm things up a bit more and give the handle a quarter turn.
- Heat up the iOpener and gently slide it between the arms of the Anti-Clamp.
- Fold the iOpener and let it rest on the bottom edge of the iPhone.
- Give it a minute to let the adhesive relax and start creating a tiny gap for an easy opening.
- Carefully slip an opening pick under the plastic bezel around the screen (avoid poking the screen itself!).
- Go ahead and skip the next two steps—you’re doing great!


Step 8

Got a suction handle in hand? Awesome! Let's get that rear glass loosened up with the next two steps.
Feel free to whip out a hair dryer, heat gun, or hot plate for some extra warmth, but keep an eye on it! We don’t want to turn your phone into a baked potato—both the display and internal battery can get a bit cranky with too much heat.
- Grab an iOpener and gently place it on the screen. Give it at least two minutes to warm up and loosen up that sticky adhesive underneath. Patience is key, so just hang tight and let the magic happen.
Tools Used

Step 9


If you're having a tough time getting that gap started, no worries! Just warm up the bottom half of the screen a bit more to help loosen the adhesive. Remember to keep an eye on the iOpener instructions to prevent any overheating mishaps.
- Stick a suction handle on the lower part of the front panel, right near the home button—make sure it’s snug.
- Gently pull up on the suction handle to open up a little gap between the front panel and the frame.
- Slide an opening pick into the gap, tucking it under the screen’s plastic edge.
Tools Used
Step 10


- Start by sliding your opening pick to the bottom right corner to slice through that sticky adhesive. Take it slow, and let the pick do the work!
- Now, grab another opening pick and slide it along the bottom edge of your device. You're doing great!
- Next, slide the pick to the bottom left corner to cut through the rest of the adhesive. Keep the momentum going!
- Leave those opening picks right where they are. This keeps the adhesive from sealing back up, making your life a little easier. You're almost there!
Step 11


Don't try to yank the top edge of the display from the rear case. It's locked in place by plastic clips, and trust us, those clips can snap if you're too rough.
If you're finding the adhesive tough to slice through, it’s probably lost its heat. Give your iOpener a quick two to three-minute recharge to warm things up again.
- Take your opening pick and slide it along the left side of your phone to gently cut through that sticky adhesive.
- Pause near the top left corner of the screen to avoid getting too carried away.
Tools Used
Step 12


Be careful not to push your pick in more than 3 mm – going deeper could mess with the delicate internals. Keep it gentle!
- Gently slide the bottom right opening pick along the right edge of your device, carefully cutting through the adhesive.
- Pause just shy of the top right corner of the display.
Step 13


Keep the display tilt under 15º to avoid putting too much stress on those delicate ribbon cables—they’re not fans of a wild stretch!
- First, let's get rid of those opening picks. They’ve done their job and it's time to say goodbye.
- Now, gently grab the suction handle and pull it up. Give that bottom edge of the display a little lift.
- Finally, remove the suction handle. You’re almost there!
Tools Used
Step 14


- Gently slide an opening pick under the top left corner of the display to get things started.
- Carefully glide the pick around the top left corner and along the top edge of the phone, slicing through the remaining adhesive like a pro.
Step 15


- Gently slide the display assembly downward toward the charging port until you feel those sneaky clips let go of the rear case.
Step 16


Hold up before completely separating the display from the phone assembly! There are still some delicate ribbon cables connecting it to the logic board, so let's be gentle here.
- Gently lift the display from the left side, just like flipping open the back cover of a book. It's a smooth move!
- Once you’ve got that display up, lean it against something sturdy to keep it standing tall while you work your magic on the phone.
Step 17

- Start by removing the four Phillips screws holding the lower display cable bracket in place.
- As you work through this guide, be sure to keep those screws safe and sound. Each one needs to go back exactly where it came from during reassembly. Installing a screw in the wrong spot could cause some serious damage.
- Two screws are 1.2mm in length.
- Two screws are 2.8mm in length.
Step 18


- Grab a pair of tweezers and gently lift off the lower display cable bracket. Be careful, it's a delicate little move!
Tools Used

Step 19


- Grab your spudger and gently pry the connector straight up from its socket to disconnect the battery. Easy does it—just a little nudge and you're good to go!
Tools Used

Step 20


The display and digitizer cables are stacked on top of each other, so they can get a bit tangled. Always make sure to disconnect the upper cable first. Trust us, you don’t want to mess with both at once – it's like untangling headphones, but worse. Take it one step at a time!
- Grab your trusty spudger and gently pop up the bottom two display cables—just lift the connectors straight up from their sockets. No need for Hulk strength here.
- When reconnecting, press down on one side until you hear that satisfying click, then do the same on the other. Skip pressing the middle; if things aren’t lined up just right, you could bend the connector, and nobody wants permanent damage.
Tools Used
Step 21

- Grab your trusty Phillips screwdriver and unscrew those three little 1.2 mm-long screws that are holding the front sensor assembly bracket in place. You've got this!
Step 22


- Grab your tweezers and gently lift out the front sensor assembly bracket. Slow and steady wins the race!
Tools Used
Step 23


- Grab your trusty spudger and use its pointed end to gently pry the front sensor assembly connector straight up from its socket. Easy peasy!
Tools Used
Step 24


- Take off the display assembly like a pro! It's time to get into the heart of your device. You've got this!
Step 25

- Let's get those screws out and free the Lighting connector bracket! Here’s what you need to do:
- First up, grab your trusty tools and unfasten one 1.2 mm-long Y000 screw.
- Next, you'll want to tackle that 2.7 mm-long Phillips screw.
- And finally, remove the 2.9 mm-long Phillips screw to complete the trio!
Step 26


- Grab your trusty tweezers and gently lift off the Lightning connector bracket like a pro!
Tools Used
Step 27


This part of the flex cable is gently stuck to the speaker. If it’s being stubborn and won’t budge, try warming it up a bit with an iOpener or hair dryer to loosen the adhesive. That way, you can separate the flex cable without any drama.
- Gently wiggle an opening pick between the antenna flex cable and the top of the speaker. You've got this!
Tools Used
Step 28


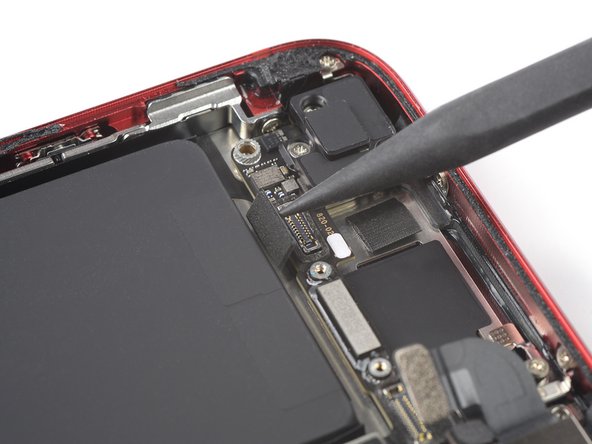
The connector’s socket is a bit loose, hanging out between the speaker and the Taptic Engine, making the cable a tad tricky to unplug. To make things smoother, try using an opening pick to gently hold down the connector socket while you disconnect the cable.
- Grab your trusty spudger and use its pointed end to gently pry the Wi-Fi diversity antenna connector straight up from its socket. You've got this!
- Reconnecting that cable? It can be a bit of a puzzle. Make it a breeze by using tweezers to hold the flex cable in place, aligning it just right with its socket. Then, with a gentle touch, press down on the connector using the flat side of your spudger until you hear that satisfying click. Perfect!
Step 29


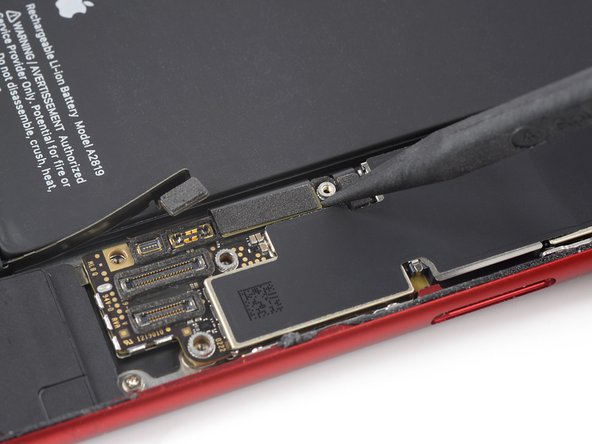
- Grab the pointed end of your spudger and gently pry the Wi-Fi diversity antenna connector straight up off the logic board socket. Nice and easy does it!
Tools Used
Step 30


- Grab a trusty pair of tweezers and gently pluck out the Wi-Fi diversity antenna. You've got this!
Tools Used
Step 31


- Gently use the pointed end of a spudger to lift the rear camera connector straight up from its socket. You're almost there!
Tools Used
Step 32

In a pinch, a small flathead screwdriver can work wonders—just be careful not to slip and accidentally take out something you didn’t mean to! A steady hand goes a long way here.
The best way to tackle those standoff screws is with a trusty standoff screwdriver or bit. You've got this!
- Time to tackle those screws holding the rear-facing camera bracket! You've got two to handle:
- One 3.0 mm-long standoff screw, just waiting to be removed.
- And a 3.1 mm-long Phillips screw, ready to join the party!
Step 33


- Grab your trusty tweezers and gently lift out the rear camera bracket like a pro!
Tools Used
Step 34


- Grab the pointy end of your trusty spudger and gently pry the flash connector straight up from its socket to disconnect it. Easy does it!
Tools Used
Step 35

- Let's get started by taking off the two screws that are holding down the upper cable bracket:
- First up, we have a Phillips screw that's 2.8 mm long.
- And don't forget the second one, a Phillips screw that measures 1.2 mm long.
Step 36


- Grab a pair of tweezers and carefully lift off the upper cable bracket. It’s a simple move, just take your time and make sure everything comes off smoothly.
Tools Used
Step 37

- Grab your trusty spudger and gently work its pointed end underneath the upper flex cable connector. A little lift straight up should do the trick to disconnect it from its socket. Easy does it!
Tools Used
Step 38

Hold your horses! Before you get too eager and try to pull off the antenna component, remember there's a sneaky fourth screw keeping it snugly attached to the rear case.
- Loosen up those three tiny 1.2 mm Phillips screws holding down the top left antenna—time to set them free!
Step 39

- Loosen that little 1.4 mm-long Phillips screw that's holding the antenna component snugly in place at the top edge of the rear case. You've got this!
Step 40


- Grab your tweezers and carefully lift off the top left antenna component.
Tools Used
Step 41

- Time to get that grounding bracket loose! Unscrew the two screws holding it down:
- One 1.5 mm Phillips screw—easy peasy!
- One 1.2 mm Phillips screw—let's get it done!
Step 42


- Grab your tweezers and carefully lift off the top left grounding bracket.
Tools Used
Step 43

A bit of protective foam is hanging out over this screw near the rear camera connector. Grab some tweezers and carefully lift just enough foam to get the screw loose.
- Remove the quartet of screws holding down the logic board:
- One Phillips screw, 1.7 mm long
- One partly-threaded Phillips screw, also 1.7 mm long
- One standoff screw, 2.5 mm long
- One standoff screw, 2.2 mm long
Tools Used
Step 44


- Grab a pair of tweezers and gently lift the logic board grounding bracket in the top right corner of the rear case. Take your time—patience is key here.
Tools Used
Step 45


- Grab the pointy end of your spudger and gently nudge the SIM card eject plunger out of the logic board’s path by sliding it over to the right edge of the rear case.
Tools Used
Step 46


- Grab your trusty spudger and carefully lift the Lightning port cable connector straight up from its socket—give it a gentle nudge, nothing wild.
- Now, using the same pointed end, pry up the wireless charging coil cable connector. A little finesse goes a long way!
Tools Used
Step 47


Go easy on the prying—no cable wrestling matches today! If something’s not budging, double-check that all cables, connectors, and parts are free and clear before you go any further.
- Gently lift up the battery connector end of the logic board using the flat end of a spudger. You've got this!
Tools Used
Step 48


Double-check that no cables nearby are playing a game of twister with the logic board or blocking its path.
- Before sealing everything up, give your device a quick test run to make sure everything’s working like a charm—this is your chance to check that repair!
- Check out your new replacement part and make sure it matches the original one. Don’t forget, you may need to move over some components or peel off adhesive backings before it goes in.
- Reassemble your device by simply retracing your steps, like going backward through your favorite playlist.
- Got e-waste? Drop it off at an R2 or e-Stewards certified recycler—let’s keep things eco-friendly!
- If things didn’t go exactly as planned, don’t worry! Try some basic troubleshooting or hop onto our Answers community for tips. And hey, if you’re stuck, you can always schedule a repair!


