iPhone X Front Camera Assembly Replacement
Duration: 45 minutes
Steps: 52 Steps
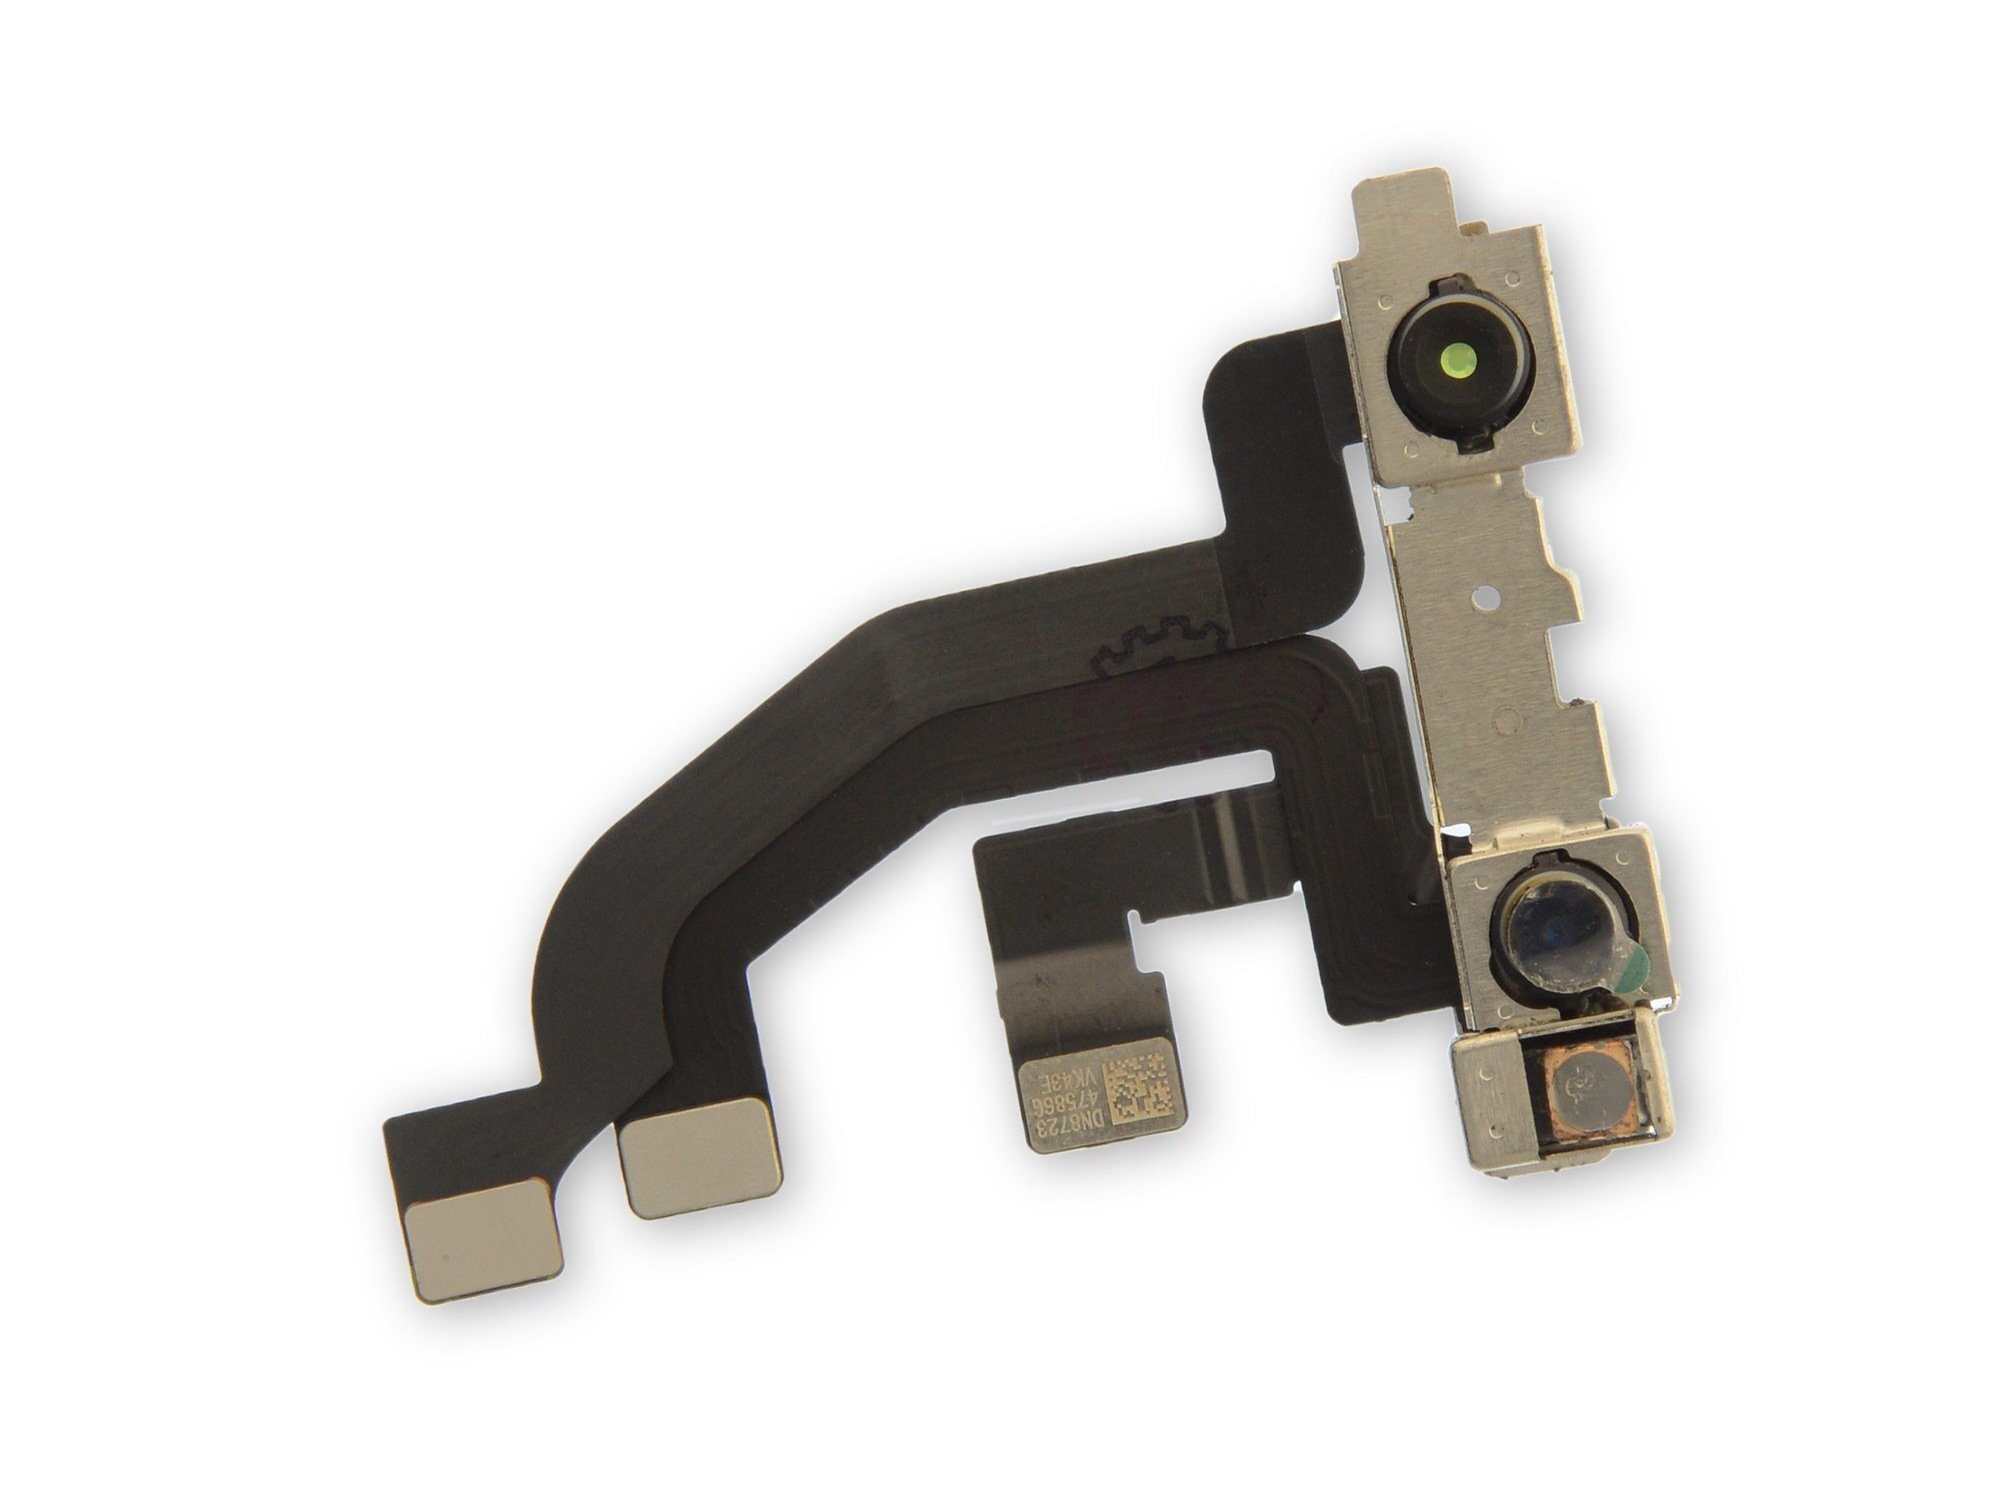
The front camera assembly includes a regular front-facing camera, an infrared (IR) camera, and a dot projector—all working together as the magic behind Apple's Face ID. Since this assembly is paired with the logic board, only Apple can swap it without losing Face ID functionality. If you're okay with losing Face ID, this guide will walk you through replacing the front camera assembly step by step.
Step 1

Before you dive in, make sure your iPhone battery is below 25%. A fully charged lithium-ion battery is a bit like that friend who gets too wild at parties – it can catch fire or even explode if it gets a little too poked and prodded!
Popping open your iPhone's display will break its waterproof seals. Make sure you have replacement seals handy before moving forward, or be extra careful to keep your phone away from any liquids if you plan to put it back together without swapping the seals.
- First things first, let’s give your iPhone a little nap—power it down before we dive in!
- Next up, grab your trusty pentalobe screwdriver and remove those two 6.9 mm-long screws chilling at the bottom edge of your iPhone.
- Uh-oh! If those screws are looking a bit worse for wear—stripped or damaged—don’t fret! Just swap them out for some fresh ones.
Step 2


Pushing the opening pick in too deep can mess up your device. Mark your pick to keep things safe and sound.
Feel free to mark the other corners of your pick with different depths for extra precision.
Another trick: tape a coin to your pick about 3 mm from the tip to stop going too far.
- From the tip, measure 3 mm and make a mark on your opening pick with a permanent marker to keep things precise.
Step 3


Pop on some safety glasses to keep your eyes safe from any rogue glass bits that might decide to fly around during the repair.
Got a cracked screen on your iPhone? Let's keep that glass from causing a mess and protect yourself while you work by slapping some tape on it. Safety first, right?
If things get a bit tricky, a little superglue on the suction cup can give you the extra grip you need to tackle that screen!
- Grab some clear packing tape and lay down overlapping strips over your iPhone's screen until it's completely covered. You'll want to make sure it's nice and snug!
- If the suction cup seems to be giving you a hard time in the next few steps, don't sweat it! Just fold a sturdy piece of tape (duct tape works great) into a handle and use that to lift the screen instead.
Step 4


The next few steps will introduce you to the Anti-Clamp, our nifty tool designed to make opening your device a breeze. If you're not rolling with the Anti-Clamp, no worries! Just hop down three steps for an alternative approach.
Want the scoop on using the Anti-Clamp? Check out this handy guide.
If your iPhone's surface feels like a slip 'n slide for the Anti-Clamp, just slap on some tape to give it a little extra grip.
- Give that blue handle a gentle tug backwards to free the Anti-Clamp's arms.
- Slide those arms over either the left or right side of your iPhone like a pro.
- Nestle the suction cups close to the bottom edge of your iPhone—one on the front, and the other on the back.
- Squeeze the cups together to create a solid grip on the spot you want to tackle.
Step 5


- Push that blue handle forward to lock those arms in place—like a superhero pose, but for tools.
- Spin the handle clockwise a full turn, or until you see the suction cups stretching out like they’re reaching for a snack.
- Keep an eye on those suction cups! If they start drifting away from each other, loosen them up a bit and nudge the arms back in line.
Step 6


Remember, just give it a gentle twist, no more than a quarter turn at a time. Take a breather and wait a full minute between those turns. Let the Anti-Clamp and a little time do their magic for you!
Hair dryers, heat guns, or hot plates can help here—but don’t get too wild with the heat, or you could end up roasting your screen or battery.
If the Anti-Clamp isn’t giving you enough space, warm up the area a bit more and give the handle a quarter turn for some extra oomph.
- Warm up an iOpener and carefully thread it through the arms of the Anti-Clamp.
- Fold the iOpener so it rests along the bottom edge of your iPhone.
- Give it a minute to work its magic and loosen the adhesive, creating a small gap for you.
- Gently slide an opening pick underneath the screen and the plastic bezel—avoid prying under the screen itself.
- Skip the following three steps.
Tools Used

Step 7

Go easy with the hairdryer or heat gun—too much heat can turn your screen into a crispy mess!
Warming up the bottom edge of your iPhone is a nifty trick to loosen the adhesive holding the display in place. This will make it a breeze to pop it open!
- Grab a hairdryer, heat gun, or an iOpener, and gently warm up the bottom edge of your iPhone for about a minute to loosen the adhesive underneath.
Tools Used
Step 8


- Grab your single suction handle and place it carefully on the bottom edge of the phone, steering clear of that curvy glass part.
Tools Used

Step 9


The waterproof glue holding the screen is seriously tough, so don't be surprised if it takes some muscle to get that first gap open. If it's putting up a fight, hit it with some more heat and gently wiggle the screen up and down. Keep at it until you've got enough space to slide your tool in.
- Give the suction cup a confident pull—steady does it!—to nudge the screen and frame apart just a smidge.
- Slide an opening pick into the space under the screen’s plastic edge (not the actual screen), and you’re on your way.
Step 10


Keep your pick shallow—no deeper than 3 mm—so you don’t accidentally poke something important hiding inside.
- Take your opening pick for a spin around the lower left corner and up along the left edge of your iPhone, gliding it through that sticky adhesive like a pro.
Step 11

Heads up! There are some super-sensitive cables hanging out along the right edge of your iPhone. Keep your pick clear of this area to avoid any cable drama.
Step 12


Keep your pick insertion to under 3 mm to avoid giving those delicate display cables a not-so-friendly poke!
- Slide your pick back in at the bottom edge of the iPhone, then cruise up the right side to keep loosening that sticky adhesive. Keep it smooth and steady!
Step 13


Be gentle with the clips—they’re delicate and might snap if you get too rough. Take your time and stay cool.
Keep your pick insertion shallow—no more than 3 mm—to avoid messing with the front panel sensor array.
The top edge of the display is held tight with both adhesive and some stubborn little clips. Get ready for a bit of a tug-of-war!
- Gently slide the opening pick around the top corner of the display while giving it a little tug or wiggle down towards the Lightning port. You're doing great!
- Now, slide that pick over to the opposite corner and slice through any leftover adhesive holding the display in place. Almost there!
Step 14

- Gently tug the little tab on the suction cup to pop it off the front panel.
Step 15


Hold your horses! Don’t go yanking that display completely off just yet—there are some delicate ribbon cables still hanging on tight to the iPhone's logic board. We don’t want any casualties here!
And hey, just a heads-up: when you’re lifting off the frame, make sure it comes off with the display like a perfect duo, so it doesn’t get stuck in the device. Teamwork makes the dream work!
- Flip open your iPhone by lifting the display from the left, just like cracking open a good book.
- Prop the screen against something sturdy so it stays put while you work your magic.
- When you're putting things back together, set the display in place, line up the clips on the top edge, and gently snap the top edge down before pressing the rest of the display into position. If it won't snap easily, take a peek at the clips around the edges to make sure none are bent out of shape.
Step 16

Keep a close eye on every screw during this repair and make sure each one goes back exactly where it came from—your iPhone will thank you for the careful treatment.
- Take out the five Y000 screws holding down the logic board connector bracket. Here’s the lineup:
- Three screws at 1.1 mm
- One screw at 3.1 mm
- One screw at 3.7 mm
Step 17

The bracket might be holding on just a little too tightly. Give it a gentle yet determined lift to help it break free.
- Take off the bracket.
- When putting things back together, now's a great time to power on your iPhone and make sure everything’s working perfectly before sealing up the display. Just remember to fully power it down again before moving on.
Step 18


Be careful not to mess up the black silicone seal around this and other board connections. These little guys are the unsung heroes keeping water and dust out, so treat them with some respect!
- Gently use the tip of a spudger or a clean fingernail to lift the battery connector out of its socket on the logic board.
- Then, carefully bend the connector away from the board just enough to keep it from accidentally touching the socket and powering up the phone while you work.
Tools Used

Step 19


- Gently pry up the front panel sensor assembly connector using the tip of a spudger or your fingernail to unplug it.
Tools Used
Step 20


- Gently use the tip of a spudger or your fingernail to unplug the OLED panel cable connector.
- When reconnecting press-fit connectors like this one, line up one side carefully and press it down until you hear a click, then do the same on the other side. Avoid pressing the middle to keep those pins happy and avoid any damage.
Tools Used
Step 21


- Grab your trusty spudger and carefully lift the digitizer cable connector out of its snug little home. It's a bit of a tight squeeze, so take your time.
- Now, when you're putting that connector back, remember it's like fitting a puzzle piece—gotta get it just right! Align it with care and give it a gentle nudge with your fingertip. Start with one side, then the other. You'll hear a satisfying click when it's snugly in place.
- If your screen starts acting a bit moody and doesn't respond to your touch after you're all done, no worries! Just disconnect the battery for a moment and re-seat that connector. Make sure it clicks in fully and that there’s no dust or anything else hanging out in the socket.
Tools Used
Step 22


The front panel sensor assembly flex cable is gently stuck down, so take it easy when lifting it up.
- Gently peel up the cable until the sticky stuff gives way.
Step 23

- Pop off the display assembly. Treat it gently—no superhero moves needed.
- When putting everything back together, this is your moment to refresh that waterproof adhesive around the edges, if you’re feeling extra thorough.
Step 24


Watch out for those three rows of grounding pads at the bottom of your iPhone—they're not just for decoration!
- Start by taking out the seven screws holding down the bracket beneath the Taptic Engine and speaker:
- Two Y000 screws, 1.9 mm each
- One Y000 screw, 1.2 mm
- One Y000 screw, 1.6 mm
- One Phillips screw, 2.4 mm
- One Phillips screw, 1.7 mm
- One Phillips screw, 1.5 mm
Step 25


- Gently lift the bracket up from the side closest to the battery. Don’t go for a full removal just yet—it’s still hanging on by a little flex cable.
Step 26


- While keeping the bracket out of the way, gently use the tip of a spudger to pop up and disconnect the flex cable hiding underneath.
Tools Used
Step 27

- Pop that bracket off and keep it somewhere safe!
Step 28


- Take out the 2.1 mm Y000 screw holding down the speaker connector cover—no sweat!
Step 29

- Pop off the speaker connector cover—it’s easier than peeling a banana!
Step 30


- Gently wedge the tip of a spudger under the speaker connector and pop it loose.
Tools Used
Step 31


When lifting out the speaker, keep an eye on the flex cable you just unplugged—it's not looking for a wrestling match. Gently nudge it aside if needed so the speaker can make a smooth exit.
- Slide a spudger under the top edge of the speaker, right by the iPhone's case. You've got this!
- Carefully lift and nudge up that top edge of the speaker. It's like giving it a little hug!
- When you're putting the speaker back in, keep an eye on that flex cable. Make sure it’s not hiding underneath the speaker, playing peek-a-boo!
Tools Used
Step 32


- Grip the speaker by its sides and gently wiggle it back and forth to loosen up the adhesive holding it to the bottom edge of your iPhone.
- Carefully pull the speaker away from the bottom edge until the sticky gasket lets go.
Step 33


- Time to give that speaker the boot!
Step 34


Keep your fingers on the outer edges of the liner to dodge any sticky situations with the exposed adhesive!
- The speaker gasket is a one-time wonder! When you're putting everything back together, make sure to swap in a fresh gasket.
- Grab those tweezers and get ready to do some spring cleaning! Carefully peel away all the old gasket from both the frame and the speaker.
- Time for a little TLC! Use a microfiber cloth and some isopropyl alcohol to wipe away any leftover adhesive residue from the frame and speaker. A clean surface is a happy surface!
- Before you get to the fun part, check the orientation of the new speaker gasket. Make sure the big cutout fits nicely around the speaker grille mesh.
- Now, let's get that gasket in place! Remove the larger, clear liner and, with your trusty tweezers, gently position the gasket on the bottom of the speaker.
- Give it a little love! Use your fingers or a spudger to press the gasket down firmly so it can stick like it means it.
- Almost there! Take off the last liner and carefully place the speaker back, ensuring the connector doesn’t hide underneath.

Step 35


- Unscrew the 2.3 mm Phillips screw that's holding the Taptic Engine in place. Easy peasy!
Step 36


- Grab your trusty spudger and gently pry up the Taptic Engine flex cable from its socket. You've got this!
Tools Used
Step 37

- Take out the Taptic Engine—it's ready for a break!
Step 38

The iPhone X's battery is stuck to the back case with four pieces of stretch-release adhesive—one holding down the top cell and three keeping the bottom nice and secure.
- Each piece of adhesive has a handy little black pull-tab at the end, which is gently stuck to the side edge of the battery. Just give it a tug, and you're on your way!
Step 39


Avoid poking the battery with sharp objects—piercing it could cause harmful leaks or even a fire. Handle with care!
Each tab has a tiny loop right in the middle; if grabbing the tab feels tricky, just poke a tool through that loop to get a better grip.
- Peel away the first battery adhesive tab from the bottom edge of the battery. You've got this!
Step 40


Be careful not to mess up the speaker cable connector located just under the center adhesive tab. It's a tricky little spot, so treat it gently!
- Go ahead and do the same thing to free up the last two adhesive tabs stuck to the bottom edge of the battery. Almost there!
Step 41


No need to sweat it if the strips decide to break! They can be a bit finicky sometimes. Just keep going for more tips on tackling those stubborn strips.
Next up, you'll gently pull each tab to slowly stretch the adhesive holding down the battery. This special stretch-release glue chills out and loses its stickiness when stretched, so the tabs will come right off in your hand, making it super simple to lift the battery out without a fuss.
- Amp up your chances of nailing this repair with these tips:
- If a strip decides to play hide and seek under the battery and you can't fish it out, don't sweat it! Just move on to the other strips and keep trucking with the steps below.
- Remember, no need to crush that battery! Just give your iPhone a gentle hug from the sides.
- Keep those strips nice and smooth while you pull them out.
- Take it easy and pull slowly, giving each strip a moment to stretch and break free. You’ll need about 15-30 seconds for each one, so patience is key!
- When you pull, do it at a low angle to avoid any snagging on the battery's bottom edge.
Step 42


If any of the adhesive strips snap under the battery and play hide-and-seek, do your best to fish out the leftovers, then keep going with the steps below.
The strip will stretch way beyond its original length, so keep pulling and reposition your grip near the battery when needed.
If those adhesive tabs snap while you're pulling, no worries! Use your fingers or some blunt tweezers to grab the leftover adhesive and keep on pulling.
- Grab one of those battery adhesive tabs and gently pull it down toward the bottom of your iPhone. Slow and steady wins the race here.
- Keep a nice, even tension on the strip as you pull. The goal is to coax it out from between the battery and the rear case—no sudden moves!
Tools Used
Step 43


- Now, let's tackle the other side! Just like before, gently peel away the strip on the opposite side, saving that center strip for the grand finale.
Step 44


- Carefully lift out the center strip—keep an eye on that sneaky speaker flex cable so it doesn’t get caught.
Step 45


Heads up! The last pull tab is hanging out super close to the Face ID hardware. If it gets messed up, only Apple can fix Face ID, so take it slow and steady here.
- Gently peel away and separate the pull tab from the final adhesive strip located at the top edge of the upper battery cell. You've got this!
Step 46


Hold your hand over the battery when pulling the strip—these things can spring out like party poppers. Just don’t press down on the battery, or the adhesive might tear underneath.
Don’t try to pry the battery out like you’re digging for treasure. If it’s stubborn, add a couple more drops of alcohol to loosen things up. Absolutely no stabbing or crushing the battery with your tools.
Watch out for the ribbon cables and the wireless charging coil hiding right underneath the battery—they don’t appreciate rough treatment.
If the adhesive holding the battery decides to play hide and seek, grab some isopropyl alcohol (at least 90%) and drip a little under the battery edge where the sticky strip broke off. Let it work its magic.
Need more ways to set that battery free? Check out the next step for alternative tactics.
- Peel off and take away the last adhesive strip.
- If all four adhesive strips are gone, you can skip the next step.
- Give it about a minute for the rubbing alcohol to loosen up the glue. Then, use the flat end of a spudger to carefully pry up the battery.
Tools Used
Step 47


Thinking about using pry tools to pop out that iPhone battery? Take it slow and gentle—there are ribbon cables and the wireless charging coil chilling right below. A little too much muscle could mess things up.
Warm up the iPhone until the back feels just a bit too toasty for comfort. Seriously though, don’t go overboard with the heat—nobody wants a battery barbecue.
- If any of the sticky strips decided to take a vacation and your battery is still glued to the rear case, grab an iOpener or a trusty hair dryer to warm up the rear case right behind that stubborn battery.
- Once that's done, flip your iPhone back over and sneak a strong piece of string (like dental floss or a thin guitar string) underneath the battery.
- Now, gently saw back and forth with the string along the battery's edges to break up that adhesive. It might take a bit of time since the adhesive likes to hold on tight, but with some patience, you'll get it free. Just be careful not to squish or damage the battery!
- Wrap the ends of the string around a cloth (or throw on some gloves) to keep your fingers safe while you work.
Tools Used
Step 48

- Lift the battery out from the bottom edge and slide it out of your iPhone—easy does it.
- If you spot any leftover alcohol solution inside, grab a lint-free cloth and gently wipe it away, or just let it chill and air dry before popping in your fresh battery.
- Go ahead and reattach the Taptic Engine and speaker first. This keeps the battery sitting just right while you work.
- Before sticking down your new battery, plug in the battery connector to the logic board socket for a quick test fit. This way, you know it's perfectly lined up.
- No adhesive on your new battery? Check out Salvation Repair’s guide for swapping out adhesive strips.
- Once you’ve put everything back together, do a force restart. It’s a handy trick to dodge weird glitches and makes troubleshooting a breeze.
- Stick down the battery, unplug it, and keep reassembling your device. You’re almost there!
Step 49


- Grab your trusty spudger and gently pry apart the three cables connecting the front camera assembly:
- The dot projector.
- The front camera.
- The infrared camera.
Tools Used
Step 50


The camera cables are just lightly stuck to the midframe, so a gentle touch will do the trick!
- Grab your trusty spudger and gently slide its tip between the IR camera cable and the case, starting at the connector. You're just giving the cable a little nudge away from the case.
- Do the same thing for the front camera cable—smooth moves only!
Tools Used
Step 51

- Warm things up a bit to loosen the adhesive holding the front camera assembly in place.
Step 52


- Now, just retrace your steps and put everything back together like a pro! If you hit a bump in the road and need a hand, don't hesitate to schedule a repair.


