
iPhone X Rear Case Replacement
Duration: 45 minutes
Steps: 108 Steps
Follow this guide to carefully remove all the parts from the back case of your iPhone X. You'll learn how to take out the speaker, cables, taptic engine, battery, logic board, and button covers—perfect for swapping out a cracked, dented, or bent rear cover. Heads up: this is the toughest repair you can tackle on an iPhone X without diving into microsoldering, so take your time and stay patient.
Step 1


- Grab a SIM card eject tool or a paperclip, and gently insert it into the tiny hole on the SIM card tray, just next to the side button on your iPhone's edge.
- Give it a firm press, and the tray should pop right out.
Tools Used

Step 2


Heads up: the SIM card tends to pop right out of the tray, so keep a close eye on it!
- Take out the SIM card tray from your iPhone—easy does it!
- When putting the SIM card back in, double-check it's lined up right with the tray to avoid any hiccups.
- That little rubber gasket hugging the SIM tray? It’s the unsung hero keeping water and dust out. If it’s looking worse for wear or missing, swap it out or replace the whole tray to keep your iPhone safe and sound.
Step 3

Heads up! Make sure your iPhone battery is drained below 25% before starting. A charged lithium-ion battery is like a firecracker waiting to happen if poked the wrong way.
Popping open your iPhone’s display will mess with its waterproof seals. Make sure you have replacement seals handy before moving forward, or be extra careful to keep liquids away if you put it back together without swapping them out.
- First, power off your iPhone. We don't want any surprises while you're disassembling it.
- Grab your pentalobe screwdriver and remove the two 6.9 mm screws at the bottom edge. Make sure they come out nice and easy.
- If the screws give you trouble, like they're stripped or damaged, don't worry—just replace them and keep going.
Step 4


Watch out for pushing that pick in too deep—your device doesn’t love surprises. Mark your pick to keep things safe and stress-free.
Feeling extra precise? Mark the other corners with different measurements so you’re always in the know.
Or, for a quick hack, tape a coin 3 mm from the tip of your pick. It’s like a bumper for your tech!
- Grab your opening pick and measure 3 mm from the tip, then make a little mark with a permanent marker. This will help guide your next steps with precision!
Step 5


Safety first! Pop on those safety glasses to keep your eyes safe from any glass bits that might come loose during the repair.
Got a cracked iPhone screen? Keep those shards in check and avoid any accidental ouchies by taping over the glass before you dive into repairs.
If the suction cup just won’t stick, try giving it a little superglue boost to get a better grip on the screen.
- Cover the iPhone’s screen with overlapping strips of clear packing tape until the entire front is snugly wrapped.
- If the suction cup refuses to stick in the upcoming steps, no worries! Fold a sturdy piece of tape (like duct tape) into a little handle and use that to gently lift the screen instead.
Step 6


The next three steps will show you how to use the Anti-Clamp—our handy tool designed to make opening your device a breeze. If you don't have one, no worries! Just skip ahead three steps for an alternative method.
For a detailed walkthrough on using the Anti-Clamp, check out our full guide.
If your iPhone's surface feels a bit too slippery for the Anti-Clamp to grip, just apply a little tape to give it some extra traction.
- Grab the blue handle and pull it back to unlock the Anti-Clamp's arms.
- Slide those arms over either the left or right side of your iPhone.
- Place the suction cups near the bottom edge of the iPhone—one on the front, and one on the back.
- Give the cups a good squeeze together to create suction where you need it.
Step 7


- Slide the blue handle forward to lock those arms in place.
- Rotate the handle clockwise a full 360 degrees or until you feel the suction cups start to stretch.
- Keep an eye on the suction cups — make sure they stay lined up. If they start to drift, just loosen them a bit and realign the arms.
Step 8


Don't twist too much at once—just a quarter turn and then pause for a minute. Let the Anti-Clamp do its magic while you take a breather.
A hair dryer, heat gun, or hot plate can help here—just be gentle with the heat, since too much can mess with your screen or battery.
If your Anti-Clamp isn’t giving you a big enough gap, warm things up a bit more and give the handle a quarter turn.
- Warm up your iOpener and slide it through the arms of the Anti-Clamp. No rush here!
- Fold the iOpener and place it gently on the bottom edge of your iPhone.
- Give it a minute to work its magic and create that sweet little gap we need to get started.
- Carefully slide an opening pick under the screen and plastic bezel (avoid poking at the screen itself!).
- Skip the next three steps. You're good to go!
Tools Used

Step 9

When using a hairdryer or heat gun, keep it cool! Too much heat can cause the screen to lose its cool and end up damaged.
Warming up the lower edge of the iPhone helps loosen the adhesive holding the display, making it much easier to pop open.
- Grab your trusty hairdryer, heat gun, or iOpener, and get ready to work some magic. Apply it to the bottom edge of your iPhone for about a minute. The heat will soften up that stubborn adhesive underneath, making the next step much smoother. Patience is key, but don't worry, you got this!
Tools Used
Step 10


- Stick the suction handle on the bottom edge of your phone—keep it away from the curvy part of the glass.
Tools Used

Step 11


That waterproof adhesive is like the gym bro of screen glue—super strong and stubborn. Getting that first gap might feel like an arm workout, but a little more heat and some gentle rocking action will loosen things up. Once you see daylight, slip your tool in and keep going!
- Gently pull up on the suction cup with steady pressure to create just enough of a gap between the screen and the frame.
- Slip an opening pick into the gap beneath the screen's plastic bezel—avoid the screen itself!
Step 12


Keep your pick to 3mm or less—going deeper might mess with the inner workings of your device. Stay gentle and safe.
- Gently slide the opening pick around the lower left corner and then up along the left edge of the iPhone, carefully cutting through the adhesive that’s keeping the display stuck in place.
Step 13

Watch out! There are some delicate cables tucked along the right edge of your iPhone. Keep your pick away from here – we don’t want to accidentally mess up those wires!
Step 14


Keep your pick insertion under 3 mm to avoid messing up those delicate display cables. Stay sharp and steady!
- Slide your pick back in at the bottom edge of the iPhone, then gently move it up the right side to keep working on separating the adhesive. Smooth and steady wins the race.
Step 15


Be gentle with those clips—they’re not fans of heavy-handed moves. Take your time and keep it chill.
Keep your pick insertion shallow—no deeper than 3 mm—to avoid messing with the front panel sensor array.
The top edge of the display is held in place with a combo of glue and clips—both doing their job to keep things secure.
- Gently slide your opening pick around the top corner of the display while easing the display down toward the Lightning port with a little wiggle or pull.
- Next, glide the pick to the opposite corner and carefully slice through any leftover adhesive holding the display in place.
Step 16

- Grab the tiny nub on the suction cup and give it a little tug to pop it off the front panel.
Step 17


Don't try to separate the display just yet—there are still some delicate ribbon cables holding it to the logic board. Take your time and be gentle.
As shown in the image, make sure the frame comes off with the display so it doesn't get stuck inside the device. A smooth exit is key!
- Start by gently swinging the iPhone display up from the left side, like you’re opening a book. Smooth and easy does it.
- Prop the display up against something sturdy while you work. You want it steady, so you don’t have to worry about it toppling over.
- When putting it all back together, carefully align the clips along the top edge first, and press the top edge into place. Once that's snug, snap the rest of the display down. If it doesn’t click into place right away, check the clips around the edges. They might be bent, so give them a little love and adjust as needed.
Step 18

As you work through this repair, keep an eye on each screw and remember exactly where it came from. This will help you avoid any oops moments when putting everything back together. It’s like a little screw scavenger hunt, but for your iPhone!
- Unscrew five Y000 screws holding down the logic board connector bracket. Here's the lineup:
- Three little 1.1 mm screws
- One slightly longer 3.1 mm screw
- And one 3.7 mm screw, the big boss of the bunch
Step 19

The bracket might be hanging on just a little—give it a gentle but steady lift to set it free.
- Take off the bracket.
- When putting everything back together, this is a perfect moment to power on your iPhone and give all the functions a quick test before sealing the display. Remember to completely power down your iPhone again before continuing with the rest of the reassembly.
Step 20


Be careful not to mess up the black silicone seal around this and other connections on the board. These little guys are the unsung heroes, keeping water and dust at bay to protect your device.
- Take your trusty spudger or a clean fingernail and gently lift the battery connector from its socket on the logic board. No brute force needed—just a little finesse.
- Once it's up, nudge the connector away from the logic board. That way, it won't sneak back into place and power up your phone while you're working your magic.
Tools Used

Step 21


- Gently pop off the front panel sensor assembly connector using the tip of a spudger or your fingernail—think of it like opening a stubborn peanut butter jar lid, but way less sticky.
Tools Used
Step 22


- Gently pop off the OLED panel cable connector using the tip of a spudger or your fingernail. No need to flex those muscles—just a little lift and you’re good.
- When reconnecting, line up the connector and press down one side until you hear a click, then do the same on the other side. Skip pressing the middle! Misaligned connectors can bend pins, and trust me, that’s a headache nobody wants.
Tools Used
Step 23


- Grab your spudger and gently pop the digitizer cable connector up from its socket. No need for brute force—just a little nudge does the trick.
- Reconnecting? This little guy likes to play hard-to-get because it’s tucked in deep. Take a breather, line it up carefully, and use your fingertip to press down—one side, then the other. You’ll feel a satisfying click when it’s locked in.
- If your screen starts acting shy and ignores your touch, disconnect the battery and give the connector another shot. Make sure it clicks in and the socket is dust-free.
Tools Used
Step 24


The front panel sensor assembly flex cable is just lightly stuck in place, so it should come off without any drama.
- Gently lift the cable to break free from the sticky adhesive.
Step 25

- Take off the display assembly. Go slow and steady—no sudden moves!
- When you’re putting things back together, this is the perfect spot to swap out the waterproof adhesive around the edges of the screen.
Step 26


Heads up! Try not to mess with the three rows of grounding pads near the bottom of the iPhone—they’re sensitive little guys.
- Let's get these seven screws out from the bracket underneath the Taptic Engine and speaker:
- Two Y000 1.9 mm screws—tiny but mighty.
- One Y000 1.2 mm screw—blink and you'll miss it.
- One Y000 1.6 mm screw—just the right size.
- One Phillips 2.4 mm screw—biggest of the bunch.
- One Phillips 1.7 mm screw—the middle child.
- One Phillips 1.5 mm screw—the little sibling.
Step 27


- Gently lift the bracket from the side closest to the battery. No need to fully detach it just yet – it's still hanging on by a small flex cable.
Step 28


- Keep the bracket pushed aside and carefully use the tip of a spudger to gently pop up and unplug the flex cable tucked underneath.
Tools Used
Step 29

- Time to take off the bracket. Gently remove it with a steady hand, and you're one step closer to success.
Step 30


- Time to show that 2.1 mm Y000 screw who's boss—remove it to free up the speaker connector cover.
Step 31

- Carefully lift off the speaker connector cover.
Step 32


- Gently use the spudger’s tip to lift and unplug the speaker connector. Take your time—it's a small but important step!
Tools Used
Step 33


When lifting the speaker, watch out for that flex cable you just disconnected—it's hanging out nearby and doesn't want to get squished. Give it a gentle nudge to the side if you need some extra wiggle room.
- Slide a spudger gently under the top edge of the speaker, right near the iPhone's case edge.
- Now, carefully lift the top edge of the speaker – it should come up with minimal effort.
- When you put the speaker back, just double-check the flex cable placement to make sure it doesn't sneak under the speaker.
Tools Used
Step 34


- Grab the speaker by its side edges and gently wiggle it side to side. This will loosen up the adhesive holding it to the bottom edge of the iPhone.
- Now, carefully pull the speaker away from the bottom edge of the iPhone. Keep going until the adhesive gasket gives way and the speaker pops free.
Step 35


- Time to take out the speaker! Give it a gentle lift and set it aside for now.
Step 36


Keep your fingers on the outer edges of the gasket liner—resist the urge to touch that sticky stuff!
- Heads up: the speaker's gasket is a one-time-use part. When putting things back together, make sure to swap it out with a fresh one.
- Grab your tweezers and carefully peel off every bit of the old gasket from both the frame and the speaker.
- Next, use a microfiber cloth soaked in isopropyl alcohol to wipe away any leftover adhesive gunk on the frame and speaker.
- Before you slap on the new gasket, take a moment to line it up right—the big cutout should wrap neatly around the speaker grille mesh at the bottom.
- Peel off the larger, clear liner from the gasket, then use tweezers to gently set the gasket onto the bottom of the speaker.
- Press down firmly with your fingers or a spudger to make sure that adhesive really sticks and the gasket stays put.
- Finally, peel off the remaining liner and pop the speaker back into place, just watch that the connector doesn’t get trapped underneath.

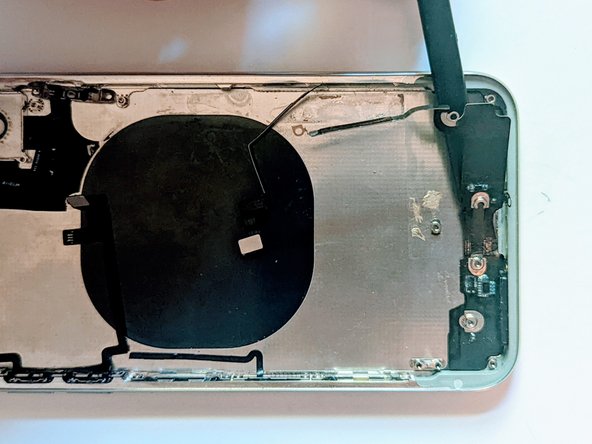
Step 37


- Unscrew the 2.3 mm Phillips screw holding down the Taptic Engine—easy does it!
Step 38


- Grab a spudger and carefully lift the Taptic Engine flex cable out of its socket. Just pry it up gently, and it’ll come free.
Tools Used
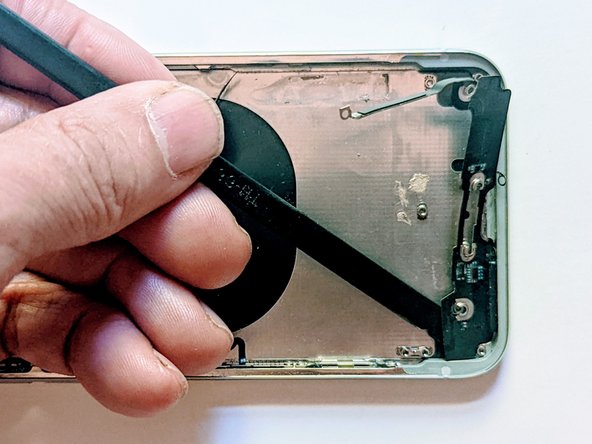
Step 39

- Lift out the Taptic Engine and set it aside like a boss.
Step 40

The iPhone X's battery is stuck to the back case with four pieces of stretch-release adhesive—one holding down the top cell and three keeping the bottom secure.
- Each adhesive strip comes with a black pull-tab at the end, gently sticking to the battery's side edge. Just give it a little tug and you'll be good to go!
Step 41


Be careful not to poke the battery with anything sharp. If it gets punctured, it could leak harmful chemicals or even catch fire. Let's keep things safe and sound!
Each tab features a tiny loop right in the middle; if grabbing the tab feels tricky, just slide a tool through that loop to get a better grip.
- Gently peel away the first battery adhesive tab from the bottom edge of the battery.
Step 42


Heads up! Be careful not to mess up the speaker cable connector right under that center adhesive tab.
- Go ahead and do the same thing for the last two adhesive tabs stuck to the bottom edge of the battery—keep it smooth and steady!
Step 43


If the strips snap, no need to worry! They're not always perfect. Just keep going, and we'll guide you through the next steps to remove those stubborn strips.
Now, grab each tab and gently stretch the adhesive under the battery. This special adhesive is designed to lose its grip as you pull, so it’ll slip right out, making it super easy to lift the battery out without any hassle.
- Want to boost your chances? Here's how:
- If a strip breaks off under the battery and won't come out, no worries! Just move on to the next strip and keep following the steps below.
- Don't squish the battery! Hold the iPhone carefully by its sides.
- Keep those strips nice and flat, no wrinkles allowed while you pull them out.
- Take it slow and steady—give the strip some time to stretch and separate. It should take around 15-30 seconds to remove each one.
- When pulling, aim for a low angle so the strip doesn’t get stuck on the bottom edge of the battery.
Step 44


If any adhesive strips decide to give up and break under the battery, don’t stress! Just remove whatever is left and follow the next steps as usual. You've got this!
The strip can stretch way beyond its original length. Keep pulling, and if needed, grab the strip closer to the battery to keep things moving.
If the battery adhesive tabs snap while pulling, don’t worry! Use your fingers or some blunt tweezers to grab whatever adhesive is left and keep pulling.
- Find one of the outer battery adhesive tabs and gently pull it away from the battery, guiding it toward the bottom of the iPhone.
- Keep a steady pull and maintain constant tension on the strip until it slides out smoothly from between the battery and the rear case.
Tools Used
Step 45


- Now, repeat the process for the opposite side, but save the center strip for last. You'll be done in no time!
Step 46


- Slide out the center strip gently, keeping an eye on that sneaky speaker flex cable so it doesn’t get caught up in the action.
Step 47


Heads up: The last pull tab is hanging out right next to the Face ID hardware. If things go sideways here, only Apple can save Face ID—so take it slow and steady!
- Gently lift and separate the pull tab from the last adhesive strip at the top edge of the upper battery cell. Give it a little wiggle if it’s feeling stubborn!
Step 48


Heads up: when you peel that strip off, the battery might try to take a little leap. Keep your hand hovering just above it to catch any surprise moves—but don’t press down on the battery itself, or you might accidentally snap the adhesive strip stuck underneath.
No need to muscle the battery out! If it’s being stubborn, drop a little more alcohol to loosen things up. And whatever you do, don’t bend or poke the battery with your pry tool—that’s a no-go.
Watch out for those delicate ribbon cables and the wireless charging coil hiding right under the battery. Treat them gently to keep everything happy.
If the adhesive breaks off under the battery and you can't get it back, just drop a few drops of high-concentration (over 90%) isopropyl alcohol under the battery's edge where the adhesive used to be. It’ll help loosen things up.
If you’re still having trouble getting the battery out, don't worry, just keep going to the next step!
- Gently peel off the last adhesive strip – it's almost there!
- If you've already removed all four adhesive strips, feel free to skip this step and move on.
- Let the alcohol solution do its magic for about a minute to loosen up the adhesive. Then, using the flat end of a spudger, carefully lift the battery out.
Tools Used
Step 49


If you're using pry tools to gently lift the battery out of the iPhone, proceed with care – you don’t want to accidentally nick any delicate cables or the wireless charging coil right under the battery.
Warm up the iPhone just enough until the back case is almost too hot to touch. Don't go overboard with the heat, or you might end up with a situation you didn’t want – like a battery that’s a little too fired up.
- If the adhesive strips snapped and the battery is still holding on for dear life, grab an iOpener or fire up a hair dryer to warm up the rear case right behind the battery.
- Flip your iPhone back so it’s screen-side up, and slide a sturdy piece of string (dental floss or some thin guitar string works wonders) underneath the battery.
- Work the string back and forth in a gentle sawing motion along the length of the battery. The adhesive can be stubborn, so take your time. Patience wins! Just don’t bend or poke the battery.
- Wrap the ends of the string around a cloth or pop on some gloves to save your fingers from the workout.
Tools Used
Step 50

- Grab the battery by its bottom edge and lift it out of the iPhone.
- If there's any leftover alcohol solution inside the phone, gently wipe it off or let it air dry before popping in your new battery.
- Before installing the new battery, reattach the Taptic Engine and speaker. This will help keep the battery in place during installation.
- Before sticking the new battery down, plug it back into the logic board socket just to make sure it fits snugly in place.
- If your new battery doesn’t have adhesive already, no worries! Follow our guide to swap out the adhesive strips.
- After putting everything back together, do a force restart. It can prevent common issues and save you time troubleshooting later on.
- Stick the battery in, unplug it for now, and finish putting your device back together.
Step 51


- Grab the flat end of your trusty spudger and gently unplug the trio of front camera assembly cables:
- First up, the dot projector.
- Next, the front camera.
- And finally, the infrared camera.
Tools Used
Step 52


The camera cables are gently stuck to the midframe. Nothing too crazy, but just a little bit of adhesive keeping them in place. Be careful when detaching!
- Grab your spudger and carefully slide its tip between the IR camera cable and the case, starting at the connector. This will help you gently separate the cable from the case.
- Now, do the same for the front camera cable. A little patience goes a long way here!
Tools Used
Step 53

- Warm things up a bit to loosen the adhesive around the front camera assembly. A little heat goes a long way!
Step 54


- Gently detach the front camera assembly and set it aside. We're almost there!
Step 55

- Carefully unplug the following cable connectors to get things moving:
- The WiFi Antenna connector.
- The Wide-Angle Camera connector.
- The Power Button / Flash / Microphone connector.
- The Telephoto Camera connector.
- The Dock Flex connector.
- The Button / Wireless Charging connector.
- The Cellular Antenna connector.
Step 56


- Gently unplug the WiFi antenna cable connector to keep things cool and connected.
Step 57

- Gently unplug the Wide-Angle Camera cable connector to keep things safe and sound.
Step 58


- Unplug the cable connector for the Power Button, Flash, and Microphone—just a gentle lift and it's out!
Step 59


- Gently unplug the Telephoto Camera cable connector to keep things moving smoothly.
Step 60


- Unplug the Dock Flex cable connector with care.
- Give that cable a little bend, about 90 degrees straight up, to create some space for removing the logic board. You've got this!
Step 61


- Gently unplug the Button / Wireless Charging cable connector—like you’re disconnecting from a group chat that’s gone off the rails.
Step 62


- Time to give the Cellular Antenna cable a little freedom – disconnect that connector!
- Gently bend the cable out of the way so it doesn’t get in the way of your next move.
Step 63


Make sure to snap that metal grounding tab back in just the right way—it’s like a tiny handshake that needs to be perfect!
- You can't take out the logic board with the SIM card tray still hanging out. If you missed it earlier, now's the time to pop it out.
- Unscrew the two Phillips screws holding things down.
- Next, remove the 2.0 mm Phillips screw that grounds the board.
- Pull off that grounding tab.
- Take out the single 2.7 mm Phillips screw.
- Then remove the 2.1 mm Phillips screw.
Step 64

- When you pop out the SIM card, a little pin comes along for the ride, sliding out from the frame and giving the eject lever a push in the SIM card carrier. Don’t forget, that pin needs to be slid back into its frame so it doesn’t block your way when you're ready to remove the logic board. Keep it neat and tidy!
Step 65


- Grab a pair of fine-tip tweezers and gently slide the SIM card eject lever to the side of the case.
- Once you’ve slid it over, the eject lever should look like this. The pin will no longer block the removal of the logic board.
Tools Used
Step 66


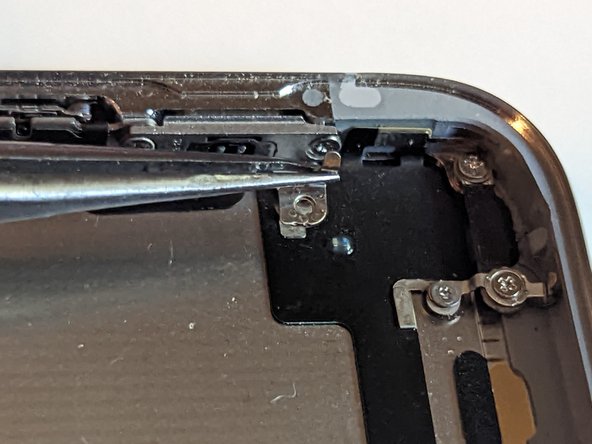
- The logic board assembly sits on two posts that poke through the lower board and lock into the upper board. To take it out, lift it straight up evenly so you easily clear the stand-offs without any drama.
Step 67

- First, grab your trusty screwdriver and unscrew the two Phillips screws holding the camera bracket in place. Here’s the scoop on the screw sizes you'll need:
- One screw is 2.3 mm long
- The other one is a little smaller, 2.0 mm
Step 68


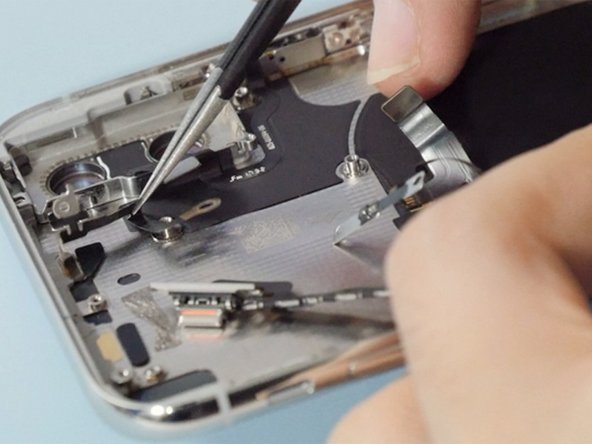
- Grab your tweezers and carefully fold that tiny metal grounding bracket out of the way. Heads up: don’t yank it up since it’s attached to a delicate flex cable—handle with care!
Tools Used
Step 69


- Gently lift the camera bracket from the side nearest the battery and take it out.
- When you're ready to pop that camera bracket back in, it's all about reversing the steps: start by aligning the outside edge and sliding the tab on the right side into the gap between the phone's case and the camera module. Then, simply swing the bracket down over the camera like a pro.
Step 70


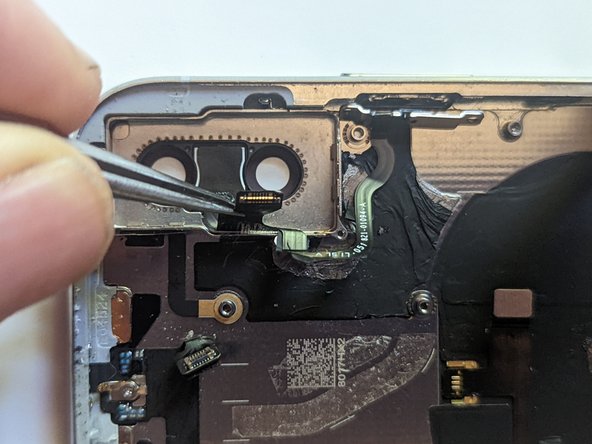
- Grab an opening tool or your trusty fingernail and gently pry the two camera connectors straight up to unplug them from their sockets.
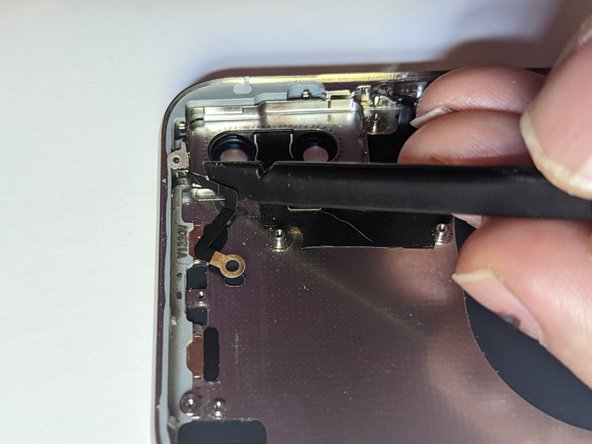
Step 71


- Place the tip of a spudger into the tiny notch at the bottom right corner of the camera module.
- Carefully pry upward to pop the camera out of the iPhone without causing any harm.
Tools Used
Step 72

- Carefully pop out the rear-facing camera module.
Step 73


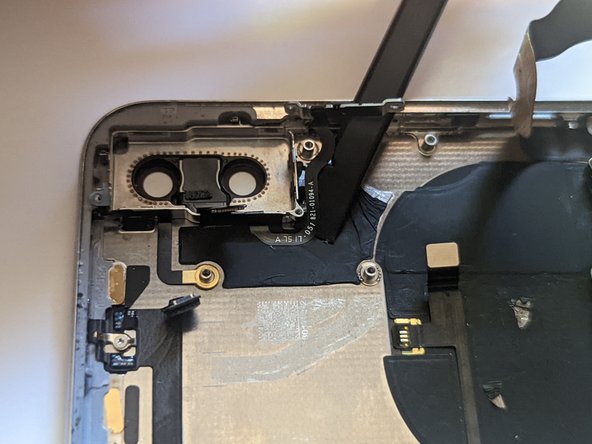
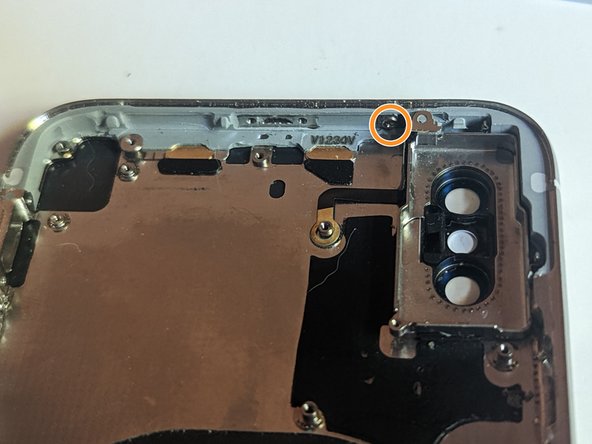
- Take out the 1.2 mm Y000 screw holding the cellular antenna cable to the screen retainer.
- Gently bend the antenna cable away from the case side so you can reach the screws that keep the retainer attached to the case.
Step 74


- Unscrew the three 1.5 mm Phillips screws that are keeping the screen retainer in place. Don’t let them roll away—you’ll need them later.
- Lift off the retainer like you’re opening a treasure chest. Onward to the next step!
Step 75


- Unscrew the 2.3 mm stand-off screw that's keeping the barometric vent in place.
- Lift off the barometric vent and set it aside.
If you're in a jam, a small flathead screwdriver will do the trick. Just be careful—make sure it doesn't slip and accidentally mess with anything around it!
To remove those standoff screws like a pro, grab a standoff screwdriver or bit. It's the best tool for the job and will make the process smooth and easy. If you're stuck, no worries—just schedule a repair and we’ve got your back.
Step 76


- Take out those two 2.6 mm stand-off screws that are keeping the Lightning connector anchored to the back of the case.
- Next, remove the pair of 2.9 mm Phillips screws that are locking the charging port into the bottom of the case.
Step 77


- Warm up the adhesive that's holding the flex cable to the case. You can use a hot air gun, a hair dryer, or heat the back of the case with an iOpener – whatever works best for you!
- Use a spudger to gently lift the dock connector cable – it's like peeling back a sticker, but way more satisfying!
Step 78


- Keep gently lifting the dock connector up – you’re doing great!
Step 79


- Carefully unplug the dock connector to set it free.
Step 80


Once you’ve taken out the Lightning connector, the interconnect cable is just sticking around thanks to some adhesive—time to gently peel it off!
- Warm up the adhesive holding the flex cable to the case by gently heating it with a hot air gun or a hair dryer, or try warming the back of the case using an iOpener to make removal a breeze.
Tools Used

Step 82


- Gently unplug the interconnect cable to keep things moving smoothly.
Step 83


- Lift up the end of the dock connector to open up space for the power button and screen holder.
- Gently fold the dock connector upward and keep it out of your way.
Step 84


- Unscrew the two screws holding down that screen clip—time to free it up!
- Gently lift off the screen retainer and set it aside.
- One screw is a 2.1 mm Phillips, the other is 1.9 mm Phillips—keep track so they don’t wander off.
- When putting the retainer back, make sure to slide it behind the black plastic piece opposite the power button—smooth moves here!
Step 85

- Unscrew the last 2.0 mm Phillips screw that's holding the power button in place. Nice and easy, just a simple twist, and you're on your way!
Step 86

- Gently peel the flex cable away from the frame. Take it slow, and it should come off smoothly without any issues!
Step 87


- Grab your trusty spudger and gently nudge out the flash and microphone. You're doing great!
- Now, it's time to remove the entire assembly. Keep up the awesome work!
Tools Used
Step 88


- Take out the 1.4 mm Phillips screw that’s keeping the grounding tab in place.
- Carefully remove the grounding tab.
- Remember how the tab is positioned – it's important to put it back the same way during reassembly. A little attention to detail goes a long way!
Step 89

- Time to remove the six screws holding the buttons in place.
- Two screws are 1.5 mm Phillips—tiny but mighty!
- Two are 1.9 mm Phillips—slightly beefier.
- One is a 2.4 mm Phillips—the heavyweight champ.
- And one is a 1.7 mm Phillips—just right.
- Keep your screws organized for a smooth reassembly!
Step 90


- Flip off the ring/silent switch located on the side of the case.
- Gently use a spudger to lift the flex cable away from the bottom of the case.
Tools Used
Step 91

If you want to reuse the button or charging coil assembly, handle this cable with the utmost care. It’s super thin and delicate, so take it slow and easy to avoid any damage. Keep stress on the cable to an absolute minimum!
- Warm up the case using an iOpener or heat the cable with a hot air gun or hair dryer to loosen the adhesive, making it a breeze to remove.
- Gently peel off the button cable.
- Use tweezers to hold the cable steady while carefully sliding a spudger between the cable and the case to lift it out.
Step 92


- Warm up the back of your phone using an iOpener, or use a hot air gun or hair dryer to gently heat the coil. This will help soften the adhesive and make it easier to remove.
- Carefully peel off the wireless charging coil once it's loosened up.
Tools Used
Step 93


- Lift out the assembly and set it aside like a pro.
Step 94

Check out the iPhone X Power and Audio Exterior Buttons guide for a smooth step-by-step on how to carefully remove the exterior switch from the button assembly.
- When swapping out the button assembly, don't forget to move the ring/silent switch from the old one to the new. It's a quick switcheroo that keeps your device running smoothly!
Step 95

- Let's kick things off by unscrewing the 1.4 mm Phillips screw that's keeping the first grounding tab in place. You got this!
- Now, gently remove that grounding tab like a pro.
- Take a quick moment to remember how that tab was oriented so you can pop it back in just right when it's time for reassembly. You've got this!
Step 96

- Unscrew the four 1.5 mm Phillips screws. Take your time – they’re small but not too tricky!
Step 97


Keep an eye on how those tabs are facing, and make sure to slide them back in just right when putting everything back together. You've got this!
- Grab your Y000 screwdriver and remove those two 1.1 mm screws. It's quick, don't sweat it!
- Now, gently remove the two grounding tabs. Nothing too tricky here, just a little finesse!


Step 99


- Gently detach the WiFi antenna from its connection. You've got this!
Step 100

- Take out the 2.3 mm Phillips screw that's holding the antenna onto the rear camera frame. Just a quick twist and it's out!
- Now, unscrew the 1.5 mm Phillips screw that's keeping the antenna attached to the case. Another easy spin and you're golden.
Step 101

- Gently lift the cable end off the post at the back of the case.
- Carefully peel the cable away from the rear camera housing using a spudger.
- Take out the Bluetooth antenna with a steady hand.
Tools Used
Step 102


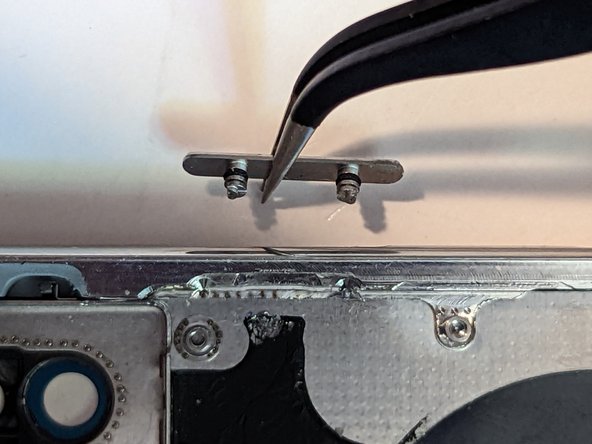
- Unscrew the four 1.5 mm Phillips screws hanging onto the two screen retainer clips on the left side. Let’s set those little guys free!
- Slide out the two retainers and give yourself a high five—one step closer to victory.
Step 103


When putting things back together, make sure the orange stripe hangs out on top—just like you see here.
- Give that switch a little nudge to the left.
- With your trusty fine tip tweezers, grab the upper arm of the switch and slide it down to free it from its cozy retainer.
- Now, gently lift the end and slide it out from the other side like a pro.
Tools Used
Step 104


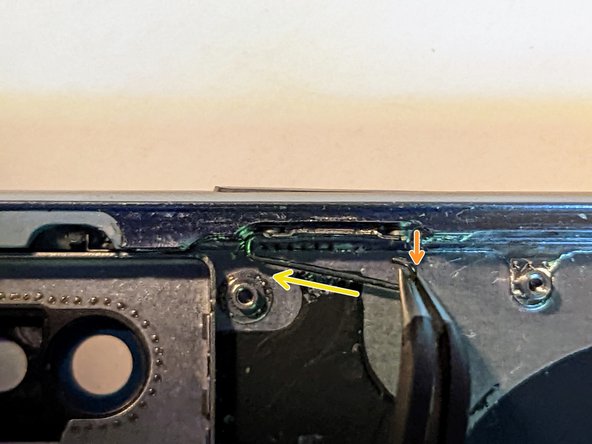
Before diving in and trying to pop these buttons out, take a moment to watch the video linked in the introduction. These buttons are a bit sneaky and can test your patience, so pay close attention and follow the instructions as closely as possible.
When you're pulling off the spring clips and retainers, it helps to keep a finger on the outside of the button to push it as far inside the frame as you can. This little trick makes the whole process smoother.
- Lift that spring clip straight up—give it a solid 90-degree salute!
Step 105

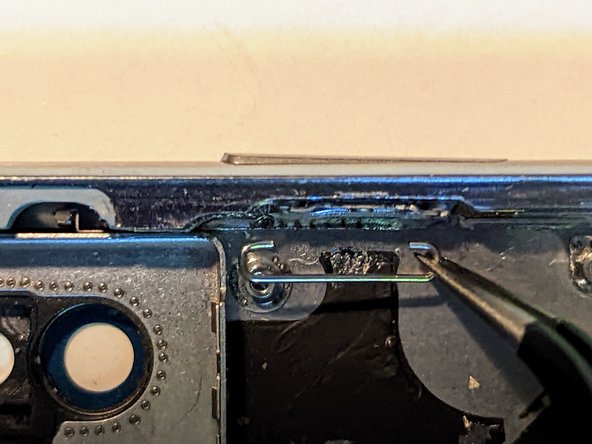
- Grab one end of the spring clip with tweezers—channel your inner claw machine champ.
- Give the clip a confident tug until it pops free from the button. No hesitation!
- Swing the clip out a bit like you’re opening a tiny door.
- Now, slide the clip the other way to release the opposite end.
- Lift out the spring clip and set it aside for its well-deserved break.
- Do the same for the volume up and down buttons. You’ve got this!
Tools Used
Step 106

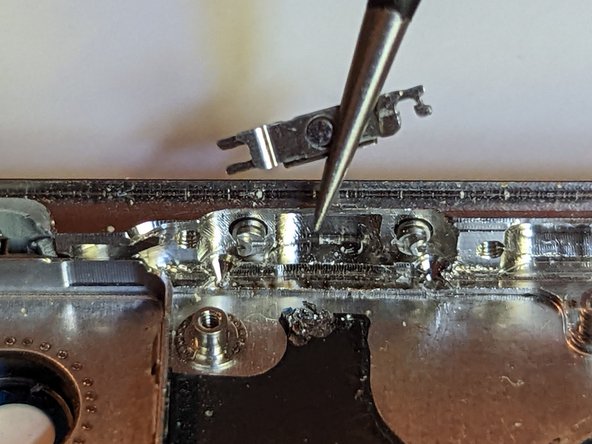
- Lift the right side of the retainer up around 20 degrees. No rush, just a nice little tilt.
- Gently pull the retainer away from the button—straight out, nice and easy.
- Repeat the process as needed. It’s like the reset button for your retainer.
- When you’re putting things back together, ensure the retainer is seated all the way down. The bottom gap should be nice and even, stretching evenly across the length of the button.
Step 107


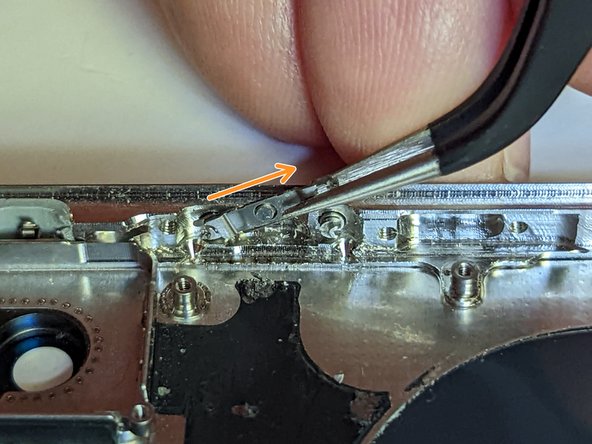
- If you're struggling to grab the button from the outside of the case, no worries—just push the pins out from the inside.
- Carefully remove the button.
- Repeat the process for the remaining buttons.
- Before jumping into reassembling the buttons, take a moment to watch the video again. If disassembling them was a challenge, reassembly might test your patience—but don't worry! Take it slow, stay focused, and soon enough, they'll fit right back in place.
Step 108

- To put your device back together, just follow these steps in reverse — you’ve got this! And if things get tricky, remember, you can always schedule a repair with us.


