
iPhone X Teardown
Duration: 45 minutes
Steps: 24 Steps
Can you believe it? A decade ago, Apple kicked off the smartphone revolution with the first iPhone. Fast forward to today, and we're diving into the iPhone X, the 18th edition of this iconic line. With its sleek, rounded edges and that stunning edge-to-edge display, it feels like the iPhone that Steve Jobs dreamed of ages ago. But now that this vision is a reality, will it leave a mark as significant as its predecessor? Only time will tell! For now, let's roll up our sleeves and explore what makes this device so special. A special shoutout to Circuitwise for hosting our teardown adventure in Sydney, and to Creative Electron for those cool X-ray images, plus TechInsights for the IC ID goodies. Speaking of Sydney, we're thrilled to have an Australia store! Keep an eye on our Facebook, Instagram, and Twitter for updates as we discover more. And if you're more into emails, don't forget to check out our newsletter!
Step 1


- The iPhone X has arrived! Let's take a peek at what's packed inside this sleek glass sandwich:
- A powerful A11 'Bionic' chip complete with a neural engine and an embedded M11 motion coprocessor.
- A stunning 5.8-inch 'all-screen' OLED multitouch Super Retina HD display boasting a resolution of 2436 × 1125 pixels (458 ppi).
- Dual 12 MP cameras (wide-angle and telephoto) featuring ƒ/1.8 and ƒ/2.4 apertures with optical image stabilization for those picture-perfect moments.
- A 7 MP TrueDepth camera with a ƒ/2.2 aperture, 1080p HD video recording, and Face ID to keep things secure.
- Support for speedy fast charging and Qi wireless charging to keep you powered up.
- Our A1865 global unit is packed with extensive cellular band support, plus 802.11a/b/g/n/ac Wi‑Fi with MIMO, Bluetooth 5.0, and NFC for all your connectivity needs.
Step 2
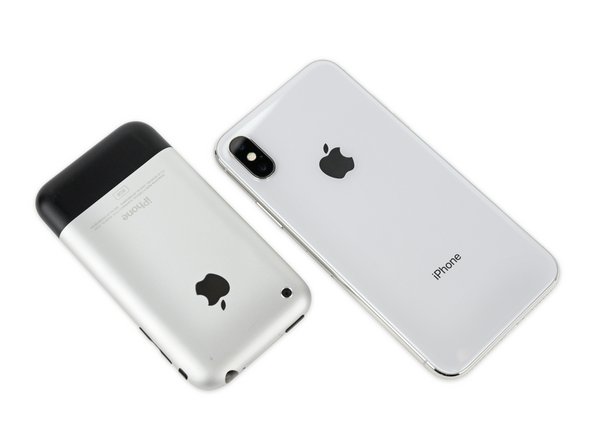


Well, except for that camera bump, the shiny stainless steel edge, the glass back, and the Lightning connector, of course.
- The iPhone has evolved a lot over the past decade—so much so that its design has come full circle, making this model look more like the original than we've seen in quite a while.
- Just like with the iPhone 8 earlier this year, Apple has removed the cluttered (and eco-friendly) regulatory markings from the back of the iPhone X.
- Jony finally got the smooth, clean back he’s always wanted. Fingers crossed these phones find their way to recyclers and don’t end up in the trash.
Step 3
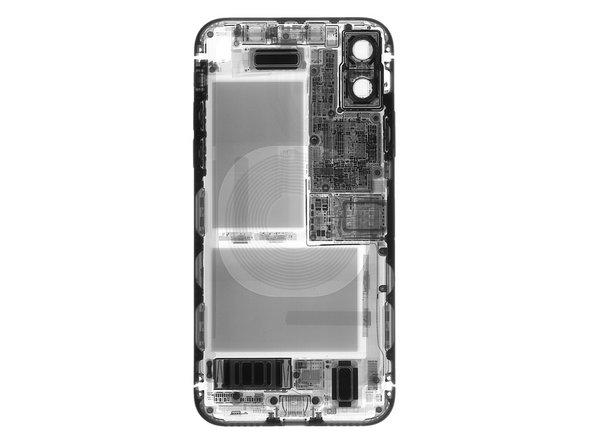


- Before jumping right in, let's take a quick peek with some 10-ray X-ray recon courtesy of Creative Electron.
- Here's what the scan revealed:
- Not just one, but two battery cells—definitely a first for an iPhone!
- A super-compact logic board footprint. Judging by the solder points, it seems like there are two layers stacked up.
- To fit extra front-facing sensors, the earpiece speaker has been moved down quite a bit.
- There's a curious chip tucked between the Taptic Engine and lower speaker—we’re eager to find out what it’s all about!
Step 4


- Check out this pentalobe screw—it’s got a quirky, unfinished vibe. Those bottom screws? More like pins just hanging out.
- The good news: the rest of the scene hasn’t changed much. Our usual crew—iOpener, Sclack, and Opening Picks—still get the job done.
- This screw is a multitasker: it shifts its threads from the display to the steel frame, and the unthreaded part stretches out into a comically long pin.
- We’re guessing this gives the display some wiggle room, and lets the mounting bracket scoot further inside. That opens up space for a beefier Lightning connector.
- No big shake-ups in resistance here. The OLED display stays well-supported by the frame—unlike some other screens we could name.


Step 5

We're getting the vibe that Apple isn't thrilled about us poking around in here.
- Sideways-opening iPhones are officially a thing now. Apple first pulled this move with the 7 Plus, and it seems like it’s here to stay.
- This bracket is multitasking hard—it covers every logic board connector in sight. That’s some serious connector crowding.
- And, of course, the tri-point screws are back, guarding the next round of repairs after you’ve tackled those pentalobe screws at the entrance.
Step 6


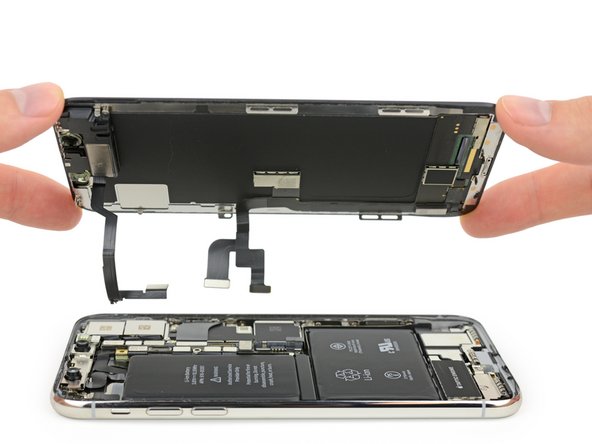
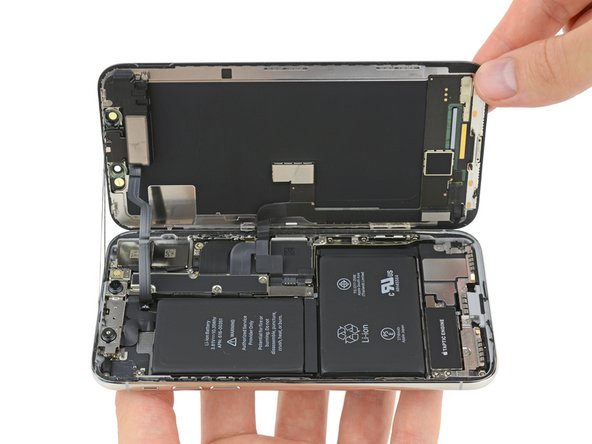
- Once we've liberated that hefty unibracket from the logic board, it's time to sneak a peek at the impressive hardware that makes Cupertino's latest flagship tick.
- We'll dive deeper into the display hardware later, but for now, let's take a moment to appreciate our X-ray vision—surprise! That elusive chip is snugly attached to the display!
- This body shot backs up our X-ray findings: the spacious dual-cell battery is taking up most of the room, while the logic board has undergone a major shrink session.
- In a delightful twist, the display pops off effortlessly, leaving the front-facing camera behind like a forgotten souvenir.
Step 7


- The dual rear camera comes equipped with a sturdy bracket—think of it as a bodyguard making sure those sensitive parts don’t get bent out of shape.
- Foam adhesive acts like a snug seatbelt, keeping the cameras locked in place so Portrait Mode and all those cool features stay sharp.
- Check out the tiny spot welds around the camera bump cover glass. They’re there to keep the walls of the camera bump firmly attached to the case.
Step 8


- Let's get this dense logic board out and take a closer look at what we've got.
- This little board is a master of space efficiency. The sheer number of connectors and components packed in here is mind-blowing. For reference, even an Apple Watch's bare board weighs in at more than this one, ounce for ounce.
- The iPhone X's compact logic board manages to cram in more tech while making the iPhone 8 Plus board next to it look like a giant by comparison.
- If you compare the size of the two boards, the iPhone X's board is about 70% of the size of the iPhone 8 Plus board. That’s a lot more room left over for the battery.
Step 9


The cool thing about this design is how sleek it is, but it does make those tricky board-level repairs a bit more of a puzzle.
- Apple found a way to pack even more tech into 70% of the space—yep, they folded the board in half. Genius, right?
- The two halves are soldered together, so we needed a little extra help from our trusty BGA hot air rework station to carefully separate them.
- The iPhone X logic board is the first double-stacked one we've seen in an iPhone since the very first model (check out the third photo).
- Once we got the pieces apart, we measured all the separate layers and added them up to 135% of the area of the iPhone 8 Plus logic board. Apple really knows how to make more fit into less!
Step 10


- First up, let's dive into the techy goodness: we've got the Apple APL1W72 A11 Bionic SoC chilling over some high-performance SK hynix H9HKNNNDBMAUUR 3 GB LPDDR4X RAM. It's a powerhouse, no doubt.
- Next, it's time to give the Apple 338S00341-B1 power management IC a quick look. This guy handles your device's power flow, so keep it in check.
- Now, the Texas Instruments SN2501 battery charger steps in. It keeps your juice flowing smoothly, ensuring you stay charged up.
- You'll also find the NXP Semiconductor CBTL1612A1 here, which is likely just an updated version of the 1610 tristar IC. Think of it as the traffic cop of your device's connections.
- The Apple 338S00248 audio codec is next. This one's all about sound—making sure your device sounds as crisp and clear as possible.
- Another power player: the STMicroelectronics STB600B0 power management IC. It makes sure everything stays powered up without a hitch.
- And finally, the Apple 338S00306 power management IC wraps up the first half, ensuring your device's power is well-managed throughout.
Step 11


- Pop open that Apple/Murata USI 170821 339S00397 WiFi/Bluetooth module—you know, the chip responsible for all your wireless wizardry. Just don’t lose it in the couch cushions.
- Say hello to the Qualcomm WTR5975 gigabit LTE transceiver! This little guy keeps your data zooming along. It’s not much to look at, but it sure works hard.
- Time to meet the modem squad: Qualcomm MDM9655 Snapdragon X16 LTE modem and its trusty PMD9655 PMIC sidekick. But here’s the twist—Apple likes to mix it up! Some models (like the A1901) rock an Intel XMM7480 (PMB9948) instead. Even though the Qualcomm modem could hit Gigabit speeds, Apple keeps it chill. No turbo mode here.
- Get ready for some amplifier action: Skyworks SKY78140-22 and SKY77366-17 power amplifiers, plus S770 6662, 3760 5418, and 1736. These chips make sure your phone’s signal stays strong, even if you’re hiding in a pillow fort.
- Bring on the Broadcom BCM59355 wireless charging controller. This chip makes charging cable-free and easy—like magic, but with science.
- Check out the NXP 80V18 PN80V NFC controller module. It’s how your phone pays for coffee and trades playlists with a tap.
- Last but not least, the Broadcom AFEM-8072 MMMB power amplifier module—boosting your signal like it’s training for a marathon.
Step 12

- Now, let's take a look at the fantastic components located on the exterior of our logic board sandwich:
- Toshiba TSB3234X68354TWNA1 64 GB flash memory, ready to store all your important data!
- Apple/Cirrus Logic 338S00296 audio amplifier, bringing the beats to your device!
- Bosch Sensortec BMP282 pressure sensor, keeping tabs on the atmosphere around you!
- Bosch Sensortec gyroscope/accelerometer, making sure your device stays balanced and steady!
Step 13


- IC Identification, continued:
- Cypress Semiconductor CYPD2104 USB type-C port controller – this little guy’s the brain behind your USB-C port. It’s the one making sure all your devices communicate smoothly.
- Texas Instruments SN61280E Li-ion DC-DC converter – responsible for efficiently transferring power, it’s the hero behind the scenes keeping your device’s battery running smoothly.
- Apple/Cirrus Logic 338S00296 audio amplifier – this one’s all about getting that sweet sound out of your device. If your audio’s been a little off, this might be the culprit.
- ON Semiconductor DC-DC converter – another power wizard! It ensures your device gets the power it needs, transforming it like magic to fit what’s required.
- SiTime MEMS oscillator – the rhythm keeper of your device! It keeps everything in sync so your system runs like a well-oiled machine.
Step 14


Check out this clever third spacer PCB hugging the perimeter. Instead of wrestling with a tricky flex cable, all the data zips through a bunch of through-hole vias—super neat and efficient!
- Alright, Apple went ahead and made a PCB sandwich—sounds tasty, right? But what's the secret sauce behind how it actually works?
- Right at the heart of the main board, you’ll find the A11 SoC snug as a bug. The X-ray images give you a cool peek at the board’s 3D setup. Around the edges, those little cylinder holes packed with solder are the connectors holding the two boards together.
Step 15
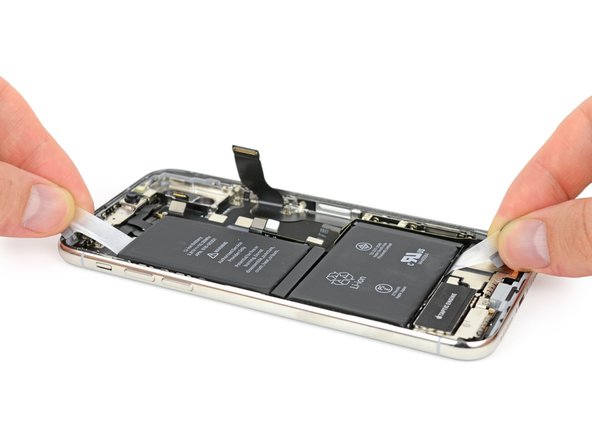


The pull-tabs are stuck to the sides of the cells instead of being folded over the top, so this might take a bit more finesse than your usual repair. No worries, though—take it slow and steady!
- The new dual-celled battery comes with four pull-tabs, similar to the ones we saw in the 8 series, but with a new twist in their orientation.
- This phone packs a 10.35 Wh (2716 mAh at 3.81 V) battery, slightly edging out the 8 Plus's 10.28 Wh, but still trailing behind the hefty 12.71 Wh battery of the Galaxy Note8.
- The dual-cell design is all about making the most of the space available. With two cells, there's more freedom to get creative with the shape and placement, maximizing every inch left by the compact logic board.
Step 16
- Remember that Face ID feature? Before diving into the teardown, we gave it a quick test. Our IR-equipped video camera isn’t quite fast enough to catch the dot pattern, but the illumination is visible and looking good!
- A little history lesson: way back, Microsoft rolled out the Kinect, which used a cool infrared dot matrix sensor developed by Israeli company PrimeSense.
- Apple snapped up PrimeSense for a neat $360 million in 2013 and has since poured hundreds of millions more into bringing this tech to life.
- Meanwhile, Microsoft had to hustle to create a new sensor system for Kinect 2. Now that the iPhone sports a depth sensor, who knows—maybe drones will get in on the action too!
Step 17


- Let’s check out the top of the phone where the mini Kinect TrueDepth camera system lives! This clever setup uses a bunch of sensors to make facial recognition happen on the X.
- First up: the flood illuminator hidden in the display shines infrared (IR) light right onto your face.
- Next, the front-facing camera (highlighted in red) makes sure there’s actually a face there.
- Then, the IR dot projector on the far right throws a pattern of dots across your face to build a 3D map.
- Finally, the IR camera on the left reads that map and sends the info to the phone.
- Behind the scenes, the X’s speedy software combines all this data to figure out if it’s really you or your sneaky twin.
Step 18


- We're almost there! Let's breeze through the last few components in the rear case.
- First up, we've got a tiny bracket, complete with spring connectors and those little EMI grounding fingers. There's a ribbon cable glued to the back too, so be gentle.
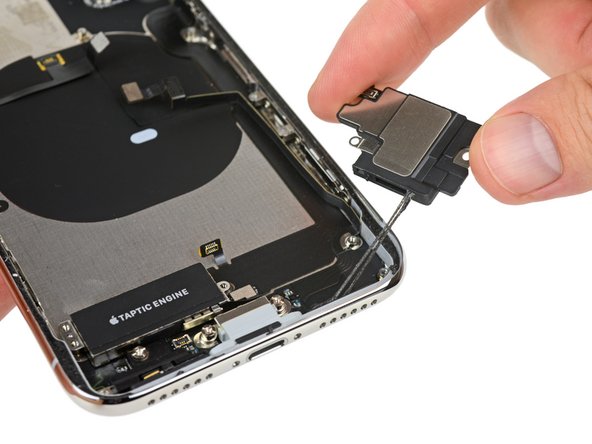
- Next, we'll tackle the lower speaker enclosure, which is all snug with waterproof adhesive around the port. It’s a bit gooey, but don’t worry, it’s all part of the fun!
- Finally, we'll release the Taptic Engine and that iconic barometric vent. Apple's Taptic Engine is just a fancy term for a linear oscillator vibration motor, but it gets the job done, so no complaints here!
Step 19

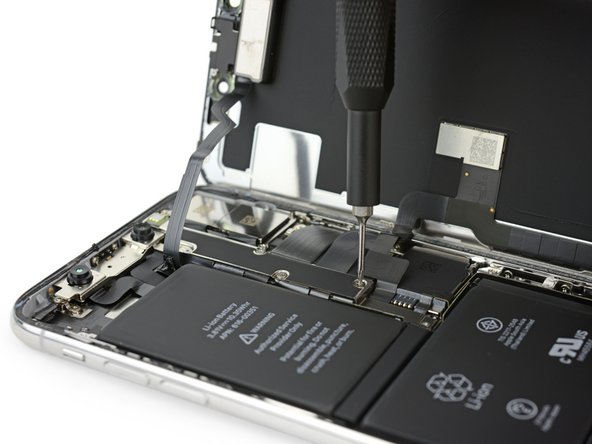
- Our teardown engineer uses the dual tweezer technique to gently remove the Lightning connector—precision at its best.
- Good news for anyone tired of dealing with a loose charging cable: the Lightning connector is now sturdier, with a wider bracket that screws into the frame's sidewall.
- Plus, it's designed with through holes for the pentalobe screws to pass through and secure the display, just like we saw earlier.
Step 20
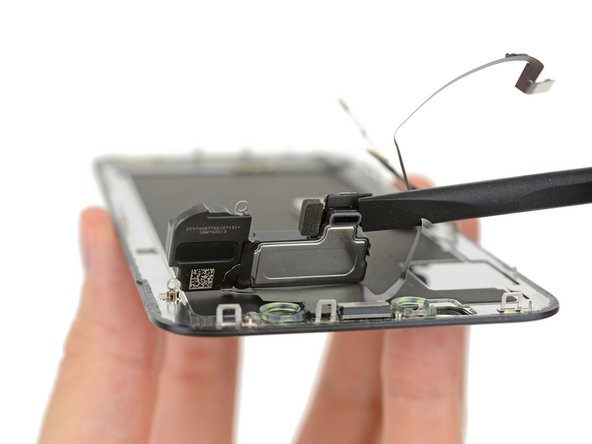


- Alright, with everything else taken apart, let's check out the display. First up: the earpiece speaker, sporting a fresh new sound duct that channels audio right through the screen. Pretty slick.
- Next, carefully lift out the upper display module—this thing is packed! You've got a loudspeaker, microphone, ambient light sensor, flood illuminator, and proximity sensor all crammed together in one neat bundle.
- Once you've removed all the bits and pieces, what’s left is a bare-bones display, ready for whatever comes next.
Step 21


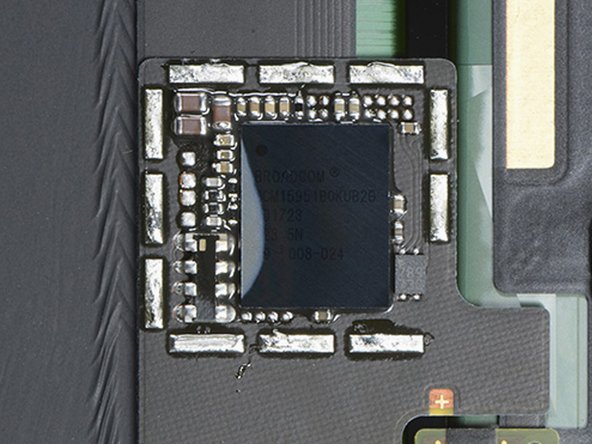
- Let's dive into that mysterious chip! Thanks to some awesome tech insights, we’ll take a sneak peek under the shields on the back of the display and discover:
- A Broadcom touch screen controller, tagged as BCM15951B0KUB2G.
- Also making an appearance is a fresh STMicro device that’s new to us, an OLED PMIC marked 10 THADT733 X-139U.
Step 22
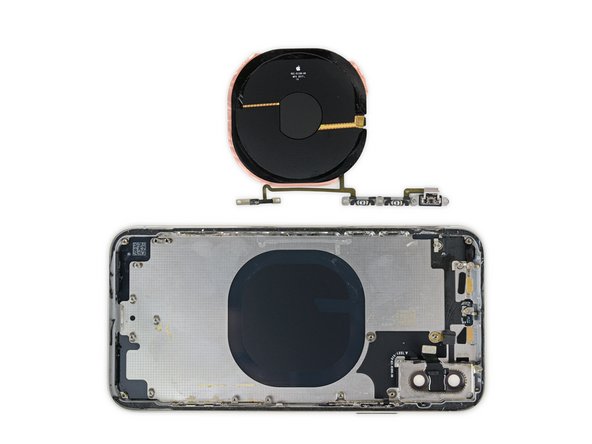
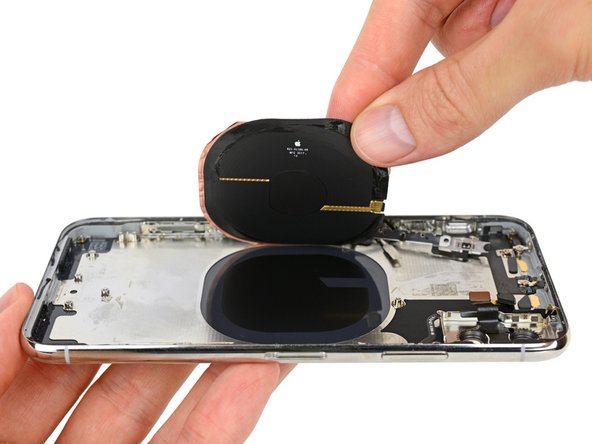
- As we dive into the heart of the device, we uncover a familiar component in this intricate masterpiece: the wireless charging coil.
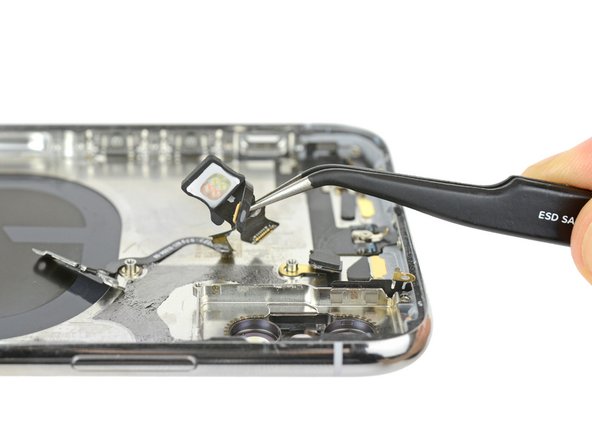
- Next, we carefully remove the multi-function cable from the top of the phone. This little assembly houses the quad-LED True Tone flash and the power button, reminiscent of the good old iPhones.
- Oh, and let's not forget everything connected to it, including the volume buttons, the ring/silent switch, and an intriguing sensor bracket.
Step 23


We're going for a camera bump-ectomy to keep that glass panel looking sharp! If you're dealing with a broken panel, well, let's just say your options are a bit limited—and you'll have quite the adventure trying to scrape out those pesky glass shards that are glued down tight.
- Bonus round: So, you’ve gone and cracked the rear glass on your shiny new iPhone X. What now?
- After a generous dose of heat, we swapped out the spudger for the trusty Jimmy. Just like the iPhone 8 and 8 Plus, the X’s back glass is seriously glued down.
- Here’s where things get interesting: Unlike the iPhone 8’s single-piece rear, the X’s camera bump actually sits on top of the rear glass and is welded tight to the metal frame underneath.
- Basically, you’ve got two options in this classic hand-in-cookie-jar scenario: either take off the camera bump (tricky), or go for the glass (messy). Pick your adventure.


Step 24

Curious about what’s lurking inside your phone, but not ready to crack it open? Take a peek at our HD see-through and X-ray iPhone X wallpapers—they give you that insider look without any tools, stress, or mess.
- Thanks for joining us on this 22-step teardown feast—it was quite the brain food!
- If you missed the iPhone 8 or iPhone 8 Plus teardowns, feel free to peek at those for some handy comparisons. You can also browse our Smartphone Repairability scores from previous devices.
- A big shoutout to our awesome contributors, Circuitwise, Creative Electron, and TechInsights!


