iPhone XS Rear-Facing Cameras Replacement
Duration: 45 minutes
Steps: 28 Steps
Ready to tackle the challenge of replacing the rear cameras in your iPhone XS? You've got this! The rear camera assembly is made up of two snazzy modules: a wide-angle camera and a telephoto camera, and they come as a dynamic duo—replaced together! Good news: the iPhone XS and XS Max share the same camera, so you can mix and match without a hitch. Just a heads up: this guide suggests you detach the display cables and remove the display assembly for easier access to those rear cameras. But if you're feeling bold, you can totally swap them out while keeping the display cables connected. Advanced DIYers can skip the display disconnect to save some extra time, as long as you support the display properly and keep those cables safe. If things get tricky, don’t hesitate to schedule a repair!
Step 1

Before you dive in, make sure your iPhone's battery is below 25%. A fully charged lithium-ion battery can be a bit of a drama queen and might catch fire or even explode if it gets punctured. Safety first, right?
Cracking open your iPhone’s display means saying goodbye to its waterproof superpowers—unless you’ve got fresh seals ready! If you skip the seal swap, keep your phone away from pool parties and steamy showers to dodge any unexpected splash drama.
- First things first, let's give your iPhone a little downtime. Power it off before we dive into the fun of disassembly!
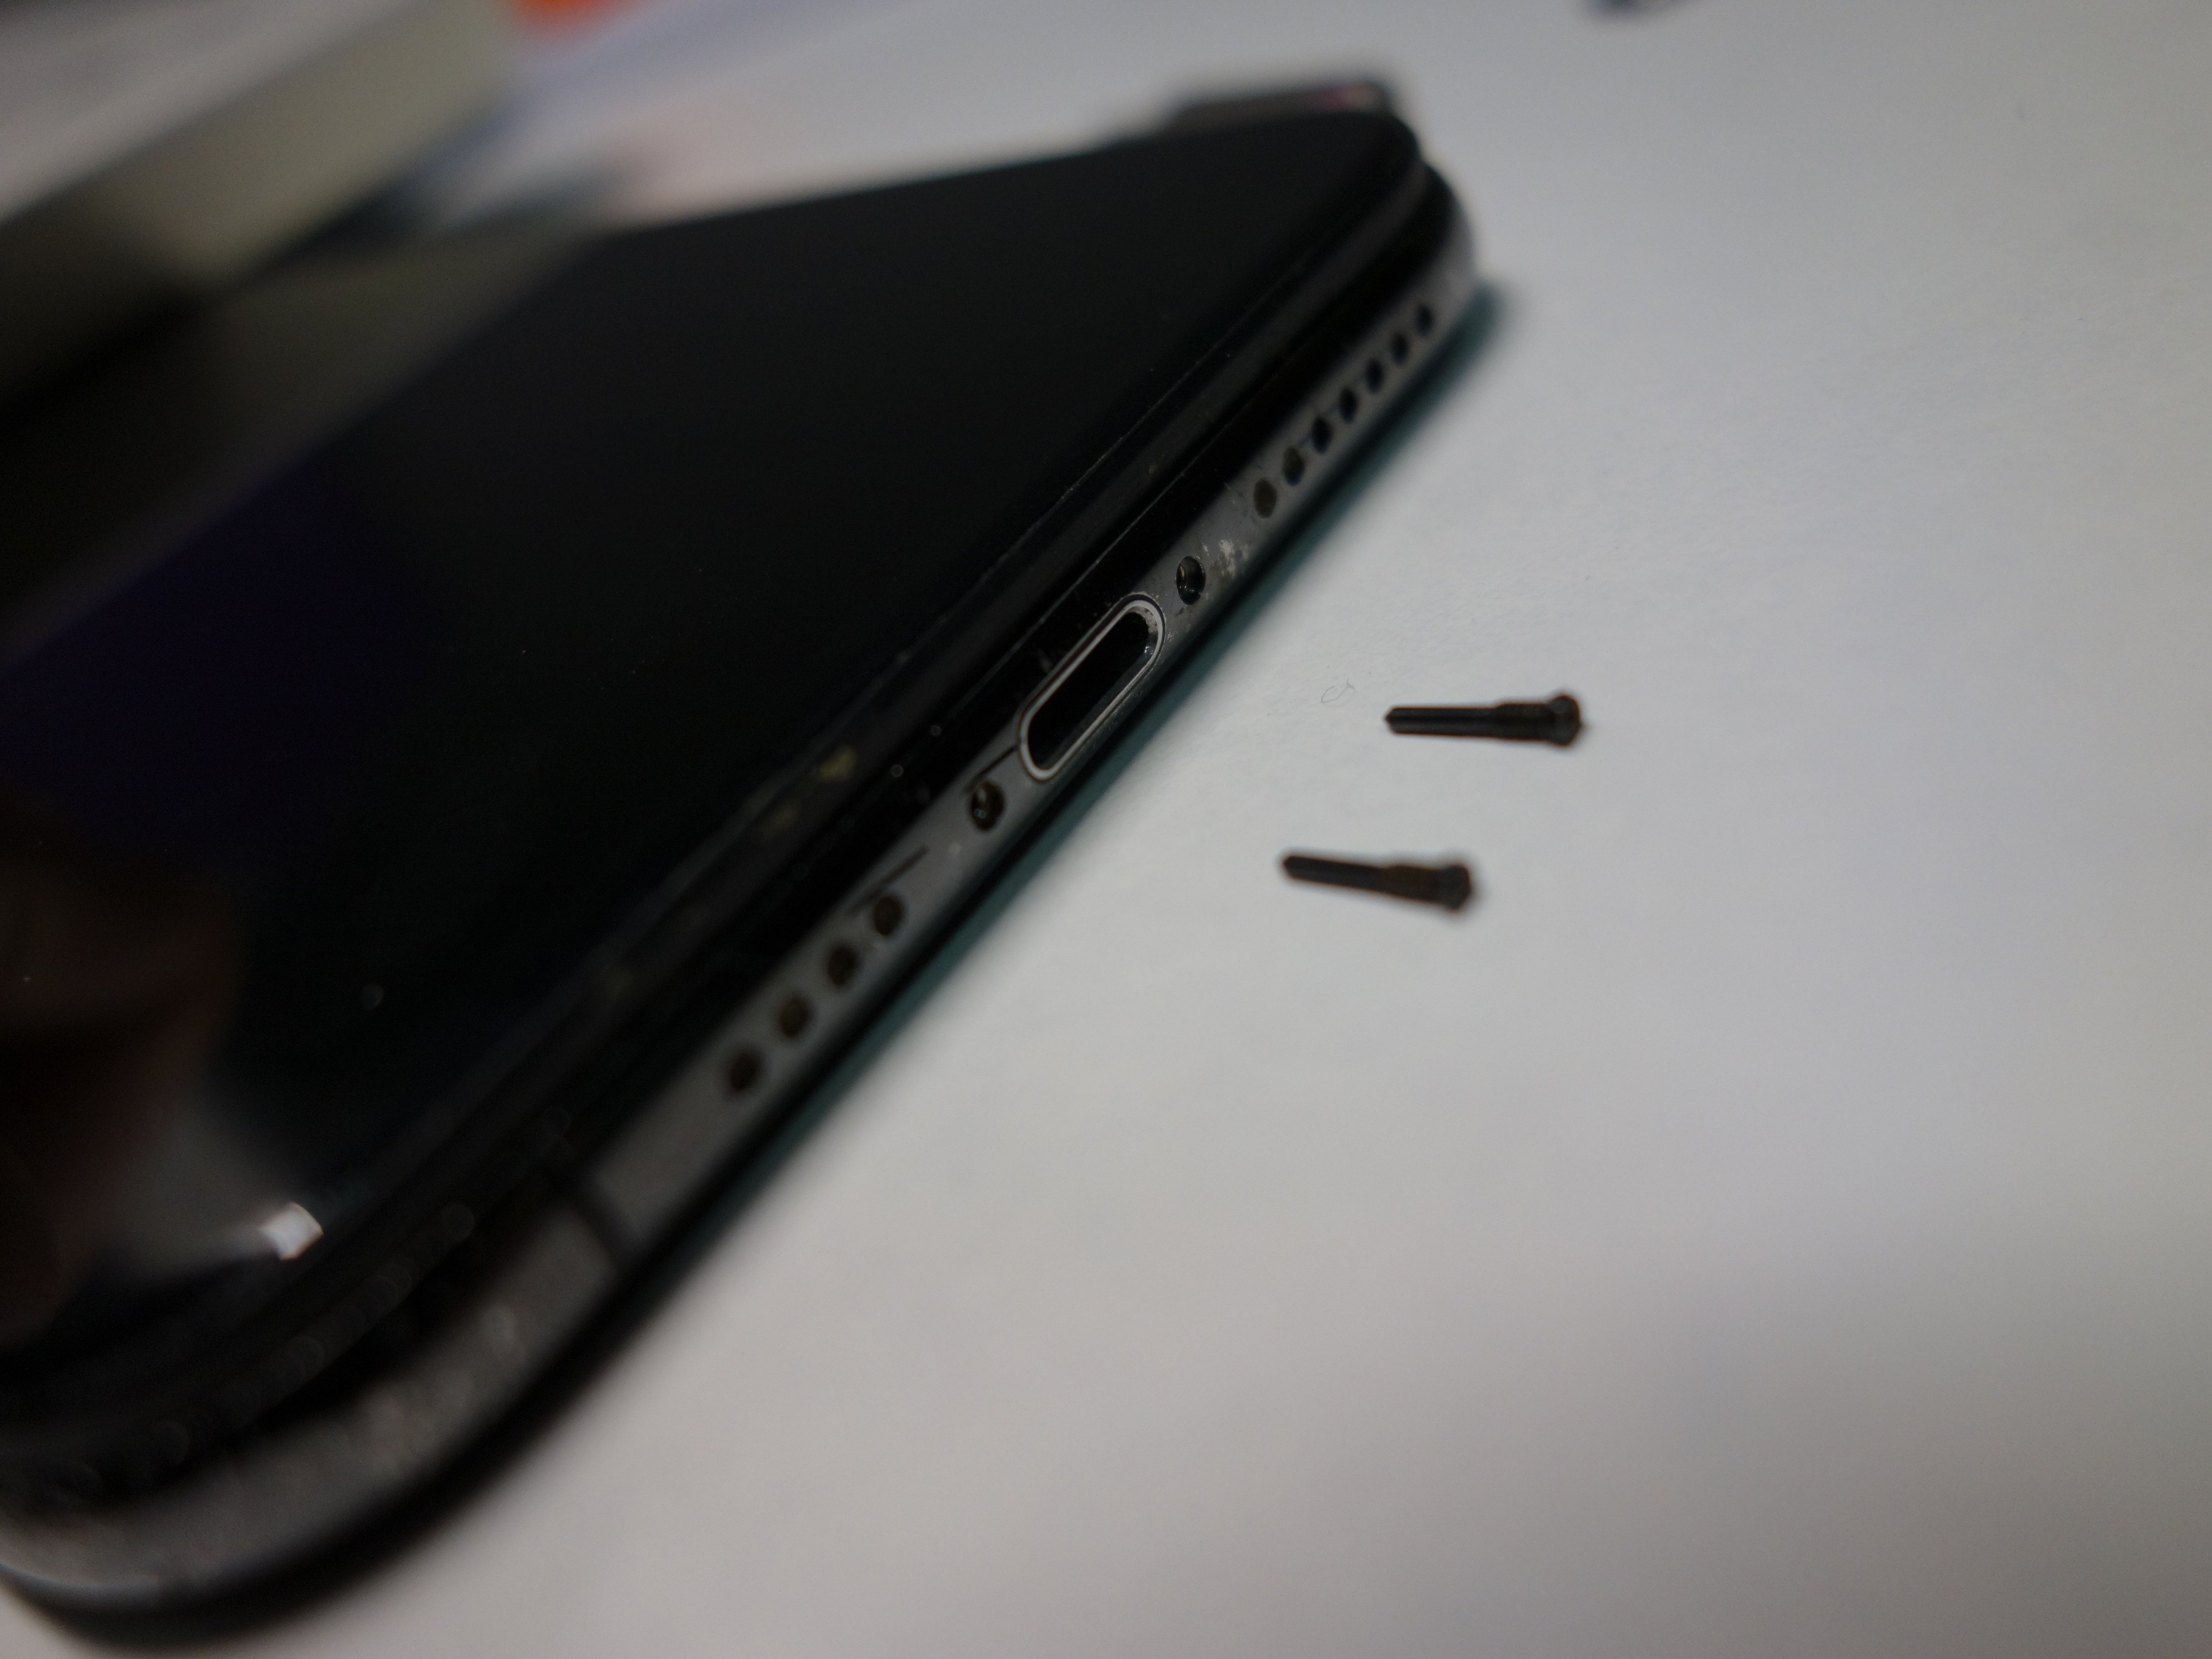
- Next up, grab your trusty screwdriver and carefully remove those two pentalobe screws at the bottom edge of your iPhone. They're 6.9 mm long, so be sure to put them somewhere safe!
Step 2


Be careful not to insert the opening pick too deep, as it could cause some damage to your device. Let's make sure to mark your pick to keep everything safe and sound.
Why not add some flair by marking the other corners of the pick with different measurements? It’s a fun way to customize your toolkit!
You can also get creative and tape a coin to a pick about 3 mm from the tip. It's a nifty little hack!
- Grab your opening pick and make a mark 3 mm from the tip with a permanent marker. This will help you keep things on track as you go!
Step 3


Pop on some safety glasses—because nobody wants surprise glitter in their eyes from loose glass bits.
Got a cracked iPhone screen? Keep those pesky shards in check and avoid any accidental ouchies by taping over the glass before you start your repair.
If the suction cup won’t stick, no worries—just superglue it to the screen and you’re good to go.
- Start by layering some clear packing tape over the iPhone's screen, overlapping the strips until the entire front is nicely covered.
- If the suction cup is feeling a bit rebellious and won’t stick in the next steps, grab a sturdy piece of tape (like duct tape) and fold it into a handy handle to lift the screen instead.
Step 4


The following three steps walk you through using the Anti-Clamp, a handy tool we made to make popping open your device a breeze. If you’re not working with the Anti-Clamp, no worries—just jump ahead three steps for another way to open it.
For full details on how to get the most out of the Anti-Clamp, check out this guide.
If your iPhone’s surface feels a bit too slick for the Anti-Clamp to grip, try adding some tape to give it a better hold.
- Give that blue handle a gentle pull backwards to let the Anti-Clamp’s arms loose.
- Slide those arms over either the left or right edge of your iPhone—whichever feels right.
- Line up the suction cups near the bottom edge—one hanging out on the front, and the other on the back.
- Press those cups together so they grip the spot you want to work on.
Step 5


- Give that blue handle a little pull forward to lock those arms in place. You've got this!
- Now, twist that handle clockwise a full 360 degrees or until you see those suction cups start to stretch. Keep going, you're doing great!
- Just a quick reminder to keep those suction cups aligned. If they start to drift apart, loosen them up a bit and realign those arms. Teamwork makes the dream work!
Step 6


Turn no more than a quarter turn at once, then take a breather for a minute. Let the Anti-Clamp and some patience do the heavy lifting!
Feel free to grab a hair dryer, heat gun, or hot plate to help out—but remember, too much heat can put a damper on your display or internal battery, so take it easy and go slow.
If the Anti-Clamp isn't quite doing its magic, give it another blast of heat and turn that handle a quarter turn for some extra wiggle room.
- Get your iOpener nice and toasty, then slip it through the Anti-Clamp arms like threading a needle.
- Fold the iOpener so it’s chilling right on the bottom edge of your iPhone.
- Give it a minute—let the adhesive think about its life choices and loosen up. You’ll see a tiny gap appear.
- Slide an opening pick gently into the gap, aiming for the space between the screen and the plastic bezel. No need to poke the actual screen!
- Go ahead and skip the next three steps—just keeping things moving.
Tools Used

Step 7

Gently warm up the lower edge of your iPhone to loosen up that stubborn adhesive holding the display in place. This makes it a whole lot easier to lift that screen up and get to the good stuff inside!
- Grab a hairdryer, heat gun, or whip up an iOpener and aim it at the lower edge of your iPhone for about a minute. This will help loosen up that pesky adhesive lurking underneath.
Tools Used
Step 8


- Grab your suction handle and stick it to the bottom edge of your phone. Just make sure to steer clear of the curved glass part – it's not a fan of being tugged on.
Tools Used

Step 9


The adhesive keeping the display stuck tight is basically a tough cookie; getting that first little gap open takes some serious muscle. If it’s being stubborn, turn up the heat a bit and gently wiggle the screen up and down to soften the glue until you can sneak your tool in.
- Give that suction cup a solid upward tug—steady and confident—to tease open a little gap between the front panel and the back case.
- Slip your opening pick into the space under the screen, aiming for the plastic bezel (not the screen itself).
Step 10


Keep your pick insertion under 3 mm to avoid poking any sensitive bits inside.
- Take your opening pick for a spin around the lower left corner and up the side of your iPhone, gently gliding it along to separate the sticky display adhesive. Nice and easy does it!
Step 11

Watch out for those delicate cables on the right side of your iPhone! It's best to keep your pick away from here to avoid any accidental damage to those little guys.
Step 12


Keep your pick insertion shallow—no more than 3 mm—to avoid messing up those delicate display cables.
- Slide your pick back in at the bottom edge of the iPhone, then glide it up along the right side to keep loosening that stubborn adhesive.
Step 13


Take it slow—those clips snap easier than you’d think! A little patience goes a long way.
Keep your pick shallow (no deeper than 3 mm). Poking too far can mess with the front panel sensor array, and nobody wants that!
At the top edge, the display isn’t just glued down—it’s hanging on with clips too, so get ready for a double whammy when you pop it loose.
- Glide your opening pick around the top corner of the screen, giving the display a gentle nudge or wiggle toward the Lightning port. Take it slow—no need for wild moves.
- Swing the pick over to the other top corner and slice through any stubborn adhesive that's still holding on.
Step 14

- Give that little nub on the suction cup a gentle pull, and it should pop right off the front panel. Nice and easy!
Step 15


Hold off on pulling the display all the way off for now—there are still some delicate ribbon cables chilling between it and the iPhone's logic board.
- Open up the iPhone by flipping the display up from the left side, just like opening the back cover of a book.
- Prop the display up against something sturdy to keep it steady while you work your magic on the phone.
- When putting it back together, place the display carefully, line up the clips along the top edge, and gently press that top edge into place before snapping the rest down. If it doesn’t snap in smoothly, double-check the clips around the display to make sure none are bent or out of place.
Step 16


- Time to tackle five tiny screws holding down the logic board connector bracket. Here’s the breakdown:
- Keep each screw matched with its spot—mixing them up is a one-way ticket to iPhone drama.
- Three Y000 screws, each 1.0 mm long
- One Y000 screw, 1.3 mm long
- One Phillips screw, 3.7 mm long
Step 17

The bracket might be a bit sticky—give it a gentle but confident lift to pop it free.
- Time to take off the bracket! You've got this.
- Now, while you're putting things back together, why not power on your iPhone for a quick test drive? Check all the features to make sure everything's running smoothly before sealing that display back up. Just remember to completely power down your iPhone before diving back into the work. You're doing great!
Step 18


Be gentle around the black silicone seal you see here and on other board connections—it’s like a superhero cape for your device, keeping water and dust out. Treat it with care so your device stays protected.
- Grab a spudger or just use your fingernail, and gently lift the battery connector up from its spot on the logic board.
- Nudge the connector away from the board a bit—this keeps it from sneaking back into place and powering up the phone while you’re working your magic.
Tools Used

Step 19


- Gently lift and unplug the front panel sensor assembly connector using a spudger or your fingernail—no need to wrestle with it, just give it a little nudge.
Tools Used
Step 20


- Gently pop the OLED panel cable connector loose with a spudger or your fingernail—think of it like opening a stubborn bag of chips, but with less crunch.
- When it's time to snap the connector back in place, line it up first, then press down on one edge until you hear a satisfying click, followed by the other side. Skip pressing the middle—those pins are sensitive! A crooked connector can mean bent pins and a world of regret.
Tools Used
Step 21


- Grab a spudger or your trusty fingernail and gently pry the digitizer cable connector up from its snug little home.
- Now, this connector can be a bit shy since it's hiding away in a recessed spot, so take your time getting it back in. Make sure to line it up just right, and then with a gentle touch, press it into place with your fingertip—first one side, then the other. You should hear a satisfying click as it settles in!
- If your screen decides to play hard to get and doesn't respond to your touch after the repair, no worries! Just disconnect the battery and give that connector another seat—ensuring it clicks in snugly and is free from any dust bunnies or obstructions in the socket.
Tools Used
Step 22


The front panel sensor assembly flex cable is gently secured, so it should come off with a bit of careful persuasion.
- Gently lift the cable until the adhesive lets go without any drama.
Step 23

- Take off the display assembly carefully.
- When putting it back together, take a moment here if you want to swap out the waterproof adhesive lining the edges of the display.
Step 24
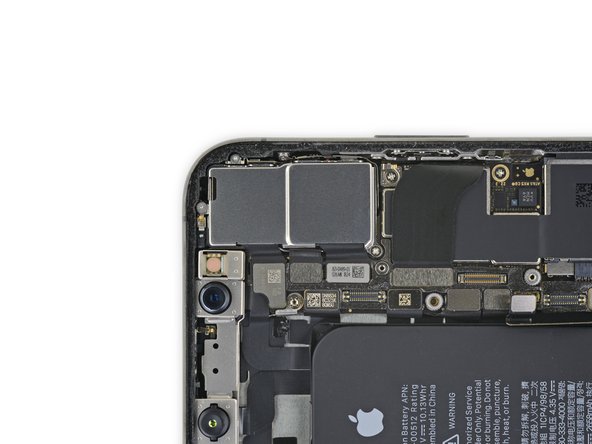

- Unscrew the two screws holding down the rear camera cover:
- One 1.4 mm Y000 screw
- One 2.0 mm Phillips screw
Step 25


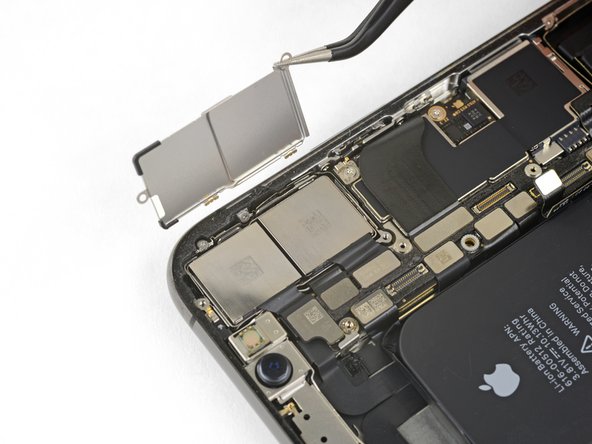
Make sure those two gold tabs are sitting pretty—if they're not lined up right, the cover will stick up like a tent.
- Gently lift the camera cover starting from the edge nearest the battery, then take it off.
- When putting the camera cover back on, just reverse these steps: first, lower the outer edge so the two little gold tabs on the cover click neatly into the bracket on the camera module's outer edge. Then, simply hinge the cover closed.
Step 26


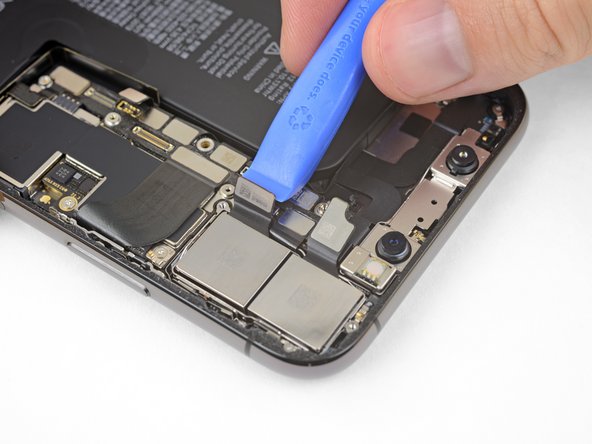
- Grab your trusty iFixit opening tool or a handy fingernail, and gently pry those two camera cable connectors straight up from their sockets. Easy peasy!
Tools Used

Step 27


The camera assembly isn't glued down, but it's snugly press-fit into place. A spudger or plastic pry tool might not have enough muscle to pop it out—so be ready to apply a bit more force!

Step 28

- Give your new part a quick side-by-side with the old one—double check for leftover bits or sticky stuff you need to peel off before popping it in.
- Ready to wrap up? Just retrace your steps, but backwards, and watch your device come back together.
- When it’s time to say goodbye to old parts, drop them at an R2 or e-Stewards certified recycler and keep things green.
- Hit a snag? The Salvation Repair Answers community is always ready with advice. Or, if you’d rather let the pros handle it, you can schedule a repair.