iPod Nano 6th Generation Teardown
Duration: 45 minutes
Steps: 14 Steps
This is one of three iPod teardowns this week: We’ve also taken apart the new iPod Touch and Shuffle. Stay in the loop on twitter for the latest teardown shenanigans. In case you missed it, last week we celebrated a major milestone. In addition to enabling Apple repair, we now have parts and repair manuals for most game consoles! We decided to celebrate by taking a trip through time and ripping apart five retro consoles. Shameless plug: We fund teardowns like this by selling iPod Nano Parts! We’ve also got free open-source repair manuals for every iPod Nano but this one, and we’re working on that.
Step 1


– The new multi-touch iPod Nano has finally arrived in our hands!
– This shiny little device showed up on our doorstep bright and early this morning, and we’re ready to dive in and explore.
– Unlike the iPod Shuffle 4th Generation we worked on yesterday, the Nano came in a much more fitting-sized box for shipping.
– Apple Model Number: A1366
Step 2


The new Nano’s downsized in a big way—it’s only 67% the volume of the last model, and its footprint is less than half as large. Small but mighty!
– iPod Nano, meet iPod Nano. Same price, but a lot of new stuff going on!
– Although the price remains the same as the previous model ($149 for the 8GB and $179 for the 16GB versions), the new Nano brings a whole bunch of changes.
– It’s not all about the looks, but there are some tweaks to the form factor.
– Say goodbye to click wheels, cameras, and video playback. Yep, it’s a whole new vibe.
– Now, we’ve got a sleek multi-touch screen . Plus, the Nano has volume control buttons and a handy sleep/wake button.
– The 5th Gen Nano measures 3.6″ x 1.5″ x 0.24″, weighing 1.28 oz.
– The 6th Gen Nano is a bit smaller, sizing up at 1.48″ x 1.68″ x 0.35″, and weighs just 0.74 oz.
Step 3

– This Nano feels like a Shuffle that got a screen upgrade—slim, sleek, and ready for action.
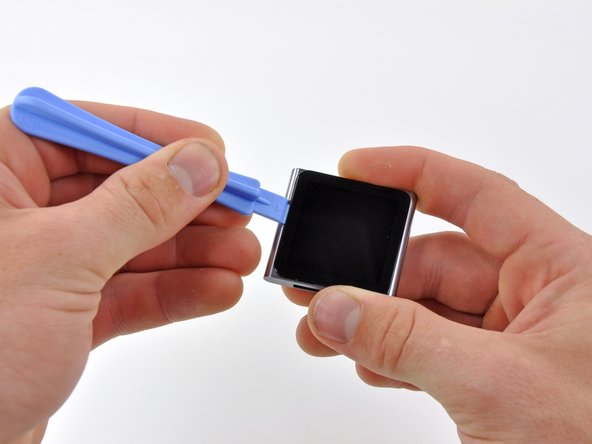
– No screws in sight? No problem. Time to warm things up a bit.
– A quick blast from the heat gun helps loosen that stubborn display glue.
– Work your way around the edges with an iPod Nano opening tool and gently pop the display free from the case.
Tools Used

Step 4

– Just like that, the Nano opens up—think of it as a mini novel waiting to be discovered.
– Time to take a peek at its mysterious insides!
The front glass on the 6th generation Nano slightly juts out about 0.3 mm from the face of the outer case. Wondering why? Likely the headphone jack is the culprit. Apple aimed to keep the device as slim as possible, and the rounded edges would have required a thicker case to make the glass sit flush. Instead, they went with a design where the glass sticks out just a bit, helping maintain that sleek profile.
Step 5


– With the display still hanging off to the side by its ribbon cable, grab your trusty #00 Phillips screwdriver and remove the two screws holding the EMI shield in place on the Nano. Inside, you’ll see a setup quite similar to that of the new Shuffle — a tiny logic board sharing space with the battery, split right down the middle.
Step 6


– Once you’ve detached the digitizer and display data cable connectors, you can carefully lift out the display. The 1.54″ LCD screen features multi-touch capabilities, although fitting more than one finger comfortably might be a bit of a puzzle. This LCD sports a 240 x 240 pixel resolution with a straightforward 1:1 aspect ratio—think of it as a tidy, square display. Like its smartphone cousins, the touchscreen, LCD, and front glass are bonded together as a single unit. For any tricky parts, remember, if you need a hand, you can always schedule a repair.
Step 7

– The Nano’s display assembly is only 2.27 mm thick—yep, that’s slimmer than the 2.93 mm iPod Touch display and even the svelte 3.05 mm iPhone 4 display.
– With a screen boasting 220 pixels per inch (PPI), the Nano packs more pixels than any other Apple device except the iPhone 4 and the 4th Gen iPod Touch. That’s nearly twice as sharp as the iPad’s 132 PPI!
Step 8


– Another connector in the mix—this one’s for the headphone jack and the power/volume button ribbon cable.
– Once you’ve taken out the single screw holding the logic board, you’re all set to lift the logic board out.
– Connectors instead of solder? Major win for repairability! Nice move, Apple.
Step 9


Looking at the battery capacities in terms we all know (amp-hours), the Nano’s battery comes in at a solid 105 mAh, while the Shuffle’s is a bit more modest at 51 mAh.
– Careful now: you can gently pry the battery out of the case using an iPod Nano opening tool, but keep in mind, it’s soldered directly to the logic board—so no quick yank! The 3.7 V lithium-ion battery packs a punch with a capacity of 0.39 Watt-hours, giving you up to 24 hours of nonstop music enjoyment. Notably, this iPod Nano’s battery only sports two wires—red and black—unlike other models that have a third wire, which usually connects to a thermistor acting as a tiny temperature gauge. Chances are, the small size and slow charge rate keep overheating at bay, so no worries there.
Step 10


– The headphone jack and button contacts are connected via a long, thin ribbon cable which runs along the inside edge of the Nano.
– Four very small screws secure the button contacts to the top edge.
– After removing yet another screw, the headphone jack pops out of place with the help of an iPod Nano opening tool.
Step 11


– The headphone jack, volume buttons, and sleep/wake button all share the same ribbon cable that winds around the inside edge of the Nano. Just like the 5th gen model, the Nano uses the headphones as its FM radio antenna—any pair of headphones will do the trick. Plus, having physical volume controls on the outside of the device is a handy new feature that makes adjusting the sound a breeze. If you need help along the way, you can always schedule a repair.
Step 12


– Key components to focus on:
– Toshiba TH58NVG6E2FLA4C 8GB NAND – the heart of your storage!
– Apple 33850859 C0E111022 – a chip that makes things happen!
– Power management Dialog D1830B (Apple 338S0783-B1 10298HLS) – keeping the power flowing smoothly.
– FM receiver 0650 D0UY 027 – tuning into what matters!
– Apple 339S0104 YGC7 1031 K4X51323P1 YRF 020A3 ARM N2HXHZMP 4 1031 – a crucial piece for performance.
– 35758907 1025 A 04 629749 – a code to look out for!
Step 13


– Three additional screws secure the new clip to the iPod Nano, bringing the total to eleven. That’s quite a handful for such a tiny device, but take your time and keep track of each screw. If you need help along the way, you can always schedule a repair to get professional assistance.
Step 14


– iPod Nano 6th Generation Repairability: 5 out of 10 (10 means super easy).
– Pro: The ribbon cable connectors let you unclip the display and headphone jack from the logic board with minimal drama.
– Pro: After you’ve pried off the display, the rest of the teardown is a walk in the park.
– Con: Getting the display off in the first place takes some serious heat and patience.
– Con: The battery is soldered down to the logic board, so swapping it out is trickier than it should be. If you’d rather skip the hassle, you can always schedule a repair.
Tools Used
Success!

