iPod Touch 2nd Generation Teardown
Duration: 45 minutes
Steps: 16 Steps
Back in the day on September 10, 2008, we took apart this iPod to see what’s inside. Follow along as we carefully disassemble it step by step, making sure everything stays intact. If you run into trouble or need some extra hands, you can always schedule a repair for the tricky parts.
Step 1

– The new iPod Touch is packed in a sleek, transparent plastic case that’s a bit more compact.
– We were tempted to power it on and play with the new software, but our excitement got the best of us, and we dove right in without wasting any time!
Step 2

– What’s in the box:
– A fresh pair of earphones
– A trusty USB 2.0 cable
– Handy dock adapter
– A polishing cloth to keep things shiny
Step 3

Keep in mind, the antenna cover also gets a makeover—it was just a simple rectangle on the 1st Gen Touch, and now it’s a bit different. No big deal, but worth noting as you go along.
– Check it out—the form now hugs those classic iPhone 3G curves just right.
Step 4

– Time to part ways with the glass display and touch screen digitizer—carefully lift them off as one piece.
Step 5

– Here’s the LCD display, stripped bare.
– Apple says it’s 3.5 inches diagonally, rocking a 480×320 pixel resolution at 163 pixels per inch. Crystal clear and compact—just the way we like it!
Step 6

– No screws here—the LCD is just hanging out with some double-sided tape keeping it in place.
Step 7

– Pop off the metal backing—don’t worry, it comes off pretty easily.
– The battery is stuck on with a couple of light adhesive strips, but just peel it away and you’re good to go.
Step 8

– Start by disconnecting the display data cable. Keep it steady, no rush!
– Check out the sticky residue from the glue that’s been holding the battery to the metal back. It’s like a little reminder of the journey ahead.
– Alright, we’re getting there! Keep it up, you’re on the right track.
Step 9

– Start by removing the battery to get ready for the next steps.
– Next, locate the WiFi antenna and circuitry—these are at the bottom of your device, near the thumb area. Be gentle as you work around these components. If you need help, you can always schedule a repair.
Step 10


– The big orange cable is your WiFi antenna’s lifeline—running from the upper left corner to the logic board.
– See that metal cover above the battery? Pop it off and you’ll find a Broadcom BCM4325 chip that handles both WiFi and Bluetooth. Yep, Bluetooth is hiding in there, even though Apple hasn’t made a peep about it.
– The Bluetooth chip here supports BT2.1+EDR. We’re still waiting to see if it’s got A2DP for those sweet stereo headphones.
– Part numbers if you’re curious: BCM4325GKWBG CD0825 B76332 P40 SF
The cable’s size, shape, and features are designed to keep external noise from messing with the digital signals as they zip along the device. Plus, this chipset comes with FM support, but historically, Apple hasn’t shown much interest in FM radio, and there’s no indication that’s about to change. If you need help, you can always schedule a repair.
Step 11

– Check out the flip side—you’ll see the wireless components, battery, and logic board hanging out together.
Step 12

– The dock connector is right in the middle, with the headphone jack sitting pretty on the right side. Keep an eye out for these ports as you go—knowing where they are makes the job smoother. If you need help at any point, you can always schedule a repair to get professional support.
Keep an eye on the tiny gold ‘square’ just above the dock connector—that’s actually a flexible spring contact. When you press the home button, this spring makes contact with it, acting like a switch. Pressing the button connects this spring to ground through the dock connector, completing the circuit. If you need a hand with this, you can always schedule a repair.
Step 13

– Here’s the logic board. Looks like the brown rectangle in the center is the speaker. The two wires in the orange ribbon cable on the right? They’re heading toward the new volume control dial. Nice and simple!
Step 14

– The battery is a 3.7 V Lithium-ion polymer type, just like you’d expect. It features the Apple part number 616-0404. We’re still waiting on the mAh rating, so stay tuned for that info.
Step 15
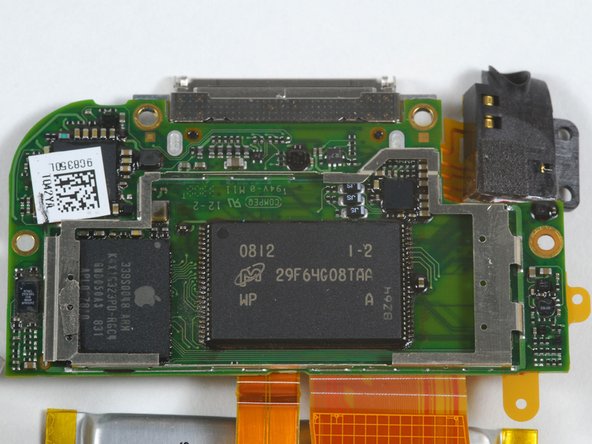
– Alright, back to the logic board. This time, we believe the speaker is out of the picture. So, we’re getting a closer look.
– The NAND flash memory is a Micron MLC chip, model MT29F64G08TAAWP. Not your average storage, this one packs some serious power.
– The processor? It’s an Apple-branded ARM chip, made by Samsung, with SDRAM right on the package. It’s pretty much the cousin of what you’d find in an iPhone.
Step 16

– And that’s a wrap! You’ve made it to the end. All that’s left is to admire your work. If anything looks off, don’t hesitate to schedule a repair. But we’re confident you nailed it!
Success!