Lenovo Horizon 2s HDD Replacement
Duration: 45 minutes
Steps: 9 Steps
Revive your two-in-one tablet with a shiny new hard drive! This guide will walk you through the simple steps to pop off the rear panel, designed to keep those delicate internal parts safe and sound. Plus, we’ll show you how to swap out the old hard drive for the new one like a pro. If you hit a snag, just remember, you can always schedule a repair.
Step 1


– Let’s get started by flipping your device over so the rear case is facing up – it’s time to get a little hands-on!
– Now, take your trusty plastic opening tool and carefully pry the plastic piece shown in the picture away from the case. Keep going until it’s completely removed – you’ve got this!
Step 2


– Gently peel off the rubber boot on the right side of the rear case using your fingers — nice and easy!
– Grab your Phillips #1 screwdriver and unscrew the screw sitting right under where the rubber boot was.
Step 3

– Grab your trusty plastic opening tool and gently nudge that display screen forward. Keep pushing until it pops free from the rear casing, just like breaking up with a clingy ex!
Step 4

– Grab your trusty plastic opening tool and gently work your way around the edges of the screen. Take your time and keep prying until the screen pops free from the rear casing, fully liberated and ready for the next step!
Step 5


– Before you can fully remove the screen from the rear casing, you’ll need to carefully disconnect two wires that are attached to both sides of the device. This will give you the freedom to completely separate the rear casing from the screen, and you’ll be one step closer to a successful repair. Take your time and make sure these wires are safely detached before moving on to the next step.
Step 6

– Grab your trusty Philips head screwdriver, number 1, and let’s tackle those four M2-6mm screws that are doing their best to hide in the picture. Unscrew them gently and with finesse!
Step 7

– Now, gently lift the hard drive that’s still linked to the boot right from the rear casing.
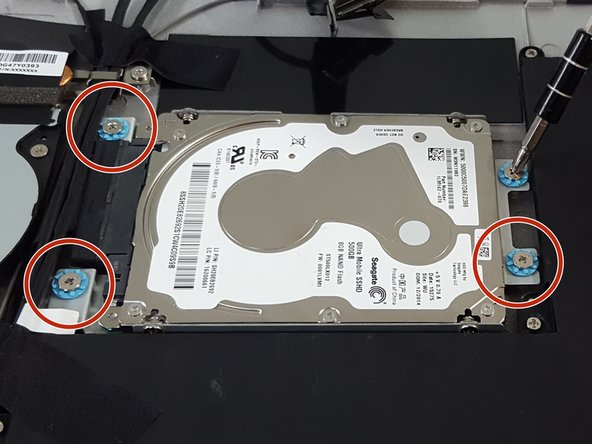
Step 8


– Now that you’ve got that hard drive free from its cozy home in the rear casing, it’s time for the next step! Grab your trusty Philips screwdriver with the number one head, and let’s get those M2-6mm screws out of the way. There are four of them, so carefully unscrew each one, taking your time. They’re highlighted in the picture, just in case you need a little extra guidance. You’re doing great!
Step 9

– Now that those pesky screws are out of the way, give yourself a little cheer! It’s time to gently lift the hard drive from its cozy metal home. You’ve got this!
Success!