Lenovo IdeaCentre K410 CPU Replacement
Duration: 45 minutes
Steps: 6 Steps
Step 1

– Flip the computer onto its side, like the cool pro you are.
– Twist out those two 14mm screws—don’t worry, they’re so chill you can unscrew them with just your fingers!
Step 2

– Gently slide the side panel back, like you’re giving it a little nudge, and carefully take it off the computer.
Step 3

Handle those screws with care—let’s keep them intact and not stripped!
– Grab your trusty Phillips #00 Precision screwdriver and smoothly remove the four 12mm screws keeping the fan locked down.
Step 4

– Carefully unplug the fan’s connector from the motherboard—it’s like uncoupling the tiniest train car! Once disconnected, lift the fan straight up and out of the computer with confidence. You’ve got this!
Step 5

Don’t worry, the screws won’t completely come out of the heat sink, so you won’t have to worry about losing them.
– Grab a Phillips #2 screwdriver and loosen the four screws holding the heat sink in place. Take your time, we’ve got this!
– Now, gently pull the heat sink straight up to remove it. It should come off smoothly, just a little wiggle if needed.
Step 6

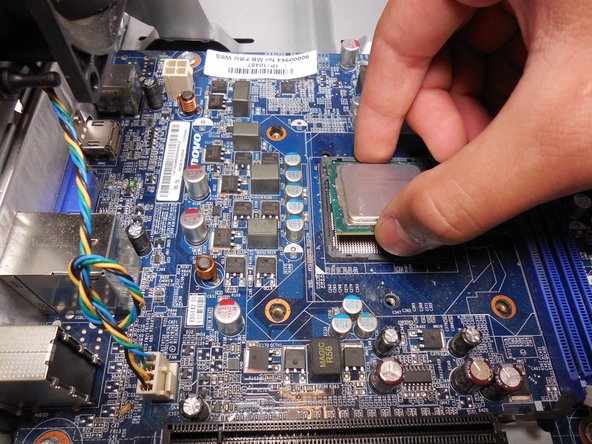
– Alright rockstar, let’s do this! First, grab your Torx #20 screwdriver and unscrew those two 8mm screws holding down the CPU cover — you’re basically a tech wizard now.
– Next up, get your trusty Torx #20 again and tackle that 11mm screw. It’s the last barrier between you and success!
– Now for the fun part: Lift off the cover and gently pull the CPU upward. Be careful, but don’t stress. You’ve got this!
Success!