Lenovo Tab 2 A8 Motherboard Replacement
Duration: 45 minutes
Steps: 5 Steps
Ready to dive into the heart of your device? This guide walks you through the process of carefully removing the motherboard. Take your time and follow along, step by step—it’s all part of the journey to getting your device back in action!
Step 1


If the screw’s seal is already gone, you’re one step ahead – move on to the next part of the process!
This screw is tiny, so you might want to grab some tweezers to make it easier to handle.
– Lay your tablet face down on something soft—treat that screen like royalty.
– Now, grab a metal spudger and gently scrape off the seal hiding the screw on the back.
– Take your Phillips #000 screwdriver and remove the M1.4 x 2.5 screw. Easy does it!
Tools Used


Step 2


Get ready to flex those muscles – you might need a bit of oomph to pry that back cover off!
Heads up: the button tabs inside the case are loose and will make a break for it when you open things up, so be prepared to catch them.
– Start at one side of the tablet and make your way around to pop off the back cover. You’ll want to grab a metal Spudger—it’s the real MVP for this step!
Tools Used
Step 3


These tiny screws can be a handful—grab a pair of tweezers to make the job way easier.
– Grab your trusty Phillips #000 screwdriver and unscrew the four M1.4 × 2.5 screws securing the motherboard. Keep those tiny screws in a safe spot—losing one is like dropping a needle in a haystack!
Tools Used
Step 4


The cable that connects the screen to the motherboard is snug and might need a little extra oomph to unplug it. Just take your time and be gentle, you got this!
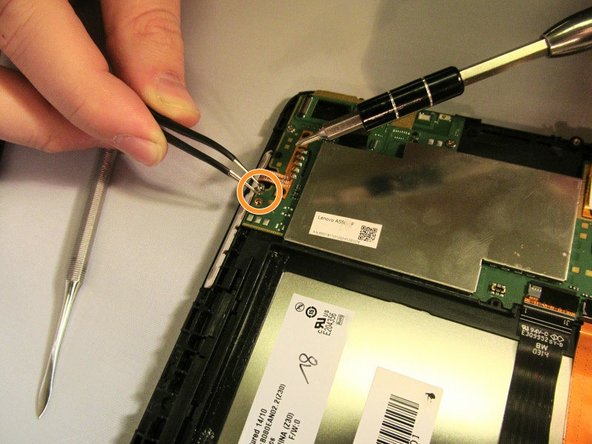
– Grab your Phillips #000 screwdriver and carefully take out the M1.4 × 2.5 screw that’s holding the battery lead to the battery.
– Using tweezers, gently nudge the battery lead aside so it doesn’t get in the way of the motherboard.
– With those handy tweezers again, delicately unplug the strip that connects the screen to the motherboard.
Tools Used
Step 5

Be gentle when prying up the motherboard, as those tiny tabs can snap if you’re too rough.
When removing the motherboard, take your time and be careful not to tear the wires – they’re stuck on with a small adhesive strip, so ease them off to avoid any damage.
– To wrap things up, simply reverse the steps you followed to take your device apart. Easy peasy!
– You did it! If you need help with anything else or have another device that needs some TLC, you can always schedule a repair
Success!