Lenovo Thinkpad T430 Motherboard Replacement
Duration: 45 minutes
Steps: 16 Steps
The motherboard is like the heart of your computer, connecting all the vital hardware components. If it’s not feeling well, you might experience some funky symptoms like your Lenovo ThinkPad T430 refusing to turn on, unexpected power outages, sluggish performance, or even some overheating drama. Think your motherboard might be on the fritz? No worries! Follow this guide to remove and replace this crucial part and get your machine back in action. And remember, if you need help, you can always schedule a repair.
Step 1


– Flip your laptop over so the bottom is facing up and ready for action.
– Give that battery unlock lever a little nudge to the right.
– With a gentle pull, ease the battery out from the device’s cozy embrace.
Step 2


– Grab your trusty Phillips #000 screwdriver and take out those two screws holding the RAM door snugly in place.
– Now, gently remove the back panel to reveal the exciting insides.
Tools Used

Step 3

– Grab your Phillips #000 screwdriver and remove the two screws holding the middle panel in place. No sweat—just a couple of twists and you’re golden!
Tools Used
Step 4


Don’t go Hulk on that ribbon cable! A little too much oomph can spell trouble for your device. Make sure to carefully disconnect the ribbon cable before taking the keyboard out completely.
– Turn your laptop upside down and pop that lid open with style!
– Give the keyboard a gentle nudge from the space bar while pressing down a bit to lift it up. It’s like a dance move but for your tech!
– Take extra care to unplug and disconnect that ribbon cable. Treat it like a delicate secret handshake!
Step 5

– Now it’s time to flip the device back over and get rid of the six screws holding the palm rest in place. Let’s get that palm rest removed and move forward with the repair!
Step 6

– Turn the device around to face you, and unscrew the two pesky screws that are holding the palm rest in position. Time to get that gadget open!
Step 7


Handle that ribbon band with care, folks! Tugging on it like it’s a tug-of-war champion can seriously mess up your device. Make sure to fully disconnect the ribbon band tucked under the keyboard before separating the palm rest—your device will thank you.
– Alright, with the top of your device looking at you, give it a gentle 45-degree tilt upwards. This will help you get a peek at those sneaky clips holding the palm rest in place.
– Now, grab your trusty Jimmy and carefully unclip that palm rest from its snug home in the device.
– Starting from the hinge, lift the palm rest gently away from the body. But wait! Before you completely detach it, make sure to unclip the ribbon band hiding beneath the mouse pad. We wouldn’t want it to feel left out!
Tools Used

Step 8


– Gently pop off those Wi-Fi cables (orange, white, and blue) from the device’s body like you’re peeling a banana—just a little tug will do the trick!
– Time to unleash that video cable! First, take out the screw that’s holding it hostage, then remove the metal bracket to let it breathe.
– Unplug the ribbon cable hanging out on the right side of the device—just give it a gentle wiggle and pull.
– Carefully disconnect the video cable from the device body. It’s like giving it a friendly wave goodbye!
– Now, let’s free the screen! Unscrew those two screws near the left and right hinges that are keeping it in place.
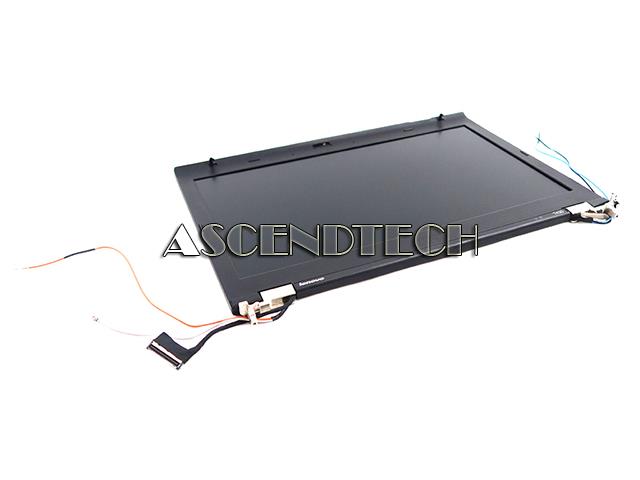
Step 9

– Time to flip your device over like a pancake! Let’s get started.
– Grab your trusty Phillips #000 screwdriver and remove those two screws from the upper corners of the laptop. You’ve got this!
– Now, gently lift the display assembly away from the rest of the device and set it aside. You’re doing great!
Tools Used
Step 10


– Head back to the front of your device and get ready for some speaker action!
– Unscrew the screws that are keeping each speaker snug on the left and right sides. Let’s get those out of there!
– Gently lift the speakers away from the device body like you’re taking a treasure out of a chest!
Step 11


– First things first, grab your trusty screwdriver and tackle those four screws that are keeping the heat sink snug as a bug. Time to give it some freedom!
– Next, it’s time to unplug the fan cable. Just gently pull it away—like a magician making a rabbit disappear!
– Now, with a careful touch, lift the heat sink off the device’s body. Think of it as giving your gadget a little spa day!
Step 12

Hey there! Be super careful when you’re handling the processor—the contacts are delicate little things that can put your device in a bit of a pickle if mishandled. Take your time while removing it, and once you’ve got it out, make sure to tuck it away in a safe spot. You’ve got this!
– Get ready to unlock the processor – twist that screw into the unlock position, marked by a handy unlocked lock symbol. You got this!
– Now, carefully lift the processor out of the device. Take your time, it’s a delicate step, but you’re doing great!
Step 13

– Let’s get this repair started! Begin by removing the screw that holds the wireless card in place – it’s time to set that card free. Gently lift the card out from the body of your device.
Step 14

– Disconnect the motherboard power connector from the device’s body.
Step 15

– Start by taking out those six screws that are keeping the bottom casing snug as a bug. You’ve got this!
– Once the screws are out, gently lift the bottom casing off the device and set it aside like a pro.
Step 16

– To wrap things up, simply reverse the steps you followed to take your device apart. Easy peasy!
– If you need help or have any questions, you can always schedule a repair