Lenovo ThinkPad X1 Extreme Docking Station Replacement
Duration: 45 minutes
Steps: 15 Steps
Alright, before we kick things off, make sure you’ve already tackled the battery, fan, and motherboard guides. This step-by-step guide is all about handling the motherboard and its components. So, here’s a hot tip: keep those hands dry and oil-free, because a little moisture could turn your device into a very sad story. If your docking station is acting up—think random disconnections, inputs not registering, or slipping out of place when touched—it might be time for a fix. Before rushing to replace the battery, be sure to check out the troubleshooting page for the Lenovo ThinkPad Gen 1 Extreme. You might save yourself a trip to the store! Oh, and one more thing—the docking station, where you plug in USBs or chargers, has a knack for attracting debris and gunk. Keep an eye on it to avoid damage. Let’s keep things smooth and steady!
Step 1


Before you dive in, make sure to power down and unplug your device. Safety first, champ!
These screws will loosen up, but they’re meant to stay attached to the cover—so don’t try to take them all the way out. Trust us, they’re chill right where they are!
– Flip the laptop over so the bottom is facing up, with the trackpad closest to you—like it’s looking right at you!
– Grab a Phillips #00 screwdriver and unscrew those seven captive screws. Take your time; no rush here!
– Take a trusty blue opening pick, slide it gently into the groove between the bottom panel and the chassis, and pop off one clip on each side. Feel free to give yourself a little cheer for each clip!
– Lift off the back cover with care, and voilà, the inside of your device is revealed!
Tools Used

Step 2

– Grab a Phillips #00 screwdriver and get to work removing those four 4 mm screws above the battery. They’re your ticket to getting that battery out. Nice and steady, and you’ll be on your way.
Step 3

– Gently lift up the speaker modules from either side of the battery—it’s like freeing little birds from their nest—and carefully unwrap the cable lounging at the front of the battery.
– Relocate the speaker modules to a safe little spot nearby. Out of sight, but never out of mind!
Step 4


– Grab those tweezers and gently lift off the plastic cover shielding the connector—it’ll come off like magic!
– Get your trusty spudger or use your fingernail to lift that battery straight up from the motherboard. Take it slow and steady—it’ll pop out just right!
Tools Used

Step 5

– Carefully lift the battery from the frame and set it aside—out of the device. Easy does it!
Step 6


– Grab your trusty Phillips #00 screwdriver and take out that 3mm screw holding the wireless adapter in place. You’re a natural!
– Gently slide the wireless adapter out of its connector—like pulling out the perfect Jenga block.
– Carefully disconnect the black and gray cables from the adapter and ease them away from the fan frame by giving a gentle upward tug. Patience and a soft touch win the day!
Tools Used
Step 7


– Pop the little black tab up and disconnect the cable attaching the fan to the frame—easy does it!
– Gently pull the cable away from the fan’s frame to separate it. You’re doing awesome!
Step 8


These screws are designed to stay in place, so no need to worry about them escaping—they’ll stay securely attached to the fan.
– Grab your trusty Philips #00 screwdriver and get ready to unscrew the five screws that are holding the fan in place on the motherboard. Once they’re loose, the fan will be free to move. Easy peasy!
Step 9


Look for the labels on the motherboard that say ‘FANR1’ and ‘FANL2’ to help you spot them.
– Carefully unplug the two cables on either side of the fan. You’ve got this!
– Gently lift the fan out and bid it farewell as you remove it from the device.
Step 10


– Grab a Phillips #00 screwdriver and take out those five 4 mm screws just below the charging port.
– Next, use your Phillips #00 screwdriver to remove the two 3 mm screws.
– Now, use the same Phillips #00 screwdriver to remove the two 5 mm screws holding a silver plate near the charging port at the top-right.
– Gently lift off the silver plate that’s sitting on top of the charging port.
Tools Used
Step 11


– Pop those ribbon cables off the motherboard with a little finesse!
– Each ribbon cable can be freed by flipping up the slim black tab where it’s connected and gently sliding the cable out. Easy-peasy!
Step 12


– Start by disconnecting the black attachment at the top right corner of the motherboard. A little tug, and you’re good to go!
– Now, grab your SIM ejector tool and gently insert it into the tiny hole at the top. Give it a little push to release the clip. Easy, right?
– Keep the pressure on and carefully pull the wire connected to it. A gentle pull, and it should come free without a fuss.
Step 13

– Carefully ease the motherboard out of the computer, like you’re lifting a sleeping kitten. Steady hands, you’re doing great!
Step 14

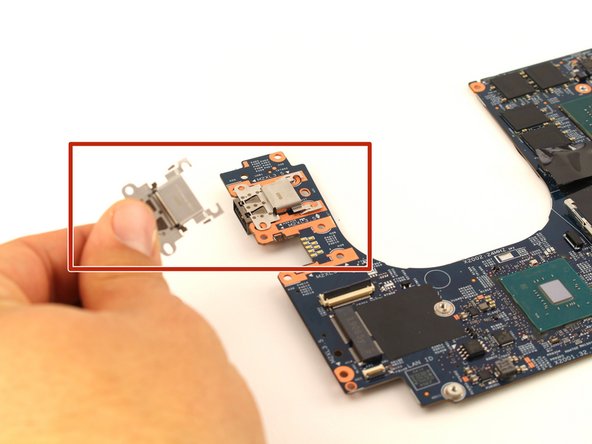
– With the motherboard out of the way, you’ve now got clear access to the docking stations.
Step 15

– Now that you’ve got it all fixed up, just put everything back together by working through these steps in reverse. You’ve got this!
–
Success!