Mac Pro Early 2009 Teardown
Duration: 45 minutes
Steps: 30 Steps
Time to show that Mac Pro who’s boss! The Early 2009 8-Core model is a powerhouse, but even powerhouses need a little TLC sometimes. Whether you’re fixing a performance hiccup or just giving it a fresh lease on life, we’re here to guide you through the process. Take your time, follow the steps, and you’ll have that machine running smoothly in no time. And hey, if things get tricky, don’t hesitate to schedule a repair!
Step 1

– I disassembled the Mac Pro with care.
Step 2

– Popped the PSU into place.
Step 3

– installed the backplane board
Step 4

– Alright, let’s dive into this! The front panel board is a key player in your device, and you’ll need to take a little extra care with it. Make sure everything is powered off before you start, and grab your tools to gently work around the edges. This can be a delicate task, so no rush—patience is key here. If you’re feeling unsure, don’t hesitate to schedule a repair to get some expert help.
Step 5

– Here’s where you check out the Mac Pro LEDs, specifically the bottom DIAG_LED. Keep an eye on these lights—they tell you a lot about what’s going on inside. If you need a hand interpreting the signals or troubleshooting, remember you can always schedule a repair with Salvation Repair to get professional help.
Step 6

– The cable that links the front panel board to the backplane board
Step 7

– Take another look at the front panel board from a different angle.
Step 8

– Here’s another angle of the backplane board so you can get a good look at what’s going on back here.
Step 9

– The BackPlane and FrontPanel boards are connected through a cable that links the two. Gently detach the cable to ensure everything stays intact.
Step 10

– The Bluetooth antenna is connected to the card on the Backplane board. Make sure it’s properly attached to avoid any mishaps, as leaving it disconnected can lead to potential short circuits on the backpanel board. Better safe than sorry!
Step 11

– Check out the PCI slots on your Early 2009 Mac Pro—here’s where all the expansion magic happens.
Step 12

– Check out the Optical Drive Cables nestled on the BackPlane Board.
Step 13

– Here’s that power button on the front panel board—get it connected and you’re one step closer to firing things up!
Step 14

– Alright, let’s dive into the processor cage! This is where all the magic happens, and we want to make sure it’s just right. Carefully remove the screws and keep them safe; we wouldn’t want them to disappear on us! Once you’ve got that done, gently lift off the cage. It’s like opening a treasure chest, but instead of jewels, we’re finding our beloved processor! If you encounter any tricky bits, no worries! Just take a deep breath and remember, if you need help, you can always schedule a repair. You’ve got this!
Step 15

– Left fan hanging out in the processor cage with the speaker—just chillin’ until you’re ready to take it out.
Step 16

– locate the right fan in the processor cage – don’t forget, it’s held in place by two clips, one at the top and one at the bottom, so be sure to release both to take the fan apart
Step 17

– This step involves handling the unit along with its PSU, BackPlane Board, and Front Panel Board. Carefully disconnect and remove these components, ensuring you’re gentle to avoid any damage. If you run into trouble or need extra hands, you can always schedule a repair for professional assistance.
Step 18

– Tiny parts that shield the PSU and Super Drive cables. Handle them carefully—they’re small, but they do a big job!
Step 19

– 8-Core Processor Heatsinks
Step 20

– Processor heatsink for the 4-core model
Step 21

– You’ll definitely notice the difference between the 8-core and 4-core – it’s like going from a tricycle to a sports car!
Step 22

– First, carefully remove the Processor Cage and the left and right Speakers.
Step 23
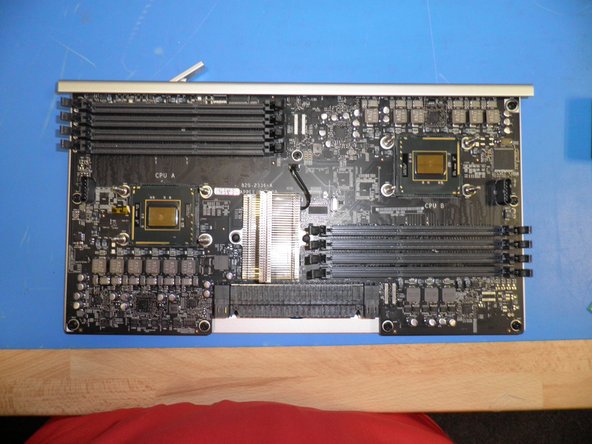
– Here’s a clear shot of the 8-core processor board. Keep this in mind as you work through your repair. If you need help, you can always schedule a repair.
Step 24

– Locate the CPU B on the processor board. Carefully disconnect any cables or connectors attached to it. Use appropriate tools to gently lift and remove the CPU B if necessary. Remember to handle all parts with care to avoid damage. If you need help, you can always schedule a repair.
Step 25

– Processor Board’s CPU A awaits your expertise!
Step 26

– CPU & Cooling System
Step 27
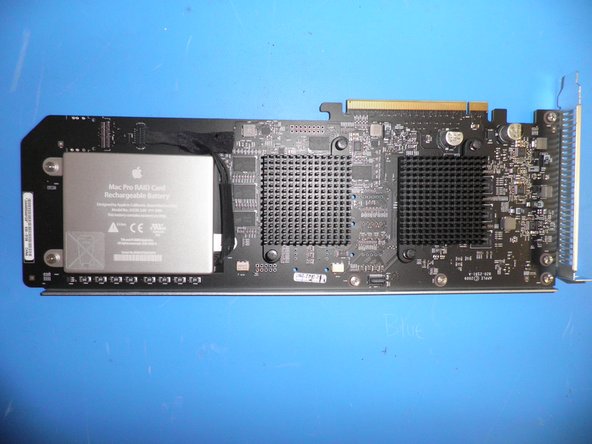
– Installing a RAID Card in Your Mac Pro (Early 2009)
Step 28

– Alright, it’s time to give your graphic card some TLC. This little guy is crucial for your display, so let’s make sure it’s in tip-top shape. First, power down your device and unplug it—no surprises here! Then, carefully open up your device, taking your time to avoid any accidental damage. When you get to the graphic card, handle it gently like you would with fragile treasure. If you’re swapping it out, make sure the new one is snug in place before reassembling everything. If it’s looking a bit too complicated or you’re feeling unsure, don’t hesitate to schedule a repair. We’ve got your back!
Step 29

– Time to dive into the world of Fibre Channel Cards! First things first, make sure you’re in a cozy, well-lit spot with all your tools at hand. It’s like setting the stage for a performance! Next, carefully remove the cover of your device to reveal the inner workings. You’ve got this! As you locate the Fibre Channel Card, take a moment to admire its sleek design. Now, gently disconnect any cables attached to it. Remember, patience is key here! If things get tricky or you feel a bit overwhelmed, don’t hesitate to reach out for support. If you need help, you can always schedule a repair. With the card out, it’s time to replace it with the new one or give it a good cleaning. Once everything is in place, reattach the cover and power it up. Voilà! You’ve just leveled up your tech skills!
Step 30

– And that’s a wrap—the device is back together and ready to roll! If you hit any snags or want a pro to double-check, you can always schedule a repair.
Success!