MacBook Pro 13″ Unibody Mid 2010 Hard Drive Cable Replacement
Duration: 45 minutes
Steps: 11 Steps
Hey there! Just a friendly heads-up: make sure to keep your workspace tidy and organized. It’ll make the repair process smoother and way more fun! If you ever feel stuck, don’t hesitate to schedule a repair for some expert assistance.
Ready to swap out that hard drive cable? This guide will help you tackle the replacement like a pro! Plus, a shiny new hard drive cable means you’ll also get a fresh IR sensor. Let’s get started!
Step 1

– Unscrew the 10 little heroes holding down the lower case of your MacBook Pro 13″ Unibody. Time to set them free!
Step 2

– Gently raise the lower case and slide it back towards the rear of the computer to pop those mounting tabs free!
Step 3

Just a friendly reminder: it’s a smart move to disconnect the battery connector from the logic board. This will help you dodge any unexpected electrical surprises. Safety first, right?
– Grab your trusty spudger and gently nudge that battery connector up and out of its cozy little socket on the logic board. You’ve got this!
Tools Used

Step 4

These screws are snugly held by the hard drive bracket, so they won’t go wandering off on their own.
– Unscrew those two Phillips screws holding the hard drive bracket snugly against the upper case and let the magic begin!
Step 5

– Gently pop the retaining bracket out of the upper case and give yourself a pat on the back for being awesome!
Step 6

– Gently grab the hard drive by its handy pull tab and slide it out of the chassis, just be mindful of the cable that’s still connected to your computer.
Step 7

– Gently disconnect the hard drive cable by pulling its connector straight out from the hard drive. You’ve got this!
Step 8
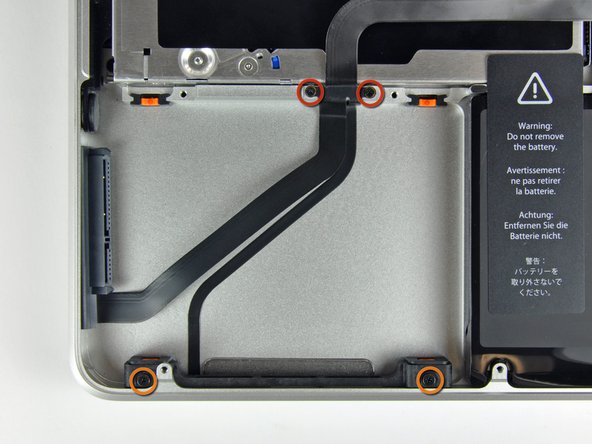
– Unscrew those four little screws holding the hard drive and IR sensor cable snugly to the upper case. You’ve got this!
Step 9


– Gently slide the hard drive and IR sensor bracket away from the edge of the upper case, like you’re giving it a little nudge to say, ‘Let’s get moving!’
– Carefully peel the hard drive and IR sensor cable from the upper case, as if you’re unwrapping a gift – take your time and be gentle!
Step 10

– Gently use the flat end of a spudger to lift that hard drive cable connector right off the logic board. You’ve got this!
Tools Used
Step 11

If your new part didn’t come with the hard drive bracket and indicator light, no worries! Just carefully detach those pieces from the old part you’re replacing and attach them to the new one. You’ve got this!
– Gently lift the hard drive/IR sensor cable assembly out of the upper case, like you’re unveiling a secret treasure!
– Your shiny new replacement part might come with a few adhesive foam bumpers. These little guys help secure both the bracket and the hard drive snugly in place. Use them as needed for a perfect fit!
