Microsoft Bluetooth Notebook Mouse 5000 Teardown
Duration: 45 minutes
Steps: 8 Steps
Unleashing the secrets of the Microsoft Bluetooth Notebook Mouse 5000! Dive into this teardown adventure and discover how to tackle it like a pro. With a clear and concise guide in hand, you’re all set to make this repair journey a breeze. If you find yourself in a pinch, remember, you can always schedule a repair!
Step 1


– Gently peel off the laser symbol from the back of the mouse. It’s just sticking there with a bit of adhesive, so it shouldn’t be too hard.
– Look for the Torx 6 screw hiding under the cover. It’s your next target.
– Whatever you do, don’t mess with the Microsoft spine between the buttons. Trust us, it’s fragile and will snap. We’ll show you what to do with it in the next step.
Step 2

– Leave the ‘Microsoft’ spine piece right where it is—no need to wrestle with it.
– Just gently shift the spine to the side so you can reach the two Phillips #0 screws hiding underneath.
Step 3
– Use a gentle side-to-side motion to carefully pop the L and R buttons past the gray spine as needed for the next step. Take your time—patience makes the process smoother. If you need help at any point, you can always schedule a repair.
Step 4


– The last two 00 Philips screws are hiding right under the L and R click buttons. Sneaky, right?
– Don’t even think about removing the ‘Microsoft spine’ piece—just gently move it aside to let the buttons slip past. Trust me, it’ll work out.
– You might need to tilt your screwdriver just right to reach those screws, but it’s not a big deal. I found it easier to approach from the middle—give it a try!
– The ‘Microsoft spine’ is locked into the button assembly with a one-way barb, like a little trap. Don’t try to yank it off without removing the whole assembly, or you’ll break it. Play it safe and take it step by step.
Step 5

– Pop the left and right sides out, they hinge up first, then swing away from the device. No screws to worry about, just two pegs on each side.
– When putting the wings back together, just drop the front onto the front peg, then gently ‘hinge’ it down onto the back peg.
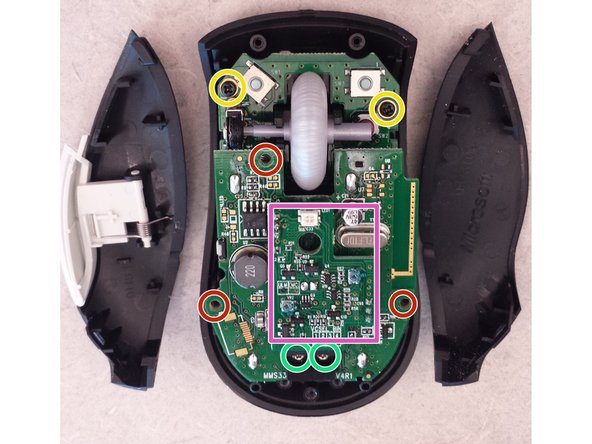
– Three Phillips 00 screws are all that keep the main board in place.
– Two Phillips 00 screws hold the L + R buttons and scroll wheel assembly. Keep those handy!
– The laser eye board is soldered to the main board, so it’s not going anywhere unless you really need to remove it.
– Two Torx T6 screws keep the lens attached to the main board. Unless you’re giving it a clean-up, you don’t need to mess with these screws.
Step 6

– Flip your device over to reveal the underside of the main board—it’s the bottom side. Next, locate the black base where a clear laser lens sits peacefully. If you unscrew the two T6 screws, you’ll be able to lift out the laser lens for closer inspection. Don’t forget, the other half of that laser lens is just waiting to be uncovered once those screws are out. Remember, if you need a hand with this process, you can always schedule a repair to get professional help.
Step 7

– Four plastic clips are keeping the battery case in place. Simply unclip one side and gently tip it out. Easy does it!
Step 8

– Two Phillips #00 screws keep the wheel and button assembly in place. I left these untouched since there are two buttons underneath. Any future disassembly should go smoothly from here.
Success!