Microsoft Kinect Accessory Camera Replacement Guide
Duration: 45 minutes
Steps: 21 Steps
The Kinect’s camera has three distinct lenses, each serving a unique purpose. If you’ve given those lenses a good cleaning and the issue still persists, don’t worry! Just follow this guide and let’s get things back on track.
Step 1


Keep the heat in check; too much can put a hurt on those delicate inner parts!
Removing the adhesive might take a bit of elbow grease, but don’t worry, it’s doable! Try applying some heat to loosen it up – it’ll make the process a whole lot easier.
– Gently pry off the two plastic strips at the bottom of the main Kinect housing using the sharper edge of your trusty metal spudger.
– Carefully peel away the two Xbox 360 stickers from the bottom of the case to uncover two sneaky hidden screws.
Tools Used

Step 2

– Alright, let’s loosen those six 12mm T10 Torx screws. You’ve got this!
Step 3


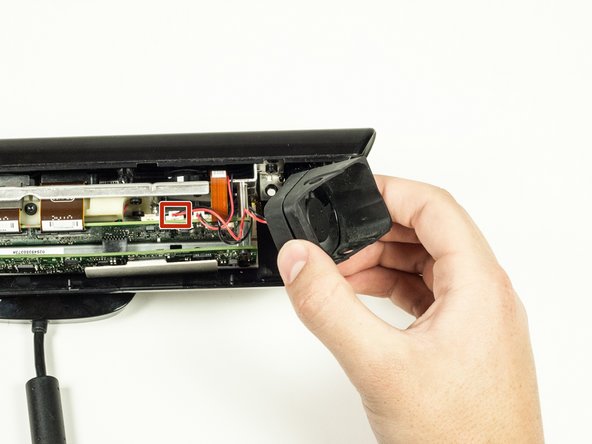
When it’s time to unplug the fan, remember to gently pull on the white connector at the end of the wire. This will help you avoid any accidental breaks, and you’ll be back to repairing in no time!
– Let’s get started by carefully removing the top portion of the case from the rest of the body – it’s the first step to freeing the insides.
– Next, gently detach the side portions of the case from the body. This will give you the access you need to move forward.
– Now it’s time to remove the fan piece from the side of the body. Don’t forget to unplug it from the logic board to fully release it from its duties.
Step 4

Sometimes that bottom case can be a little stubborn, especially if there’s some leftover glue. If you’re having trouble, don’t worry! Just give it a little heat and wiggle it around – it’ll come loose eventually!
– Let’s get started by sliding the bottom portion of the case out from under the body. It’s time to get hands-on and make some progress on this repair!
Step 5

– Let’s get started by removing the four 7mm T10 Torx screws – you’ll find two on each side of the metal body, so take your time and make sure you get them all out.
Step 6


– First, carefully remove the front part of the case that houses the camera lenses – it’s time to get inside!
– Now, let’s tackle the LED component. It’s attached to the front of the case, so simply pull it out of its plastic connector to disconnect it.

Step 8

Gently wiggle the cable free to keep it safe and sound!
– Now it’s time to get a little creative – carefully remove the microphone panel and gently thread the cable that was connected to the motherboard through the hole on the camera panel. Take your time and make sure everything is lined up nicely.
Step 9

– Let’s get started by removing the seven 6.5mm T10 Torx screws – simply unscrew them to begin your repair journey.
Step 10

– Let’s get that bridge out of the way! Gently disconnect the bridge connecting the first and second layer of the motherboard.
– Time to take the first layer of the motherboard for a spin. Pull it off carefully.

Step 12

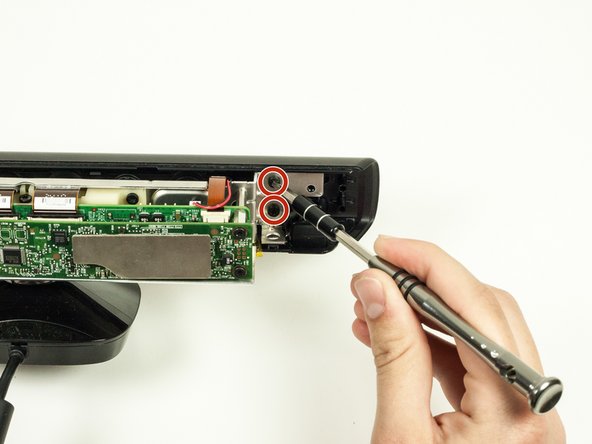
– Let’s get started by removing the three 16.5mm screws – grab your trusty 5mm Nut Driver and get to work!
– Next, take out the one 6.5mm T10 Torx screw. You’re making great progress!
Step 13

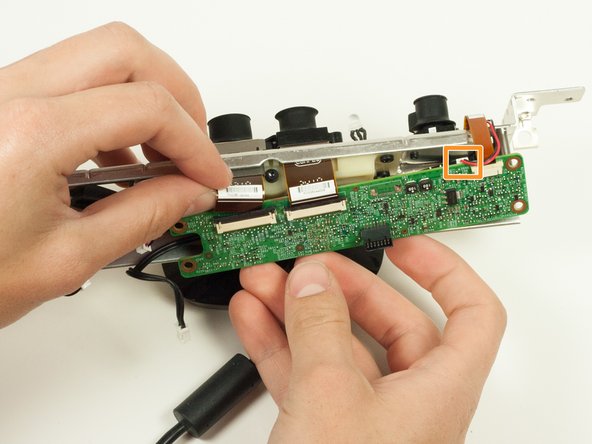
– Let’s get started by removing the three ribbon cables – this is a crucial step, so take your time!
– Next, carefully disconnect the leftmost camera from the motherboard, making sure not to damage any of the surrounding components.
Step 14

– Carefully coax the LED out of the front of the metal casing. It should glide right out without any fuss!
Step 15

– Carefully unscrew the four 7mm T10 Torx screws holding the plastic body in place. You’ve got this!
Step 16

– Alright, let’s get that gold metal cylindrical piece off the metal body on the left side of the Kinect. Think of it like taking a little vacation from the Kinect!
Step 17

– Gently lift the top part of the Kinect from its stand by guiding the cable through the nifty little hole on the bottom side of the body. Once that’s done, simply lift the body off the plastic stand with care. You’re doing great!
Step 18

– Let’s get started by removing the nine 7mm T6 Torx screws from the metal body – these screws keep the cameras securely in place, so take your time and make sure they’re all out before moving on.
Step 19

– Gently slide the plastic cover off the metal frame, letting it glide away from the metal cylinders. You’ve got this!
Step 20

– Gently detach the two connected cameras on the left by sliding their ribbon cables out of their designated slots. You’ve got this!
Step 21

Getting that cable through the hole can feel a bit like trying to squeeze a large marshmallow into a tiny graham cracker! But don’t worry, a little squish goes a long way. Just give those rubbery bits a gentle squeeze and they should slide right through. You’ve got this!
– To put everything back together, just work your way through these steps in reverse – easy peasy!
– If you didn’t quite get it done, no worries – you can always schedule a repair.
– You’re almost done! Take a deep breath, you’ve made it through the tough part.
Success!
