Microsoft Surface 2 I/O Cable Replacement
Duration: 45 minutes
Steps: 5 Steps
If you’ve tried turning on your Microsoft Surface 2 multiple times and it’s still not budging, it might be time to swap out the I/O cable that houses the charging port. This same cable also controls the SD card slot, so if that’s not working as expected, it’s a good idea to replace it as well. Don’t worry, it’s a straightforward fix! If you need help, you can always schedule a repair.
Step 1


Keep the heat gun at a safe distance from the Microsoft Surface 2 to avoid any accidental warping – we don’t want any unexpected shape-shifting!
Watch out for the metal tip of the gun – it’s hot enough to make you say ‘ouch!’ Keep your hands safe and avoid touching it.
– Start by warming up the adhesive around the edge of the screen using a heat gun or the iOpener. Patience pays off here—take your time to get things nice and toasty.
– Slide opening picks just under the screen and that black border, making sure to keep things balanced by placing them evenly on each side.
– With the picks creating a gap, gently work a plastic opening tool around the edge to lift the screen away from your Microsoft Surface 2. Keep it even and slow for the smoothest results.
Tools Used

Step 2


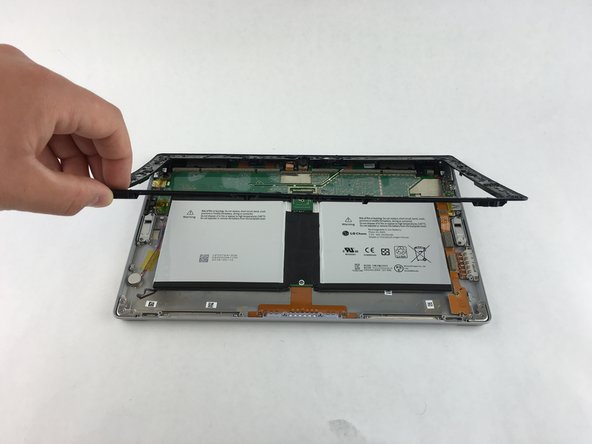
Now that the screen is separated from the body, you’ll notice a ribbon cable keeping it connected to the motherboard. It’s like the final thread holding everything together.
Sometimes, the ribbon cable might be stuck to the motherboard with a little glue. Just be gentle as you work it loose.
– Grab a plastic spudger and gently wiggle it to lift the retaining clip away from the display cable.
– Carefully tug on the ribbon cable, pulling it free from its socket on the motherboard.
Tools Used

Step 3

– Keep your workspace near a Magnetic Project Map to make sure those pesky screws don’t go on an adventure.
– Unscrew the ten 3.45 mm T3 screws located at the corners of the black plastic bezel. They’re hiding, but not for long!
– Next, tackle the remaining seventeen 4.4 mm T5 screws around the edges of the bezel. You’re almost there!
– Once all the screws are out, gently lift the bezel off the device. It should come off smoothly—if it’s being stubborn, take a breath and try again.
Step 4
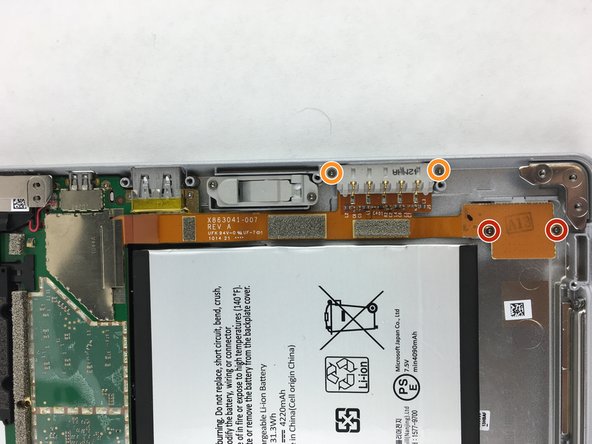

– Use your T3 screwdriver to take out the two 2.19 mm screws holding the SD card ribbon cable—don’t mix them up with the others!
– Next, unscrew the two 3.27 mm T3 screws that secure the charging port. Easy does it!
Step 5


– Grab your trusty spudger and gently lift the retaining plate at the end of the ribbon cable.
– Use the spudger to carefully flip up the tiny retaining flap on the cable’s zero insertion force connector.
– Now, carefully remove the ribbon cable from its port. You’re almost there!
Careful! You want to lift the little locking flap, not the connector itself.
The retaining chip might be snugly glued onto the motherboard, so a gentle touch is usually enough. When it comes to the ribbon cable, there’s no need to yank or force—just plug it in or out with ease. If you run into any snags, remember, you can always schedule a repair to get professional help.
Tools Used
Success!