Microsoft Surface 3 15-inch Replacement Guide
Duration: 45 minutes
Steps: 24 Steps
This guide will walk you through removing or swapping out the heatsink, or fixing up a troublesome cooling fan, on a Microsoft Surface Laptop 3 (15″).
Step 1


– First things first, let’s give your laptop a little break—power it down and unplug all those pesky cables.
– Now, go ahead and close that laptop like you’re tucking it in for a cozy nap.
Step 2


– Turn your laptop upside down and set it on your workspace with the feet pointing up.
Step 3


Time to pop off those laptop feet using the spudger’s pointed end.
Heads-up: the rear (screen) edge feet are different from the front ones.
– Each little foot has a sneaky hidden notch to make your life easier.
– To hit the sweet spot, slide the spudger into the nearest long edge, keeping it parallel to the short edges of the laptop—just like the diagram shows.
Tools Used

Step 4


The two back feet are held in place with a bit of light adhesive magic.
– Slide the sharp end of a spudger under one of the rear feet, right at its back edge.
– Gently lift the spudger to pop the foot off with a satisfying little crack.
– Now, do the same for the second rear foot and get ready to move on!
Tools Used
Step 5


The two front feet are held in place with plastic clips and just a touch of adhesive. Easy peasy!
– Let’s get started by inserting the pointed end of a spudger under one of the two front feet, right at its front edge. Easy does it!
– Gently push the spudger under the foot and pry up to release it. You’re making great progress!
– Repeat the same steps to remove the second front foot. Almost there!
Tools Used
Step 6


– As you put everything back together, keep in mind that the front and rear feet are not the same.
– Remember, the front feet have a special way they like to clip in—make sure to align them just right!
Step 7


– Instead of sticking with those old, tired feet on your device, why not jazz things up with some 8 mm rubber furniture pads? They’re a fantastic alternative!
– Just peel a pad off its backing, line it up over the foot cavity, and give it a good press to make sure it sticks. Easy peasy!
Step 8

Stay organized and keep those screws in check! Make sure each one goes back to its original spot to avoid any damage to your laptop. It’s like solving a puzzle, and we’ve got your back!
– Grab a T5 Torx driver and unscrew the four 3 mm screws hanging out in the foot cavities that are keeping the upper case locked down.
– When putting it all back together, go easy on those screws—tighten gently, as they can strip out faster than you’d think!
Step 9


– Turn the device upside down. Time to flip it like a pancake!
– Push the display open as wide as it’ll go. Stretch it out, but gently—no wrestling moves!
Step 10


Hold up! Don’t yank off that upper case just yet—it’s still tethered to the rest of the laptop, so take it easy.
Double-check that the upper case hugs the edges snugly all around. Any gaps near the display could spell trouble for the screen when it’s shut.
The top cover is snugly held in place by magnets.
– Grasp the top edge of the upper case above the keyboard and lift it straight up to pop it free.
– Gently lift the front edge of the upper case away from the laptop, making sure not to put any strain on the keyboard and touchpad ribbon cable underneath.
– When putting everything back together, lower the upper case onto the lower case until the magnets click into place, and it lies flat.
Step 11


First, let’s get started by locating the keyboard and touchpad ribbon cable – it’s held in place by a sneaky magnet connector!
On some models, you might find this connector is wrapped up in black tape, so be sure to check for that before proceeding.
– Gently slip the flat end of a spudger under one side of the ribbon cable connector and give it a little lift to pop it free.
– Carefully detach the ribbon cable from the motherboard—nice and easy now!
Tools Used
Step 12


Make sure the ribbon cable is sitting nice and flat, without any twists or tension. Give it a little love, so it stays smooth and relaxed.
– Pop off that upper case like a pro.
– Flip it over onto a clean surface, with the keyboard side chillin’ face down.
Step 13

Taking out the SSD is like giving your device a little nap—it also disconnects the battery! Make sure to do this before diving into any big repairs.
– Grab your trusty T5 Torx driver and unscrew that 2.7 mm screw holding the SSD in place. You’ve got this!
Step 14


Once you’ve tackled that SSD screw, watch as the SSD gracefully lifts up at a slight angle, ready for its next adventure!
– Grab the end of the SSD and gently wiggle it free from its board connector. You’ve got this!
– When you’re putting things back together, angle the SSD in just a bit, then slide it into the board connector. Once it’s snug, secure it in place with the SSD screw. Easy peasy!
Step 15


– Grab those trusty tweezers and peel off the two pieces of black tape hanging out at the bottom left and bottom right corners of the motherboard.
– When putting things back together, if the tape still has some stickiness left, go ahead and reapply it.
Tools Used

Step 16


Be gentle with the shield—it’s going to need to go back in during reassembly, so let’s keep it in good shape!
– Grab your trusty opening tool and gently pop up the front edge of that metal shield over the heatsink. Easy does it, you’ve got this!
Step 17


– Gently work your way around the edge of the shield, lifting it up a bit at a time, until you can pop it off completely. Keep it steady and you’ll get there!
Step 18


– Pop off that heatsink shield like a pro.
Step 19
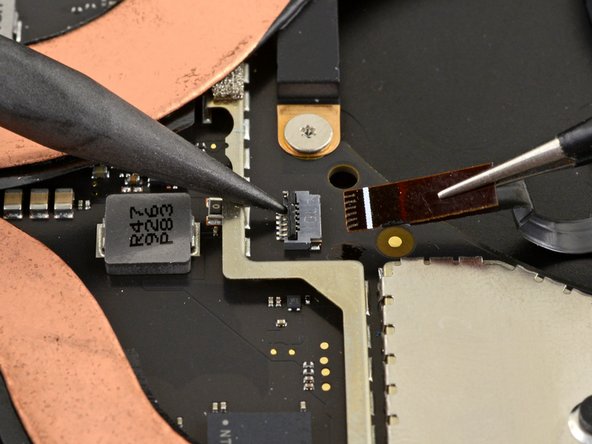

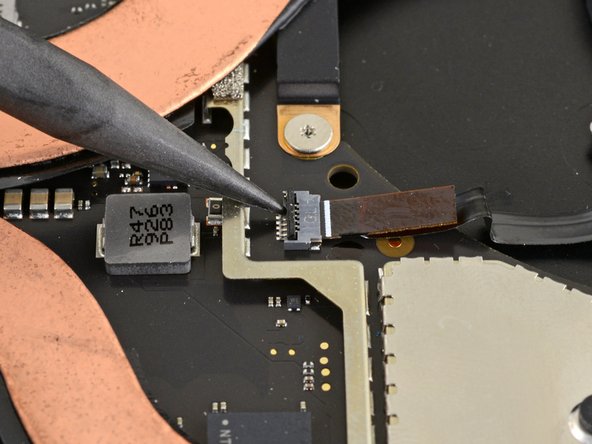
– Grab the pointy end of your trusty spudger and carefully pop up the little locking flap on the fan cable’s ZIF connector. It’s like opening a tiny treasure chest—go slow and steady!
– Now, with your tweezers in hand, gently pull that fan cable straight out of the connector. No yanking—just a smooth, confident move!
Step 20

– Grab your T3 Torx driver and take out those ten screws holding the heatsink in place:
– Two 2.5mm screws
– Three 2.0mm screws
– One 3.0mm screw
– Two 4.1mm screws
– Two 3.4mm screws
Step 21

– When you’re putting things back together:
– Line up the heatsink with the centering peg on the motherboard.
– Tighten the four CPU tension screws in a cool X pattern.
Step 22


– Use your fingertip to carefully lift the far-right edge of the heatsink up and off the small alignment peg near the right side of the fan on the lower case—just like giving it a tiny high-five!
– Once the heatsink is free from the peg, gently slide the right edge toward the front of the device. Easy peasy!
Step 23


Be gentle when handling the heatsink; those heat pipes don’t like being bent out of shape.
If the heatsink feels glued to the CPU, give it a gentle side-to-side wiggle to free it from the clingy thermal paste.
– Pop off that heatsink!
Tools Used

Step 24


– Match up your new part with the old one—you might need to swap over any extra bits or peel off adhesive before getting it in place.
– To put your device back together, just reverse the steps you’ve followed so far.
– Recycle your e-waste responsibly at an R2 or e-Stewards certified recycler.
– Having trouble with the repair? Try some basic troubleshooting or search our Answers community for tips.
– Cancel: I didn’t complete this guide.
– If you need help, you can always schedule a repair
Tools Used
Success!