
Microsoft Surface Pro 7 Kickstand Hinge Replacement
Duration: 45 minutes
Steps: 22 Steps
Be careful! The display panel is delicate, and there's a good chance it could break during this procedure. Handle with care!
Get ready to tackle the task of swapping out one or both kickstand hinges on your Microsoft Surface Pro 7! Just a heads up—while you're getting into this, there's a chance the delicate display panel might get a little too adventurous and break on you. So, remember to bring the heat and be super cautious when cutting through that sticky adhesive. And hey, don’t forget those safety glasses—just in case the glass decides to throw a surprise party!
Step 1


Put on those stylish safety glasses to keep your peepers safe, and remember to treat that LCD screen like the fragile beauty it is!
This keeps those sneaky glass shards from escaping and gives your display some solid backup when you’re prying and lifting.
- Got a cracked display? No worries! Let’s keep those pesky shards contained and avoid any potential ouchies while you work your magic. A little tape goes a long way!
- Grab some clear packing tape and lay down overlapping strips all over your device's screen until it’s fully covered. Think of it as a protective shield!
- Now, follow along with the rest of the guide to get things sorted. Just a heads-up: once the glass starts to crack, it might want to keep on breaking. If that happens, feel free to use a metal prying tool to gently scoop out the glass. You've got this!
Step 2

Make sure to power off your Surface completely before diving in. Safety first!
If you need a bit more heat, a hair dryer or heat gun can do the trick. Just be mindful though—don’t overdo it! Both the screen and battery are sensitive to heat and can take some damage if you’re not careful.
You might have to heat up and reapply the iOpener a few times to get the tablet nice and toasty. Just follow the iOpener’s instructions so you don’t overdo it.
- Heat up your iOpener and give it a cozy spot on the right edge of the screen. Let it chill there for about two minutes to loosen things up.
Tools Used

Step 3

- Before diving in, take a moment to check out the layout of the adhesive on the screen. It's like your roadmap for this journey!
- These specific areas are just adhesive party zones, so feel free to cut away without worry.
- Watch out! The display board and flex cables are hanging out close to the edge. Slice carefully, and remember: no pick should venture deeper than 1/8 inch (3 mm).
- Beneath this section of the screen are delicate antenna cables. Follow the steps in step 13 like a pro to keep them safe. Plus, this is where the adhesive gets a bit thicker, so tread lightly!
Step 4


Keep that opening pick just at the edge of the black bezel, okay? Going too deep might give your LCD a case of the ouchies!
- Slide an opening pick into the tiny speaker slot on the screen and gently work it between the glass and the speaker grille like you're performing a delicate dance move!
Step 5


- Tilt the pick towards the bottom of the Surface and gently slide it under the lower edge of the speaker cutout. Give it a little nudge and you're on your way!
Step 6


If you’re feeling some serious resistance while sliding the pick, don’t push it! Take a breather, reheat that section, and give it another go. Remember, too much force can turn your glass into confetti, and nobody wants that!
- Gently glide the pick down the right edge of the Surface to break through the sticky stuff holding the screen in place.
- Keep that opening pick snug in the right edge to stop the adhesive from making a comeback.
Step 7

You can also use a hair dryer or heat gun for extra heat, but go easy—overheating the Surface isn’t cool since the screen and battery don’t like too much heat!
You might have to heat up and reapply the iOpener a few times to get your tablet nice and toasty. Just follow the iOpener’s guidelines to keep things from getting too hot!
- Heat up your trusty iOpener and gently place it on the bottom edge of your Surface's screen for a solid two minutes. Let's get that adhesive nice and toasty!
Tools Used
Step 8


Keep the opening pick shallow—don’t push it past the black bezel along the screen’s edge. Going too deep might mess up the LCD, and we want to keep that screen happy!
- Pop a new opening pick into the bottom right corner and glide it around the corner heading toward the bottom edge.
- Gently slide the pick along the bottom edge of your Surface to slice through that stubborn screen adhesive.
- Keep this pick wedged at the bottom edge to stop the adhesive from locking back together.
Step 9

If you're feeling extra, you can grab a hair dryer or heat gun to amp up the heat a bit, but don’t go overboard! Remember, the screen and internal battery are pretty sensitive to heat. A little warmth goes a long way!
You might have to warm up and reapply the iOpener a few times to get your tablet nice and toasty. Just follow the iOpener’s instructions to keep things from getting too hot.
- Warm up your trusty iOpener and give it a cozy spot on the left edge of the Surface's screen for a solid two minutes.
Tools Used
Step 10


Heads up! When cutting under the lower 2.5 inches (65 mm) of the left edge, keep your opening pick no deeper than 1/8 inch (3 mm). The display cables hang out close by and are easy to nick. After you’re past the cable zone, don’t push the pick beyond the bezel—stay safe and steady!
- Pop a fresh opening pick into the bottom left corner and wiggle it around the corner towards the left edge.
- Slide that pick along the left edge of the Surface to help break through the sticky screen adhesive.
- Keep that pick in the left edge to ensure the adhesive doesn’t play any tricks and reseal itself.
Step 11

A hair dryer or heat gun can amp up the heat if needed, but take it easy—overheating the Surface might fry the screen or battery, and that’s no fun.
The adhesive is thickest along this edge, so it might take a few attempts to get the tablet warm enough. Feel free to reheat and reapply the iOpener as needed, but remember to follow the iOpener instructions closely to avoid overheating. Patience is key here!
- Heat up your iOpener again and stick it onto the left side of the Surface's screen for a solid two minutes. Let that heat work its magic!
Tools Used
Step 12


Heads up! The next 6 inches (15 cm) along the top edge of the case hide the left and right antennas, snuggled between the case and the screen bezel. Take it slow and steady here to keep those antennas safe and sound.
- Gently curve the opening pick around the left corner and glide it along the top edge of the Surface. Pause when the pick is about 2.75 inches (70 mm) away from the left edge.
Step 13


Be careful! The delicate antenna cables are tucked just beneath the top edge of the screen. Follow the steps with precision to keep them safe and sound!
- Slide the tip of your pick right under the display where you left off cutting. Keep it shallow—don’t push it past the bezel’s edge.
- Gently roll the pick to the right, pressing its long edge into the adhesive holding the screen under the bezel. This motion slices through the glue—just don’t drag the pick along the Surface’s edge.
- Keep repeating: stick the pick point where you last cut, then roll it to the right along the top edge, until you’re about 2.5 inches (64 mm) away from the Surface’s right side.
Step 14


- After you've sliced through the adhesive near the antennas (about 8.5 inches or 22 cm from the left side), grab your pick and keep it moving along the top edge. When you reach the top right corner, curve it gently to cut through any remaining adhesive. Smooth and easy!
Step 15


Hold your horses! The screen is still snugly connected to the motherboard with two cables. Let's not rush this part.
- Gently coax the screen assembly away from the Surface case, taking your time! If you hit a snag, pause and ensure all the adhesive is fully detached.
- Grab an opening pick and carefully slice through any leftover adhesive—it's like cutting through butter!
- Watch out for the flash lens; it might just pop out of the Surface case. Keep it safe and remember to pop it back into its spot when you're putting everything back together.
Step 16


Be gentle with those display ribbon cables — they’re delicate and don’t like any pulling or stretching!
Gather your trusty tweezers and spudger, because you're going to need them right up front!


Step 17


- Grab the pointy end of your spudger and gently press on each side of the battery connector with care.
- Switching sides like a pro, slowly wiggle the connector out of its socket, nice and easy.
Tools Used
Step 18


Keep that tape cozy on the ribbon cable – it's doing an important job!
Step 19


Keep that tape on the ribbon cable! It's doing its job, so let's not disturb it.
- Grab your trusty tweezers and carefully peel back that shiny silver tape that's holding the right display cable snug to the motherboard. You've got this!
- Now, take the flat end of your spudger and gently lift the right display cable straight up to disconnect it from the motherboard. Easy peasy!
Step 20

- Take off the screen carefully.
- When you get to this point while putting things back together, jump over to the screen adhesive replacement guide to finish up the job.
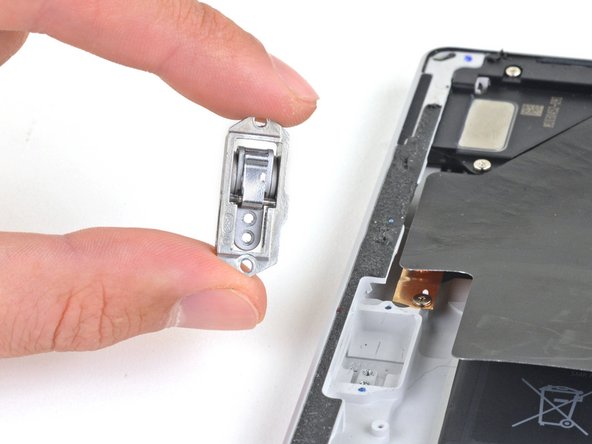
Step 21


- Time to get those kickstand hinges ready for action! First up, let's unscrew the four screws that are holding them in place. Here's what you'll need to tackle this job:
- Two 2.7 mm T3 Torx screws
- Two 3.9 mm T5 Torx screws
Step 22

- Put your device back together by reversing the steps above.
- Remember to recycle your e-waste responsibly at an R2 or e-Stewards certified facility.
- If things didn’t go quite as expected, try some basic troubleshooting, or reach out to our community for advice. And if all else fails, you can always schedule a repair!