Microsoft Surface Rear Cover Replacement
Duration: 45 minutes
Steps: 6 Steps
Alright, let’s get that Microsoft Surface tablet back cover off smoothly and easily! You’ll need just a few tools to make it happen – a soft flat-headed prying tool for popping off panels, a trusty T5 Torx screwdriver, and, of course, your Microsoft Surface itself. Safety goggles are a must because we like those eyes just the way they are. Make sure you’re set up in a clean workspace with good lighting, and you’re all set to go! This task involves removing a handful of tiny screws and panel covers around the camera, so take it slow and steady. Let’s make those tools work their magic!
Step 1


Shut down your gadget completely before moving forward—it’s always better to start the journey with a clean slate!
– Before diving into repairs, double-check that the device is positioned correctly. Get familiar with all its ports and buttons. The screen should be facing up with the Windows logo chilling at the bottom—ready to roll!
Step 2


– Flip the tablet so its screen faces down—gently, like you’re tucking it in for a nap.
– Grab the bottom corners and lift them up to pop open the stand. You’ve got this!
Step 3


You’ll find those two little screws hanging out on the left and right sides of the kickstand, just waiting to be unscrewed!
– Take out the two 5.1 mm T5 Torx screws. Easy peasy, right?
– When removing the screws, take a moment to be gentle—no one likes a stripped screw head!
– Once the screws are out, give the stand a little shimmy-shake from side to side until the lever in the middle pops free, letting the stand go. Smooth moves!
Step 4


Take it slow—those small bezels along the edges mean you’ll need to work carefully around the casing. Keep it chill and steady, you’ll do great!
– Let’s get started! Use a spudger or a similar flat-headed tool to carefully release the small bezels outlined in the image. Next, gently remove the plastic trim covering the camera using the soft, flat-headed tool. Remember to take your time and be patient – you’ve got this!
Tools Used

Step 5


Heads up: there’s a sneaky electrical ribbon hooking the rear cover to the motherboard. Once you loosen the rear cover, resist the urge to yank it off—keep it cool and steady.
– Alright, let’s get crackin’! Start by unscrewing the ten 5.92mm T5 Torx screws hiding under the kickstand. Don’t be shy—show those screws who’s boss!
– Next up, tackle the seven 5.87mm T5 Torx screws lounging beneath the camera casing. Oh, and heads-up! There’s a sneaky sticker hiding the second screw from the left. Peel it off carefully and keep going!
– Now, grab your trusty spudger and gently work some magic! Start loosening the back cover from the main shell wherever there’s a gap. It’s like separating peanut butter from jelly—go gently but firmly.
– Keep spudging your way around—hit up all the corners and pop those snap-ons loose one by one. Take your time, and soon, the rear cover will dance right off. Pat yourself on the back!
Tools Used
Step 6


Reattaching the rear cover to the motherboard? Reinserting that ribbon cable might feel like threading a needle in a snowstorm with a spudger. No worries—ditch the spudger for this step! Use your fingers to gently slide the cable end into the slot until you hear a satisfying click. Smooth and steady wins the race!
– Flip the device around so the bottom part is now your focus point—nice work, you’re halfway there already!
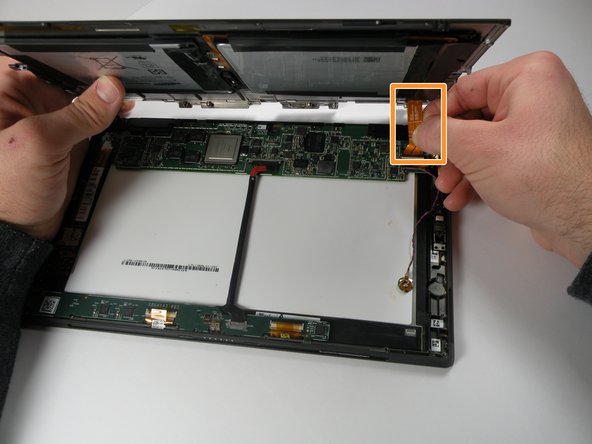
– You’ll spot a ribbon connecting the battery on the rear cover to the motherboard. Gently lift the bottom part of the rear cover until you get a peek at that ribbon—go slow and steady.
– Grab a spudger (your trusty tool!) to nudge the ribbon away from the motherboard. Make sure you’re sliding it parallel to the motherboard for a clean removal. Look at you go!
– Lift the rear cover straight up and off, separating it from the main system. Boom—you’re making this look easy!
Tools Used
Success!