Nintendo 3DS XL Upper LCD Display Replacement
Duration: 45 minutes
Steps: 29 Steps
First, let’s dive into the lower case of your Nintendo 3DS XL. Once that’s done, we’ll tackle the upper case to get to those sneaky ribbons connecting the Upper LCD screen to the rest of the device. You’ve got this!
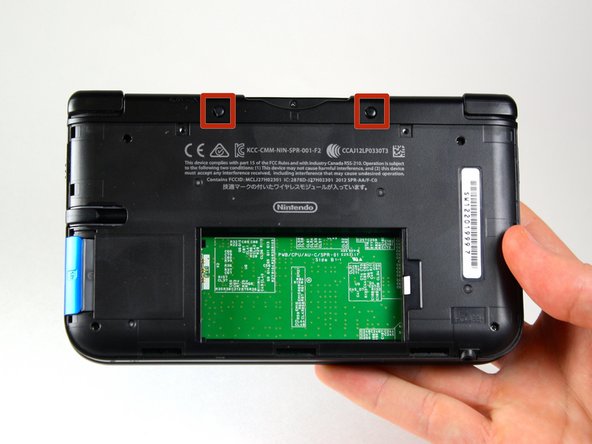
Step 1


The screws have nifty locking washers that keep them snugly attached to the back cover. No need to mess with these washers—they’re staying right where they belong for this repair guide. Easy peasy!
– Unscrew the two #00 Phillips 4.2 mm screws hanging out at the top of the back cover. Time to let them take a break!
Step 2


– Grip your device with the cover facing up.
– Use a plastic opening tool to gently pry off the cover starting at the top right corner.
– Remove the cover completely and set it aside.
– Hold onto the edge of the cover to prevent it from reattaching.
– Check the area below the stylus compartment. If the cover is still attached, pry it off there.
Step 3


– Grab that trusty plastic opening tool and slide it into the groove on the right side of the battery—just like a pro.
– Gently pry the battery out of the lower casing. No need to rush, take your time and let the tool do the work.
– Carefully lift the battery out of its spot and set it aside like the champion you are. Onward to the next step!
Step 4

– Grab your trusty tweezers and gently pluck out those little rubber bumpers chilling at the top of the device, right on either side of the game cartridge slot. Easy-peasy!
Tools Used

Step 5


– Grab your trusty Phillips #00 screwdriver and start unscrewing those six 6.2 mm screws. Take your time – no rush, we’ve got this!
Tools Used

Step 6

– Use your trusty Phillips #00 screwdriver to unscrew the 2.3 mm screw hanging out above the game cartridge slot. It’s time to show that screw who’s boss!
Tools Used
Step 7


– First things first, let’s get that SD card out of the way! Grab your trusty plastic opening tool and gently pry off the lower case, starting from the bottom edge and working your way around the perimeter. Easy peasy!
– Now, as you lift the case, you’ll notice two ribbon cables connecting it to the circuit board. Be super careful here—don’t yank too hard or you might accidentally rip those cables. Take your time and you’ll be just fine!
Step 8


– Gently lift the ribbon cables tucked under the left and right bumpers using a plastic opening tool – treat them like delicate little flowers!
– Carefully detach the lower case from the rest of the device and place it to the side, giving it a comfy rest.
Step 9


– Set up the device so the game cartridge slot is at the top.
– Find the circle pad on the right side of the device.
– Unscrew the two 7.5 mm screws at the top left and bottom right corners.
Step 10


There’s a loose washer chilling between the circle pad joystick and the circle pad. Handle with care and don’t let this little piece escape!
– Grab that trusty plastic opening tool and gently pop off the circle pad joystick. No hulk moves here—just a smooth and steady hand!
– Easy does it—don’t go all out with the tool. There’s a delicate ribbon connecting the circle pad joystick to the motherboard, and it’s staying put for now.
Step 11


– Grab the flat head side of your trusty spudger and gently pop up the retaining flap that keeps the circle pad ribbon snug on the motherboard.
– Slide out the ribbon and lift away the circle pad joystick like a pro. On to the next step!
Tools Used

Step 12


Oops! It looks like the IR board is upside-down in these photos. If you install it like this, your DS might just refuse to wake up. Before you take it out, make sure to check the orientation of your IR board, and put it back in the same way. You’ve got this!
– Flip the device so the game cartridge slot is at the top.
– Spot the IR board chilling on the upper right of the motherboard.
– Use a plastic opening tool to gently lift the IR board by sliding the tool beneath it and carefully prying up.
Step 13


– Grab a plastic opening tool and gently work your way around to lift the Wi-Fi board off. Don’t worry, it’s still connected by a wire, so there’s no need to take it completely out just yet. Just move it aside for now.
Step 14


– First things first, find that volume switch hanging out on the right side of the motherboard, right next to the circle pad joystick. It’s playing hide and seek!
– Now, grab your tweezers and gently coax the volume board out of its cozy casing. Don’t worry, it’s still connected to the motherboard by a ribbon cable, so it’s not going anywhere just yet!
Tools Used
Step 15

– Gently use the flat head side of the spudger to lift the flap connecting the volume board ribbon to the motherboard. Take your time, you’ve got this!
– Carefully remove the volume board and set it aside for now. You’re making great progress!
Tools Used
Step 16


– Gently pluck out the black plastic pieces from the lower left and right corners using your fingers or tweezers. You’ve got this!
– For an easier escape, try flipping the 3DS upside-down. Those little guys usually pop right out, but keep an eye on them so they don’t run away!
Tools Used
Step 17


– Grab that trusty flat-head spudger and gently lift the flap that holds the two smaller ribbons to the motherboard.
– The flaps are hanging out on the top right and bottom right of the motherboard.
– Now, carefully detach those ribbons from the flap. You got this!
Tools Used
Step 18


For the wider ribbons, remember to lift the flaps from the white side, just like unlocking hidden secrets!
– Grab your flat-head spudger and gently lift the flaps holding the wider ribbons to the motherboard.
– Carefully remove the ribbons from the raised flaps.
Tools Used
Step 19


To lift this flap, go for the black side—it’s the key to success!
– With the flat side of the spudger, gently lift up the flap holding the ribbon to the motherboard.
– Slip the ribbon out from under the flap.
– Reassembly: This wide ribbon, identified by the BLACK STRIPE, belongs on the top (visible) side of the motherboard during reassembly.
Tools Used
Step 20


– Take out the ten 3.0 mm screws around the motherboard’s face. Easy peasy!
Step 21


Heads up! The motherboard is still clinging on at the top right corner, so don’t yank it off just yet.
– Carefully lift the board straight up just enough to clear the two plastic mounts near the top corners of the cartridge slot.
– Gently flip the motherboard over to the top side.
Step 22


Be sure to gently lift the flap from the white side. You’ve got this!
– With a gentle touch, use the flat head side of the spudger to lift the flap that connects the wider ribbon on the upper right side to the motherboard. Take your time, you’ve got this!
– Once the flap is open, carefully remove the ribbon from its cozy spot.
– Now, set the motherboard aside and give yourself a pat on the back for a job well done!
Tools Used
Step 23


– Pop the device open so that the top LCD screen faces up.
– Grab your trusty tweezers and carefully remove the four rubber bits from each corner.
Tools Used
Step 24


– Pop off those four little rubber feet to reveal the hidden screws beneath, then grab your Phillips #00 screwdriver and unscrew the four 4.3 mm screws like a pro!
Tools Used
Step 25


– Flip your device upside-down and snap that hinge shut.
– Place your fingers on top of the hinge and give it a gentle push down. Slide the cover down and away from the hinge—it only moves about 2mm (1/8″). Easy does it!
Step 26

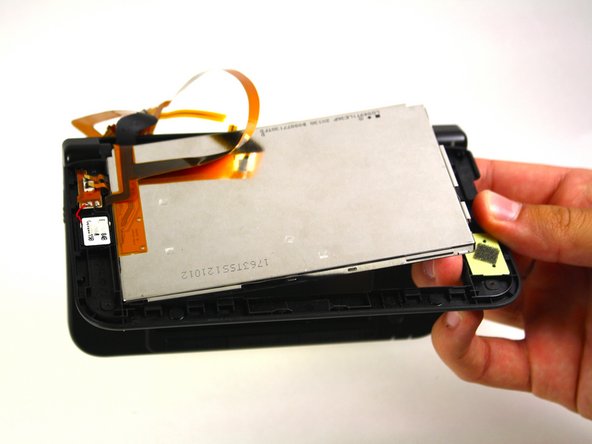
– Once you’ve got the top case all loosened up and unhooked, go ahead and lift it off the device like a pro!
Step 27


Those ribbons are stuck on there with some pretty strong adhesives, so be gentle while prying them off.
– Take out the screw securing the 3D mechanism toggle button.
– Gently detach the ribbons connecting the camera and speakers to the Upper LCD.
Step 28

– Gently detach the two tiny ribbons nestled in the upper left corner.
– Grab your trusty spudger and carefully lift the black hinges that hold the ribbons to the bracket.
– Now, give those ribbons a little tug and pull them out of the bracket.
Tools Used
Step 29


Don’t let those tiny fabric and rubber water-resistant rectangles for the speakers escape—they’re sneaky and love to disappear when the speakers are removed. Keep an eye on ’em!
While it’s not absolutely necessary, popping off the hinge barrel on the right side makes tackling those ribbon cables way easier.
– To reassemble your device, follow these instructions in reverse order.
– Cancel: I did not complete this guide.
– 147 other people completed this guide.
Success!
