Nintendo 64 Teardown Guide: Step-by-Step DIY Tutorial
Duration: 45 minutes
Steps: 9 Steps
Celebrating 20 years of gaming glory, we’re cracking open the iconic Nintendo 64 to uncover the magic inside this legendary console that shaped a generation.
Step 1

– The Nintendo 64 was Nintendo’s third home console, a total game-changer when it hit the scene in 1996 in the US and Japan. Packing a punch with 64-bit graphics, it delivered the sharpest, most immersive gaming visuals of its time. The N64 was a collaborative brainchild of Nintendo and Silicon Graphics.
– Under the hood: a NEC VR4300 64-bit CPU clocking in at 93.75 MHz.
– Graphics powered by the Silicon Graphics Reality Coprocessor (RCP) GPU for those sweet visuals.
– Supports 576i (720×576) composite video output for a crisp display.
– And hey, it’s a gamers’ dream with support for up to 4 players—couch gaming at its finest!
Step 2


– Time to get familiar with the I/O ports!
– You’ve got 4 N64 controller ports – perfect for some friendly gaming competition
– The Nintendo 64 Game Pak slot is where the magic happens – insert your favorite game and get ready to play
– Next up, we have the composite video cable port – this is where you connect to your TV
– Last but not least, there’s the N64 power supply port (12V/3.3V DC switching) – the power behind the fun
Step 3


– Okay, let’s kick things off by popping off the top cover—easy peasy!
– Next up, grab your trusty Gamebit 4.5mm screwdriver and unscrew the 6 screws hanging out at the 4 corners, plus the ones chilling near the top-middle and bottom-middle.
– Now, using a metal spudger, slide the Jumper Pak out of its slot like a pro and set it aside for safekeeping.
Step 4


– Stand the console up, and the top cover pops right off.
– Use a Philips #2 screwdriver to remove the 10 crossbar screws.
– Take out the 2 screws holding a piece of the expansion slot shield, also with a Philips #2.
– Remove the 2 black screws and the one at the bottom left of the expansion slot shield with a Philips #2.
– Lastly, remove the 2 long screws from the ends of the slot with a Philips #0.
Step 5


Don’t forget to take these parts off BEFORE you tackle that heatsink crossbar!
– Pop off the three pieces of the expansion slot shield like a pro.
Step 6


– Time to say goodbye to the heatsink crossbar! It pops right off, giving us a clear view of the motherboard shield.
– Now, let’s tackle those 5 screws on either side of the shield. A trusty Philips #2 will make quick work of them!
– Next up, we’ve got 2 screws on each side of the Game Pak slot. They’re a bit longer but still manageable with that Philips #2.
– And just like that, the shield slides off like a charm, revealing the heart of the Nintendo 64’s power!
Step 7

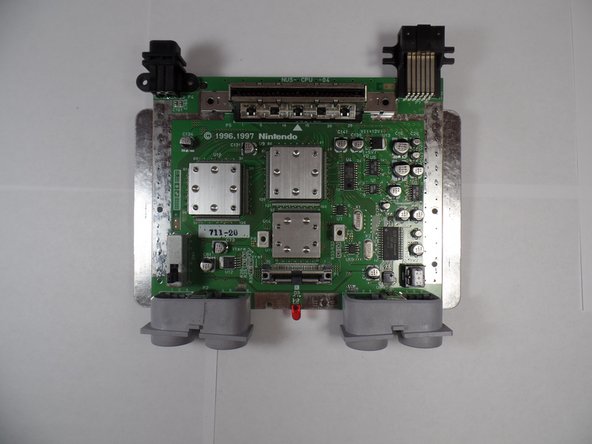
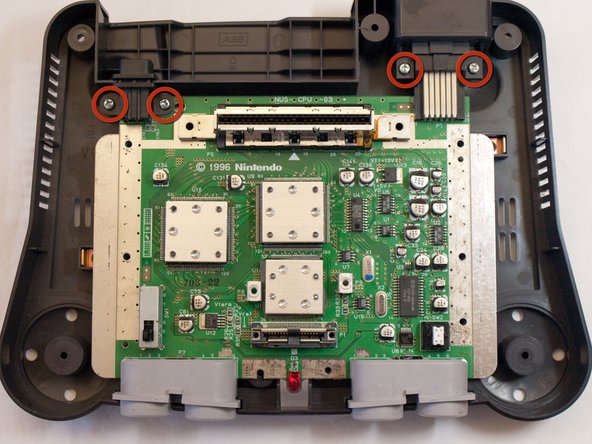
– The motherboard sports three eye-catching steel blocks, hinting that the crucial components are nestled beneath them. But hey, let’s safely remove the motherboard from the bottom case first.
– To get the motherboard out, unscrew the 4 Philips #2 screws from the two back I/O ports, and voilà, the motherboard is ready for extraction.
Step 8


– Grab your trusty Jimmy and gently pry off each chip’s heatsink to uncover the magic inside the console’s processing units.
– Nintendo CPU-NUS-A
– Nintendo RCP-NUS
– Nintendo RDRAM18-NUS-B (2x2MB modules)
Step 9

– And that’s a wrap on dismantling one of the all-time legendary consoles. High five for pulling off this teardown like a pro!
Success!