PlayStation 3 Fat 4 USB Teardown
Duration: 45 minutes
Steps: 16 Steps
Time to get your PS3 Fat nice and clean! Start by opening it up and giving the inside a thorough clean-up. You’ll also be swapping out that old thermal paste for some fresh stuff to keep things running cool. It’s been through some battles, so don’t be surprised if there’s a lot of dust hiding in there. Ready to breathe new life into your console? Let’s get started!
Step 1

– Time to jump in! Follow these steps and your device will be back in action before you know it. No sweat—just take it one step at a time, and you’ll be all set.
Step 2


– Alright, let’s get rolling! Follow each step below and you’ll have this sorted out in no time. Take it slow, keep your workspace tidy, and remember: you got this!
Step 3

– Get started on this repair by following these simple steps. All you need to do is follow the instructions and you’ll be rocking and rolling in no time. Start by reading through the entire guide, familiarizing yourself with the steps involved. Once you’re ready, let’s get started. Take your time and work carefully – we’ve got you covered.
Step 4


– Grab your toolkit and power down the device to keep things safe. If you need a hand, you can always schedule a repair.
– Carefully open up the device’s casing—patience is key here. Keep track of all screws and components so nothing gets lost.
– Locate the part that needs fixing or replacing. Use the appropriate tools to disconnect any connectors gently—no force needed!
– Remove the faulty or damaged component from its slot. Take your time to ensure you don’t damage surrounding parts.
– If you’re installing a new component, align it properly and press it into place. Double-check that everything is seated correctly.
– Reconnect any disconnected cables or connectors, making sure they click in securely.
– Close up the device casing carefully, ensuring all screws and clips are back in their places.
– Power on the device to test that everything works smoothly. If it’s still not quite right, a professional touch might be the way to go.
– Remember, if you hit a tricky spot or need some extra help, you can always schedule a repair with the pros.
Step 5


– Ready to dive in? Follow these steps and your device will be back in action in no time!
Step 6


– Handle the data connector with care, it’s delicate and can break easily. Give it some love and attention while working with it!
Step 7


– Ready to dive in? Let’s get that device back to its prime! Follow these steps carefully, and you’ll be good to go. Just take it slow, no rush!
– First thing’s first, make sure your device is powered down. It’s always a good idea to keep it safe while working your magic.
– Now, grab your trusty tools! We’re starting with the easy stuff, but don’t worry, we’ve got you covered every step of the way.
– Remove the screws or fasteners—this is where you start revealing the magic inside. Go slow and keep track of what you take off. It’s all part of the journey.
– Time to take apart those parts! Gently pull the components apart. You’ll see the inside of your device, so be careful and take your time.
– Once you’ve got everything disassembled, double-check that there’s nothing left to remove. You don’t want to miss any steps!
– Okay, now it’s repair time. Put the new parts in place and connect everything back. Be patient here—you’re almost done.
– Start putting it back together! Reverse the steps, and remember: no step is too small to take seriously.
– All done? Great job! Before you power everything back on, give it one last check to make sure everything is securely back in place.
– If at any point you get stuck, don’t hesitate to schedule a repair. We’re here to help!
– Now, power it on and enjoy your like-new device. You did it!
Step 8


– Time to get hands-on! Just follow each step below, and you’ll have your device sorted in no time.
Step 9


– Time to get this repair started! First, carefully follow the steps below. It’s all about being gentle and patient—no rush! If things get tricky, don’t worry, you got this! But hey, if you hit a snag or just want a little extra help, feel free to schedule a repair. We’ve got your back!
Step 10


– Step into the world of repair with ease! Start by gently prepping your device, making sure it’s powered off and ready for action. Grab your tools and get in the zone. Carefully follow the steps – no rush, take it one move at a time! When you’re done, feel free to power it up and check if everything’s working like a charm. If you hit a tough spot along the way, no worries – you can always schedule a repair and we’ll lend a hand. But if you’ve made it this far, you’re almost there! Keep it up, you got this!
Step 11


– Let’s get started! Grab your tools, follow along, and fix this thing step by step. You got this!
Step 12


– Ready to dive in? Here’s where you’ll get your hands moving. Follow each step, keep your tools nearby, and let’s bring your device back to life!
Step 13


– Alright, let’s dive in! Follow these steps and you’ll have your device back in action in no time. Grab your tools, set up a comfy workspace, and let’s get started!
Step 14


– Let’s get down to business and fix this thing up! Follow these steps carefully and you’ll have your device back to its former glory in no time. If things get tricky, don’t hesitate to schedule a repair for expert help.
Step 15

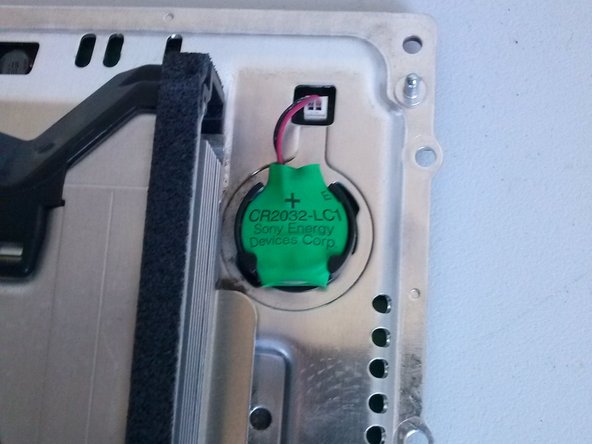

– Start by disconnecting the BIOS battery to prevent any power flow. Then, power on the device and carefully eject any sensors that might be in the way. Finally, locate and disconnect the main AC power connector along with the ground connector to ensure everything is safely disconnected. If you need help, you can always schedule a repair.
Step 16


– Alright, let’s start by unscrewing the HD case screw. This is usually a simple step, just take your tool and get that screw loose!
– Once you’ve done that, move on to the HD slot. Carefully remove it, but don’t rush—patience is key. You got this!
Success!

