
PlayStation 3 Slim Teardown
Duration: 45 minutes
Steps: 28 Steps
Take your first peek inside Sony’s sleek and stylish PlayStation 3 Slim! It’s cooler, thinner, and ready to be explored. Need a hand? Check out our PS3 Slim teardown video on YouTube for some extra guidance!
Step 1

Ever thought about tearing down your gadgets and seeing what’s inside? It’s pretty cool! Grab an old phone, microwave, or toy robot, and dive into the guts of your tech. Share your discoveries and show the world what you’ve got!
– Look what showed up early—our PS3 Slim made it before the mailman could even finish his route!
– The box is trim, just like the console itself—no wasted space here.
– Our online editor lets you create clear, step-by-step teardowns with ease.
– We handle the hosting for free, and you’ll get sharp photos, a clean layout, and fullscreen slideshows—just like what you see here!
Step 2


– Inside the box with your PS3 Slim, you’ll find:
– A Sixaxis DualShock 3 controller – because gaming is better with a great controller.
– RCA cables – for connecting to your TV (if you’re into that retro feel).
– A USB cable – for charging and syncing, because who doesn’t love charging cables?
– Power cord – keeping your PS3 alive and ready for action.
– A QuickStart Guide and Instruction Manual – the essentials to get you up and running.
– A ‘Welcome to PS3 and PS Network Blu-ray Disc’ – dive into the world of PS3 and PS Network.
– That ‘Guide to Video Game Ratings’ pamphlet – you know, the one that nobody really reads but is still there.
Step 3

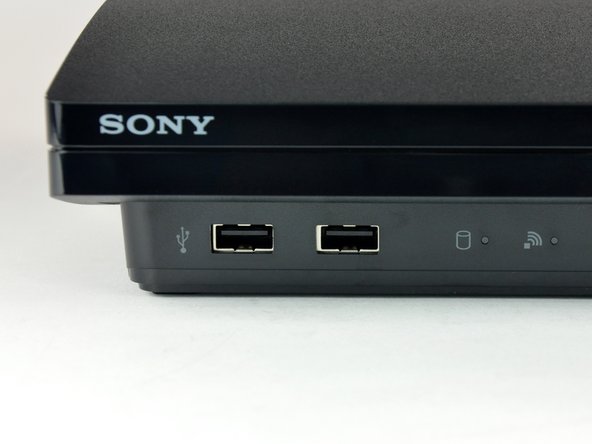
– On the front left, we have two USB ports, a hard drive indicator light, and a Wi-Fi indicator light.
– Front right yields a slot-loading Blu-ray drive, power button, and eject button.
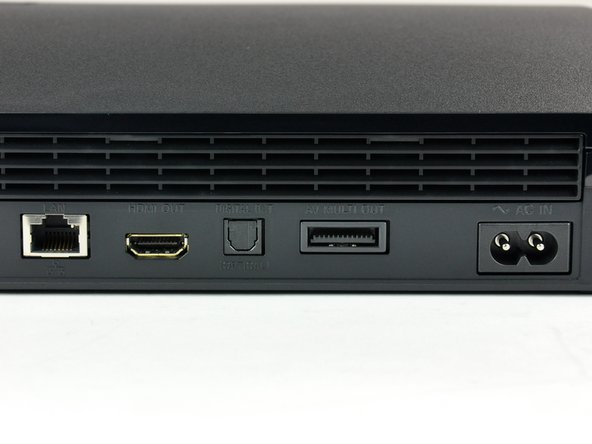
– The back has a LAN connection, HDMI port, digital audio-out, multi-connector (RCA or component video) and a new type of power plug.
– Owners of the current-gen PS3s will notice an absence of the rear manual power switch. All your powering needs are now served by the front power button.
Step 4


Let’s kick things off with the hard drive.
– Alright, let’s roll up our sleeves and get started!
– There’s a sneaky blue Phillips screw hiding under what we like to call the ‘blue Phillips screw cover.’ Go ahead and remove that screw.
– Now, take off the hard drive cover.
Step 5


– The drive enclosure comes with a handy metal pull tab. Give it a gentle tug to free the drive from its bay.
– Here’s the 120 GB Toshiba drive, looking all sleek and ready for action. We’re pretty confident that upgrading this to 500GB is going to be a breeze…
Step 6
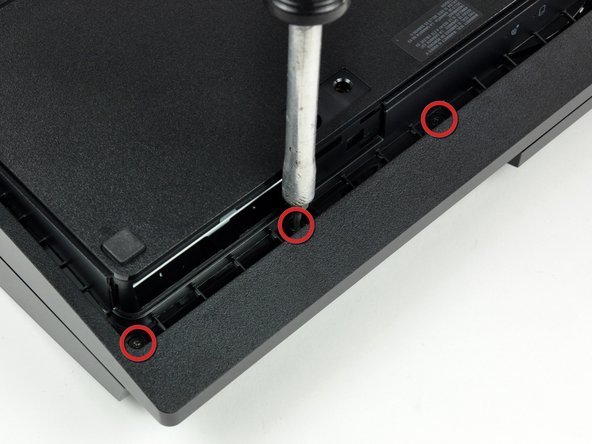
Those three TR8 security Torx screws are pretty much the only fasteners on this device that don’t have a Phillips head. Keep an eye out for these special screws—they might be hiding in plain sight amidst the rest of the hardware. If you need help, you can always schedule a repair.
– Start by removing the three (or sometimes four) TR8 security Torx screws on the bottom of the PS3 Slim. These screws are a bit sneaky—they have a pin in the middle that blocks a standard Torx screwdriver. Luckily, special security Torx screwdrivers are pretty common, just a little harder to find than regular ones. Sony included these to prevent casual opening—hardware hacking is a long-standing tradition. No worries, though—we’ll help you get the right tools to make this step smooth.
Step 7


– Let’s get started by removing the warranty and tabs from the underside of the Slim – carefully, please!
– Before we dive in, take a look at some of our other teardowns, where we’ve taken apart everything from a cappuccino machine to an iPhone 3GS.
– Check out our MacBook Pro 13″ Unibody Mid 2009 Teardown for more repair guides.
– We’ve also got a Palm Pre Teardown and a Banana Teardown – because why not?
– Remember, if you’re not feeling confident, you can always schedule a repair with Salvation Repair.
Step 8

– First up, take out the seven Phillips screws from the bottom — easy does it!
– Fun fact: the rubber pad on the front-right corner of the PS3 doesn’t have a screw hiding underneath. We were just as surprised as you will be when we peeled it off!
Step 9


– Flip the PS3 over to get to the bottom side.
– Hold tight, we’re almost there…
– Guess what? A mega fan is in the house!
– This powerful 12V, 1.3A fan packs a punch, rivaling the best cooling fans you’d find in a desktop PC. Sony didn’t hold back with this one.
Step 10


– Get a close-up look at the massive fan and the controller antennas—these are the key players in keeping your device cool. The fan is a brushless DC type, a common choice that runs quietly and relies on precise computer control to operate smoothly. Unlike some fancy fans you might have heard of, this one isn’t maglev, but it gets the job done efficiently. The Bluetooth and WLAN antennas, designed with a cool three-dimensional shape, are securely attached to the lower case with Phillips screws. Handle these components carefully as you proceed with your repair. If you need help at any point, you can always schedule a repair.
Step 11


– Unplug the two power supply cables. Simple stuff, right?
– The AC inlet cable is missing its third ‘ground’ pin, which is a bit odd for a unit that pulls close to 250W. Definitely something to keep an eye on!
Step 12


– Time to evict the power supply! This one’s much more compact than the OG PS3 model, and should keep things cooler under pressure.
– No need to stress about global voltage dramas—the power supply can handle anything from 100V to 240V AC.
Step 13


– Let’s dive into the guts of this new power supply and see what’s going on.
– This thing is seriously compact—curious to find out how it handles staying cool.
– Delivers a whopping 18 amps at 12V DC! Seriously, watch your fingers around this beast.
Step 14


– This fan is by far the biggest one we’ve seen in a device of this size. Talk about bringing the cool factor to the next level!
– Sony’s definitely not skimping on cooling here. They mean business.
– The ~95 mm diameter, 17-blade impeller looks like it was crafted for stealth mode. It’s super stiff and likely made from ABS plastic, keeping things cool without any unnecessary noise.
Step 15


– The tape’s keeping those antenna and power cables in place.
– It’s practically begging to be peeled off.
– We gave in. Go ahead, rip it off!
Step 16


– Give the plug a gentle tug and twist that screwdriver like you’re on a mission. No stress, just take it slow and steady.
– Now, carefully remove any screws or components in your way. A little patience goes a long way here!
– Once you’ve got everything loose, carefully separate the parts, keeping everything in order. You’re almost there!
– If you need help along the way, don’t hesitate to schedule a repair. We’re always here to give you a hand!
Step 17

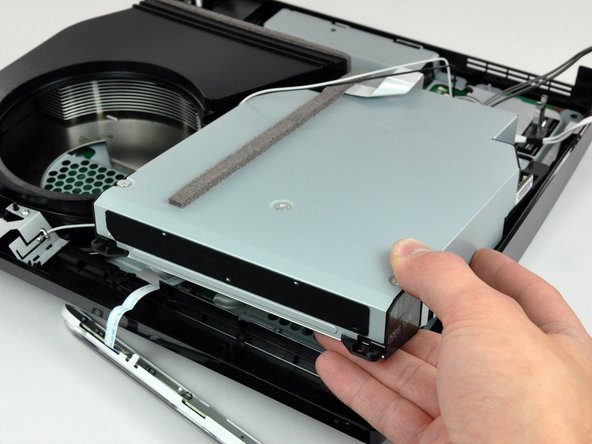
– Once you’ve unscrewed the case, the Blu-ray drive should slide out smoothly, so just give it a gentle pull and it’ll come right out.
– Keep in mind, this drive is pretty hefty and takes up most of the space inside the PS3, so handle it with a little care.
– We took apart the drive and found that it looks like a proprietary part made specifically by Sony, so it’s not exactly your average drive.
Step 18


– Disconnect any additional connectors and remove screws as needed—these are holding things together snugly.
– This device has a simple, straightforward look—more functional than flashy, but still quite appealing in its own way.
– Some parts, like the AC power inlet, are just held in place by the pressure of the screws connecting the top and bottom cases. No fancy clips, just screws doing all the work.
Step 19


– A few more screws, and the logic board will come right out of the chassis!
– Those three T8 security Torx screws? They’re the only ones in the whole device that aren’t Phillips head. Keep an eye on them!
Step 20


– Start by unscrewing the screws holding the EMI shield in place. Simple, right?
– The two identical matte-finished brackets in the first image are your friends here. They’re designed to gently press down on the center of the processors, ensuring they stay cozy and securely seated on their heat sinks.
Step 21


– Time to lift off that metal electromagnetic shield from the logic board—just ease it away and keep things gentle.
Step 22

– Everything but the kitchen sink!
– From left to right, going counterclockwise:
– Power supply, main board, hard drive, EMI shield, heat sink, fan, Blu-ray drive, controller, and the plastic case are all on display.
Step 23


– That’s all for the disassembly part! But stay tuned, we’ll keep updating with more board photos and insights as the details come in.
– Here’s the logic board. Sony is going eco-friendly on the inside, showing their commitment to sustainability.
– We’ve never spotted such unique snowflake-like patterns in the thermal paste after removing a heat sink before. This might mean it was overapplied, or maybe it didn’t spread out evenly.
– Take a closer look at the thermal paste – it’s a fractal! How cool is that?
Step 24


– The Cell processor looks sleek and shiny under our lights, almost like it’s showing off a little.
– We didn’t think it was possible to bend reality, but the RSX chip (wait, is that from an Acura?!) totally proves us wrong.
– Chip labels: RSX Reality Synthesizer CXD2991EGB 0916HFZ 114477
Step 25


– There are lots of manufacturers and functions at play here. The first image shows two of the four NEC/TOKIN 0e108 capacitors.
– You’ll spot two Elpida 512Mbit RAM chips (out of the four total on the board).
– The third image breaks down, from left to right:
– NEC/TOKIN Corporation is all about creating ‘next-generation, value-added devices that integrate.’ Whatever that means.
– High-speed decoupling device: Proadlizer PF/A Series.
– Marvell Ethernet controller – the brain of the network!
– Panasonic HDMI controller – for all your high-definition needs.
– Sony AV multi-out controller – connect it all, and make it work seamlessly.
Step 26


– Let’s keep going! Here’s the lineup of clock generators from left to right: Samsung K8Q2815UQB-PI4B, SW2-301 0920KMOOT, Sony CXD9963G8, ICS 9249AGLF, and ICS 1493DG. This step helps you identify each component so you can proceed confidently. If you need a hand, you can always schedule a repair.
Step 27

– Place the latest iPod Shuffle gently on top of the processor. It’s just a smidge longer, but trust us—the processor’s surface area is a lot more spacious. It’s like fitting a small snack on a giant plate.
Step 28

– Inventory check time—make sure you’ve got all your parts and pieces ready to roll!
Success!