PlayStation 3 Super Slim Laser Lens Replacement
Duration: 45 minutes
Steps: 13 Steps
Get ready to dive into the world of PlayStation 3 Super Slim repair! This guide will walk you through the process of removing the laser lens with ease. We’ll guide you on which screws and cables to tackle, empowering you to extract the optical drive from its cozy home. Once that’s done, we’ll help you pop open the optical drive to access the laser lens, the superstar component that reads those Blu-Ray discs. If you hit a snag, don’t hesitate to schedule a repair for some extra support!
Step 1
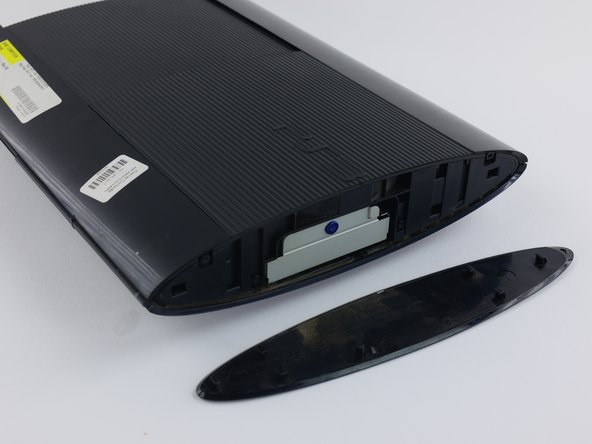
Let’s get started! The bay cover is conveniently located on the right side of your device.
– Slide the side HDD bay cover toward the back of the device to pop it off.
Step 2
– Take your T-8 security screwdriver and remove those three black screws, each 9.8mm long. Easy peasy!
– Grab your Phillips #1 screwdriver and unscrew the blue 7.9mm screw. It’s a small but mighty step!
Tools Used
Step 3
Gently remove the HDD and stash it somewhere cozy and safe—no risky business! Keep that precious data out of harm’s way.
– Give that tab a gentle tug to pop the HDD out like a pro!
Step 4
One sneaky screw is hiding under the warranty sticker. You can either peel that bad boy off or just poke it through with your screwdriver like a pro.
– Let’s get started! Use a metal spudger to carefully pry out the three rubber feet covers from the bottom of your device.
– Next, remove the four black 36.3mm long screws underneath using a Phillips #1 screwdriver. Take your time and make sure they’re all out before moving on.
Tools Used
Step 5
This part can be a bit tricky! If the latch on the front panel is being stubborn, you could try to carefully unhook all the latches. Just a heads-up though—these little hooks are delicate, so take it slow and steady.
– Let’s get started! Locate the hook on the far right side of the device, just beneath the front panel. Gently unlatch it and lift the panel up slightly – you’re making great progress already!
– Next, use a plastic opening tool to slide into the marked area and release the second hook on the right side. You’re doing fantastic!
– Now, slide the panel to the left to release the rest of the hooks. You’re really getting the hang of this! If you need help, you can always schedule a repair
Step 6
– To get started, gently press down on the tab located on the right side of your device, then slide the back panel to the left to remove it. Easy peasy!
Step 7
– Grab your Phillips #1 screwdriver and take out the five shiny silver screws (20.8mm long)—you’re on your way!
– Switch it up with a T-8 security screwdriver to carefully unscrew the two black screws (9.9mm long) holding the disc reader in place. Nice and steady!
– Lift off the top black plastic shell like a pro. Voila, you’ve cracked it open!
Tools Used
Step 8
– Slide that optical drive gently to the side, and voilà—you’ll spot one of those shiny silver 8.8mm screws staring back at you.
– Grab your trusty Phillips #1 screwdriver and carefully remove the two gleaming silver 8.8mm screws on each side. Easy-peasy!
Tools Used
Step 9
When you’re unplugging that cable, give a gentle tug on the plastic connector, not the wires. Treat it like a delicate dance, not a wrestling match!
– First, let’s unplug that cable and gently free the wires from their cozy plastic hooks.
– Next up, it’s time to say goodbye to the power supply unit. You’ve got this!
Step 10
– Gently pop off the white flex-ribbon cable in the front by pulling it straight up from its base. Easy does it!
– Now, tackle the black-and-blue flex-ribbon cable right behind it. Lift up the black tab first, then slide that cable right out. Smooth moves!
Step 11
– Flip your device upside down like you’re giving it a little dance! It’s time to get to work.
– Gently tug on that back white flex-ribbon cable, pulling it up from its base like you’re lifting a secret treasure.
– Out with the old! Carefully take out the optical drive and make some space for the new.
Step 12
– Gently lift up the loose end of the laser lens—it’s like peeling back the first layer of a sandwich, but way cooler.
– Flip up the little black plastic latch on the bottom of the lens to free the flex ribbon cable. It’s like unclipping a tiny seatbelt!
Step 13
– To wrap up, simply reverse the steps you followed to take your device apart. Easy peasy!
– You did it! If you need help with anything else, you can always schedule a repair
Success!


