PlayStation 3 Super Slim Laser Replacement Guide
Duration: 45 minutes
Steps: 13 Steps
Get ready to dive into the world of PlayStation 3 Super Slim repair! This guide will walk you through the process of removing the laser lens with ease. We’ll guide you on how to tackle those pesky screws and cables, empowering you to take out the optical drive from its cozy home. Once that’s done, we’ll help you pop open the optical drive to access the laser lens. This little component is key to reading those Blu-Ray discs, so let’s get to it! And remember, if you ever feel stuck, you can always schedule a repair.
Step 1
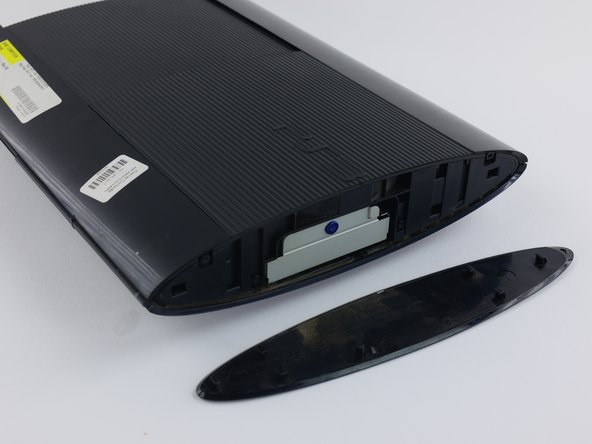
You’ll find the bay cover chillin’ on the right side of the device.
– Slide off the side HDD bay cover by pushing the panel towards the back. Easy peasy!
Step 2
– Alright, let’s tackle this! Grab your T-8 security screwdriver and unscrew all three black 9.8mm-long screws. Easy peasy!
– Next up, with your trusty Phillips #1 screwdriver, take out the blue 7.9mm-long screw. Smooth moves!
Tools Used
Step 3
Gently take out the HDD and keep it safe and sound to ensure your precious data stays intact!
– Give that tab a confident tug and slide the HDD right out. Easy peasy!
Step 4
One of the screws is hiding under the warranty sticker. You can either peel it off carefully or just go ahead and poke through it with your screwdriver. No big deal!
– Flip the device over and use the metal spudger to gently pop out those three rubber feet covers at the bottom. Don’t worry, they come off easily!
– Grab your Phillips #1 screwdriver and remove the four black screws hiding underneath. They’re 36.3mm long, so keep track of them!
Tools Used
Step 5
This part can be a bit tricky! If you’re having trouble unhooking the front panel, you might consider gently prying off all the hooks. Just a heads up, though—these little guys can be fragile, so proceed with caution!
– First up, on the top of the device, pop the hook on the far right beneath the front panel. Lift the panel a bit and give it a gentle push.
– Next, release the second right-side hook by sliding a plastic opening tool in the marked area. You’ve got this!
– Finally, slide the panel to the left to unhook the rest. Easy peasy!
Step 6
– To get started, press down the tab on the right side of your device and slide the back panel to the left. It should come right off, no problem!
Step 7
– Let’s kick things off by unscrewing those five shiny silver screws that are 20.8mm long using a trusty Phillips #1 screwdriver. You’ve got this!
– Next up, grab your T-8 security screwdriver and tackle the two black screws, each 9.9mm long, hiding in the disc reader. They won’t know what hit them!
– Now, gently lift off the top black plastic shell. You’re making great progress!
Tools Used
Step 8
– Slide the optical drive aside to uncover one of the silver 8.8mm screws.
– Use a Phillips #1 screwdriver to remove the two silver 8.8mm screws on either side.
Tools Used
Step 9
When disconnecting the cable from the plug, make sure to grab the plastic male connector instead of tugging on the wires. Your tech will thank you for it!
– Unplug the cable and free the wires from those two plastic hooks.
– Take out the power supply unit.
Step 10
– Gently lift the white front flex-ribbon cable by pulling it upwards from its base.
– Lift the black and blue flex-ribbon cable behind it by pulling upward on the black tab, then slide out the cable.
Step 11
– First, give your device a quick spin – rotate it 180 degrees to get started.
– Next, gently pry up the back white flex-ribbon cable from its base. It’s like freeing a cable from its cozy little home!
– Now, carefully remove the optical drive. Don’t worry, it’s easier than it sounds!
Step 12
– Gently lift the free end of the laser lens to part the two layers like you’re peeling a banana.
– At the bottom of the laser lens, flip up the black plastic latch to disconnect the flex ribbon cable. It’s like opening a little door—just a quick flick!
Step 13
– To put your device back together, just follow these steps in reverse.
– Cancel: I did not complete this guide.
– If you need help, you can always schedule a repair
Success!


