PlayStation 5 Teardown Guide: Step-by-Step Repair Tutorial
Duration: 45 minutes
Steps: 19 Steps
After taking a breather from our PS5, it’s time for a proper teardown! We’re always here to voice your frustrations when devices give you a hard time—and trust us, this one has its challenges. Our goal is to get this beauty back in action by the end of this journey. So, let’s dive in and break it down to its core components. Ready? Let’s go! For more exciting teardowns and repair insights, don’t forget to check out Salvation Repair’s YouTube channel, follow us on Instagram and Twitter, and subscribe to our newsletter to stay updated on our latest gadget explorations.
Step 1


– We’ve kicked back with a little Spider-Man, caught up on some Z’s, and now it’s time to take apart this PS5. The last full-numbered PlayStation drop was all the way back in November 2013, so we’re pretty pumped! Here’s what our gently-loved system has under the hood:
– Now, here’s a crucial decision: do we dive into the disc-less Digital Edition or the fancier version with the 4K UHD Blu-ray drive?
– AMD custom 8-core / 16-thread 3.5 GHz Zen 2 CPU
– AMD custom RDNA 2 GPU (2230 MHz with 36 compute units)
– 16 GB GDDR6 RAM
– 825 GB of SSD storage (plus an m.2 SSD expansion slot)
– HDMI 2.1 connectivity that supports 8K video at 60 Hz or 4K at 120 Hz
– We flipped a coin to make our choice and promptly lost it in the disc drive slot. Guess we’re going with that one, then.
Step 2


The PS5 says goodbye to the PS4’s optical audio port—so if you’re rocking an older receiver or sound bar, you might need a workaround.
– Rumor has it the PS5 is large—but, good news, it still fits in Creative Electron’s X-ray machine. Take a look at that massive fan, and all those heat pipes crossing like a superhighway interchange.
– This console *seriously* dwarfs its predecessor—not to mention the other consoles out there.
– To keep this beautifully curved machine steady, Sony provides a cleverly designed stand. With a little adjustment, it lets the PS5 stand tall vertically or recline horizontally with elegance.
– On the rear, the PS5 shows off its connection points: a pair of USB-A 3.0, LAN, HDMI 2.1, and a two-pin power port. Combine those with the two USB ports in front (one Type A, one Type C), and you have a pretty well-equipped console.
– There’s even a nifty little compartment on the bottom to store the stand’s screw when it’s in horizontal mode. Clever thinking!
Step 3


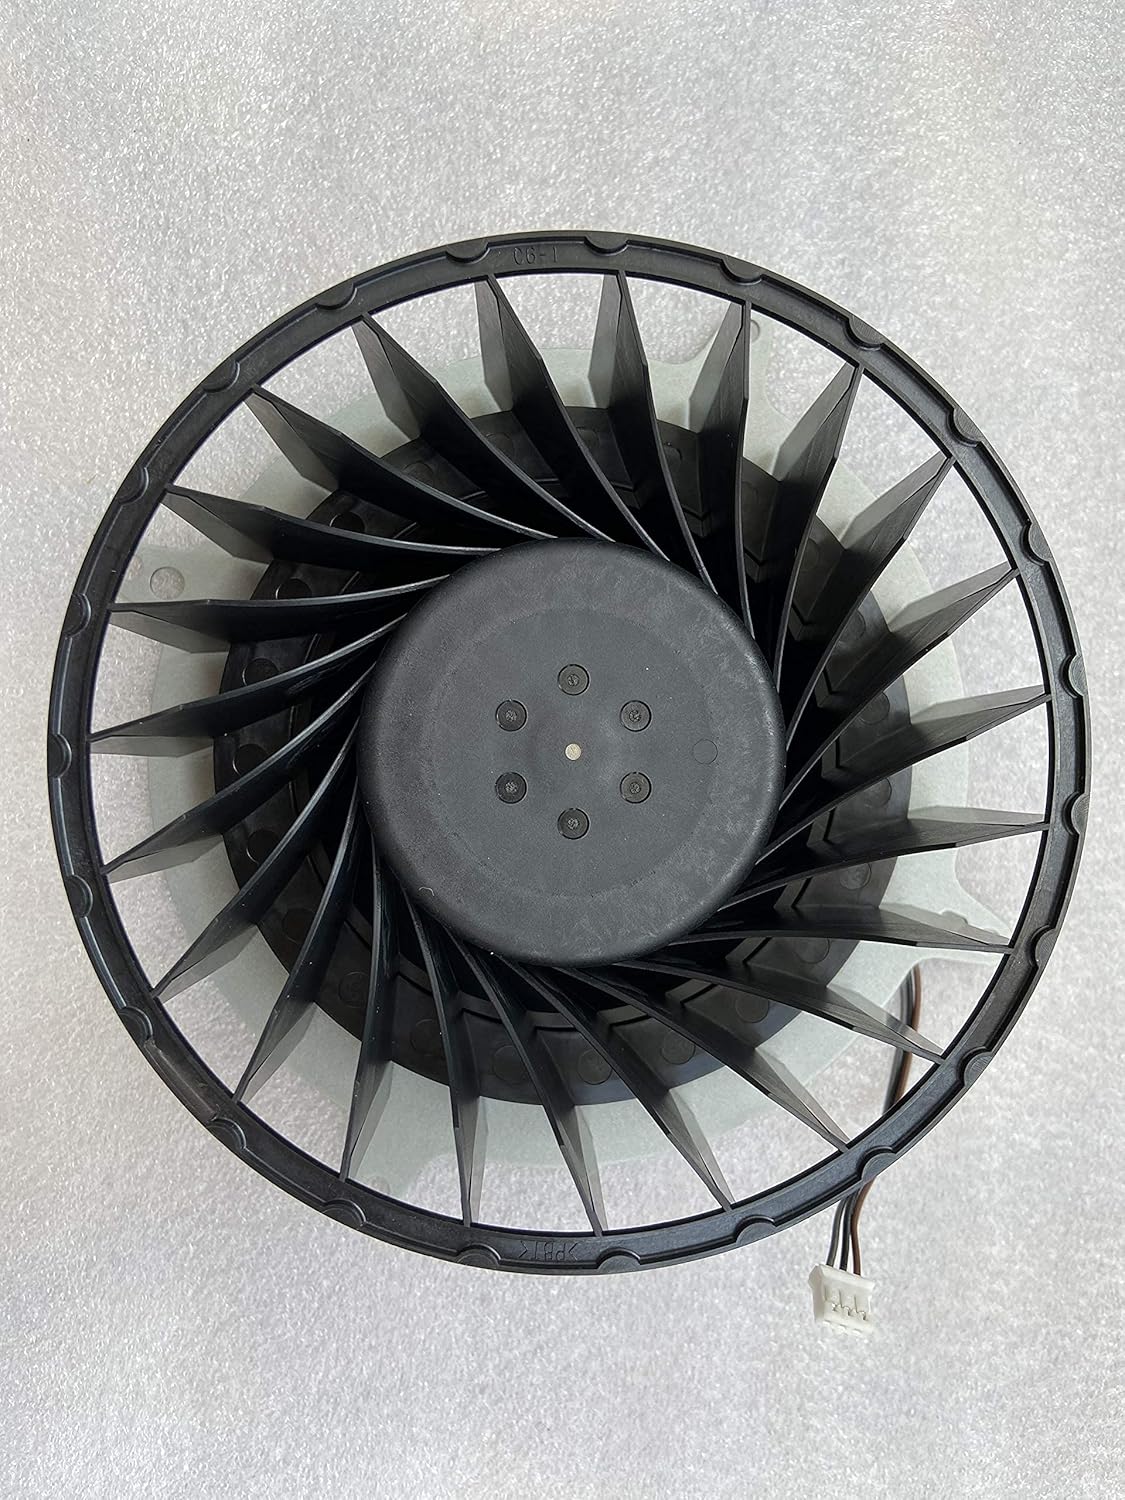
The PS5 has a cool ‘omnidirectional’ cooling system. It’s a beefy 120 mm squirrel cage fan that sucks in fresh air from both sides. This baby can move a lot of air, but don’t worry—it won’t spin so fast that it makes a racket.
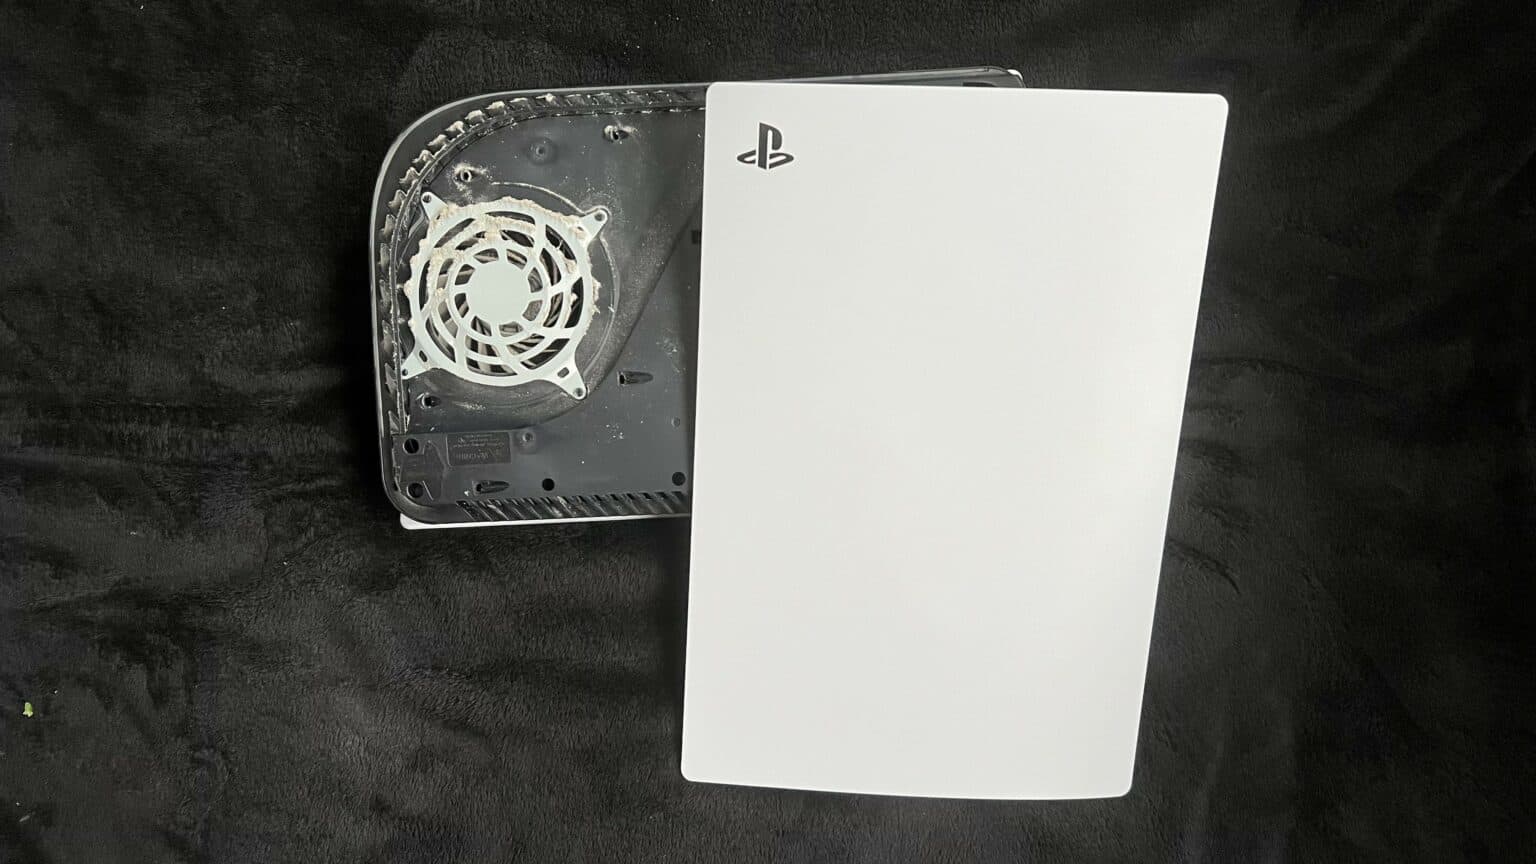
– This console might resemble something from outer space, but don’t worry, getting inside is super easy! Just gently lift and slide those white panels, and boom! You’re in. You’ll immediately see the M.2 SSD expansion slot, the fan, and… wait for it… special ports you can vacuum. Seriously!
– We’re all about making it easy to keep your console’s cooling system in tip-top shape.
– Okay, to go further, you’ll need a T8 Torx Security driver. (Seriously, Sony? Security screws for a fan?)
– The good news is, adding more storage is a breeze. Just remove one Phillips screw and a metal cover, and you’re all set to upgrade. Nice move, Sony, considering the built-in storage isn’t exactly huge.
Step 4


– We’ve got some more security screws ahead. One’s even hiding under a tamper-evident sticker—but don’t worry, it’s not a “Warranty Void” sticker, those are illegal! Tinker away without fear, as long as you don’t break anything, your warranty is safe.
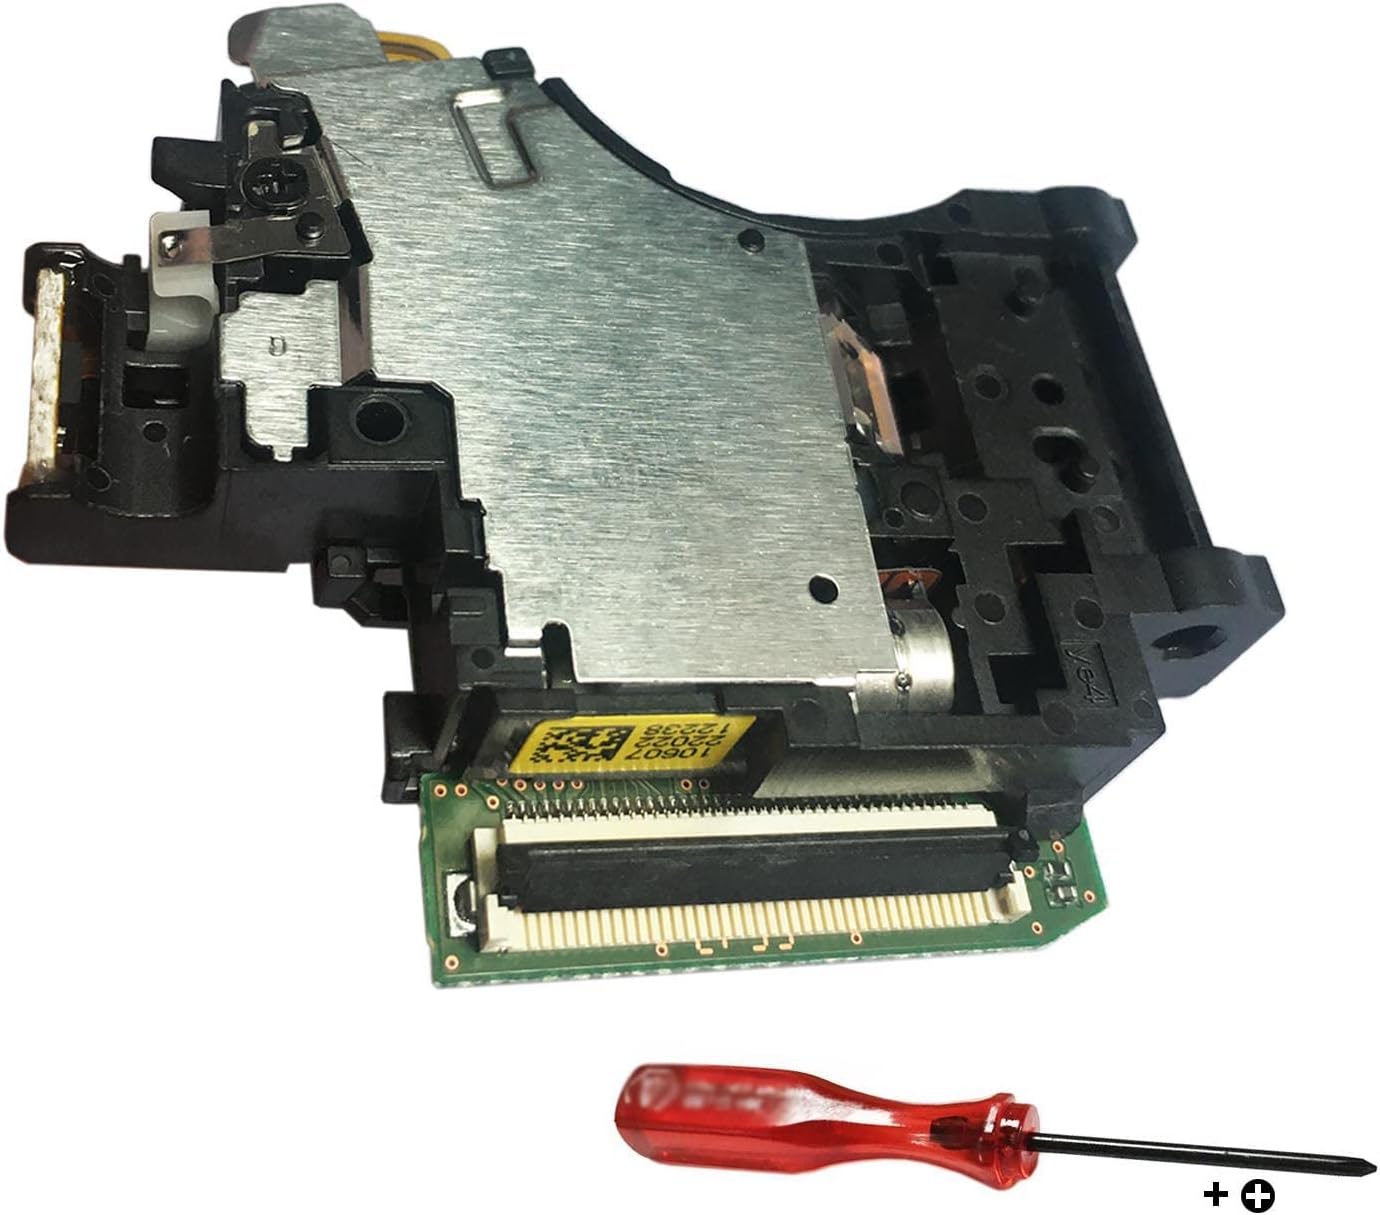
– After removing the first half of the black plastic shell, we get our first peek—the optical drive.
– The slim optical drive comes out easily—great for potential replacements, or so you’d think, until you try one.
– Just like in the Xbox Series X, our tests show that the PS5’s optical drive is married to its motherboard. A replacement drive just won’t work.
– There might be a way around this, if you are willing to take the drive apart and keep the original circuit board. If we get the chance to test that, we will give an update.
Step 5


Liquid metal is a favorite among PC enthusiasts and overclockers because it conducts heat like a champ—way better than your typical thermal pastes and putties. What does that mean? Cooler chips can run faster and deliver stunning graphics.
– Wow, Sony really likes screws, huh? This steel plate is held on with a whole bunch of them! We appreciate the enthusiasm, Sony!
– Underneath that, we’ve got a heat pipe to cool down a row of VRMs, connected to a cute little fin stack. It looks like we’re checking out the back of the main board here—all the heavy-duty cooling gear is mounted below.
– We might be getting to the point of no return, but let’s remove the hardware and flip this board out.
– Yup, that shiny stuff on the processor is our favorite—mimetic polyalloy liquid metal! It’s the best of the best for high-performance thermal interface material.
– But, that thermal conductivity also means it conducts electricity—so we gotta make sure it doesn’t get anywhere it shouldn’t.
– Sony has a patent for a cool, insulated, foam-cushioned pouch that keeps the liquid metal on the chip surface … so try to avoid doing this at home, you can always schedule a repair
Step 6


– Before we highlight the big chips you might know, check out these cool features of this massive PCB:
– Bothhand USA GST5009 LF 1000 Base-T Magnetics Module
– Murata Piezo Buzzer
– 3v battery backup (probably used for keeping the device’s time and date intact)
– Sony J20H100 Wi-Fi Module
– Power input prong that fits directly into the power supply
– M.2 SSD expansion slot—ready to be super useful, as soon as Sony flips the switch.
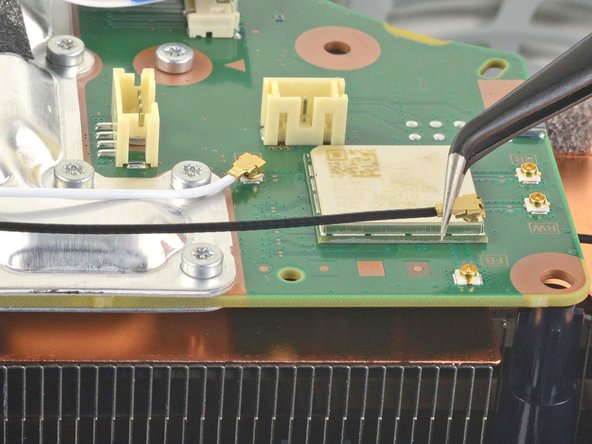
– Wi-Fi module antenna connector
Step 7


Sony whipped up a custom SSD controller to manage the PS5’s blazing-fast data speeds—while the Series X has a more standard setup with hardware from SanDisk. If you need help, you can always schedule a repair
– Alright, let’s dive into the heart of the PS5! Check out the impressive silicon that makes it all tick:
– Sony Interactive Entertainment Inc./AMD CXD90060GG 8-Core CPU w/ GPU
– Sony Interactive Entertainment Inc. CXD90062GG SSD Controller
– SK Hynix H5AN4G8NBJR-UHC DDR4 SDRAM Memory – 512 MB
– 6x (three per side) Kioxia/Toshiba Memory TH58LJT0T24BA4M BiCS flash memory (likely)
– Micron MT61K512M32KPA-14:B 2 GB GDDR6 SGRAM
Step 8


– These nifty little chips are your best buddies when it comes to moving data to and from the devices you connect to your PlayStation:
– Sony Interactive Entertainment Inc. CXD90061GG I/O controller (most likely)
– Winbond W25Q16JV 16 Mb serial flash memory
– Panasonic MN864739 HDMI redriver (probably)
– Texas Instruments TUSB1044 10 Gbps USB Type-C bi-directional linear redriver
– Texas Instruments TPS2001D 2 A USB power switch
– These tiny heroes also help shield your device from pesky electrostatic discharge.
Step 9


– Why have all this awesome silicon without the right power for each chip? Here are the equally crucial power chips:
– Infineon XDPE14286A 16 Phase PWM Controller (likely)
– ON Semiconductor NCP252160 Power Module
– Richtek RT5126 Power Management (likely)
– Richtek RT5127 Power Management (likely)
– Texas Instruments TPS53219A Synchronous Buck Controller
– Texas Instruments TLV62090 3A Step Down Converter
– The capacitors marked in purple do the final voltage filtering before power hits the main processor. Gotta keep that voltage steady if you want peak performance!
Step 10


Nestled below the massive heatsink is the PS5’s boot-shaped, 350-watt enclosed power supply—easily handling the tested 200W draw at full load, and even outshining the 315W power supply we found in the Series X.
– Beneath the second metal shield, you’ll find a hefty heatsink and a rather unique power supply.
– Since heat naturally rises, it makes perfect sense that this heatsink is crafted to channel heat upward through those nifty heat pipes we spotted earlier in the X-ray. Meanwhile, the heat radiating from the silver fin stacks is whisked away by the fan.
– When you compare it to the Xbox Series X’s heatsink, the PS5’s definitely boasts a bit more surface area to handle that sizzling heat. While the PS5 skips the vapor chamber that the Series X uses, Sony assures us that their mix of copper heat pipes and heatsinks does the job just as well.
– And for those curious about the details, here’s a closeup of the specs—the PSU is made by Delta.
Step 11

– The PlayStation 5 is a massive step up in gaming tech, standing proud alongside its Microsoft counterpart. After spending some quality time with it, we’ve picked up a ton of helpful insights.
– Its semi-modular, repair-friendly design is a plus, though a few quirks like Torx security screws and software barriers can be a bit of a buzzkill—but nothing too wild.
– On the bright side, a tool-free entry point, easy fan access, and simple storage upgrades are definite wins in our book.
– Curious about how the PS5 scores on the repairability scale? Stick around and let’s find out together.
Step 12


Heads-up: For a visual deep-dive, you can also check out the video version of this controller teardown over on our YouTube channel.
– While we eagerly awaited the arrival of our PS5, we turned our attention to the DualSense controller. There’s so much packed into it that it deserves its own spotlight:
– The ‘Shock’ might have been dropped from its name, but its impact on the gaming world will continue to be felt.
– With futuristic adaptive triggers, an outstanding haptic system, a spacious trackpad, USB-C charging, a clever grip pattern, and a whole lot more, this controller is ready to elevate your gaming experience!
Step 13


– The sleek new design has left us with absolutely no visible screws—thanks, Sony! It looks like they want to keep us on our toes.
– But no worries—where there’s a seam, there’s a way! The black trim cover around the joysticks pops off effortlessly, revealing two screws hiding near the tips of the handles.
– We’re sure there are a couple more screws waiting to be discovered.
– Aha! We’ve found them! Two more screws are cleverly tucked away under the L1 and R1 buttons, which can be lifted with a little clip-prying (just watch out for any flying parts!).
Step 14


The new DualSense battery is more like the 5 Wh pack you’ll find in Nintendo’s Switch Pro Controller—solid choice and a breeze to swap out.
– Blast off! Only four Phillips screws and a few clips separate customers from opening the DualSense controller. Sweet!
– Similar to the DualShock 4 and DualShock 3, the DualSense battery features a robust plastic shield and isn’t glued down. Awesome!
– The grey battery unit is 5.7 Wh. That’s a nice bump up from the DualShock 4’s 3.7 Wh pack, and it’s needed: all this tech needs power!
– For pure battery-swapping ease, this outshines most modern smartphones (but not all). If you need help, you can always schedule a repair
Step 15


Sony’s really flexing its innovation muscles here with the DualSense. They dedicated half of the controller’s space to those mind-blowing triggers and haptics!
– Alright, let’s dive into the heart of the beast: we’ll be extracting the button sensors, motherboard, haptic drivers, and adaptive triggers, all snugly attached to a sleek black midframe.
– The adaptive trigger assemblies are linked by cables, while the haptic drivers, USB-C port, and joysticks are firmly secured with soldered connections.
– Flipping it over, we find the main circuit board. And where there’s a circuit board, there’s a party of chips:
– SIE CXD9006GG — Probably a custom Sony chip handling the heavy lifting.
– Dialog DA9087 PMIC
– Realtek ALC5524 audio codec
– Nuvoton NAU8225 3.0 W Class-D Audio Amplifier
Step 16

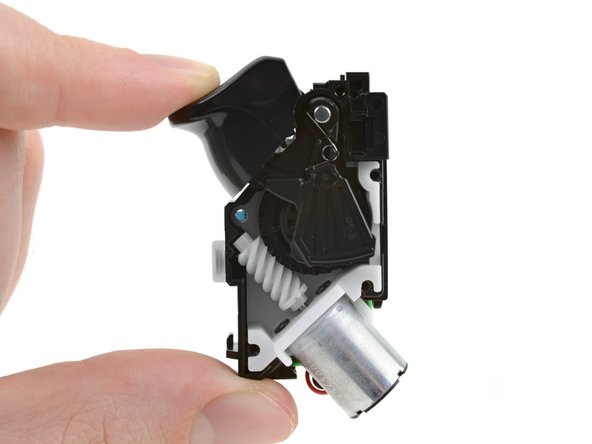
– Let’s dive into this high-tech mystery device—oh, I mean, variable resistance trigger.
– The trigger works just fine without any of the mechanics active, making contact with a button on the blue ribbon cable. However, game developers can program the controller to tweak how tough it is to pull.
– The silver motor spins the white worm gear, which pushes the black lever arm up, adding resistance to the trigger’s lever action and giving you that extra bit of feedback.
Step 17


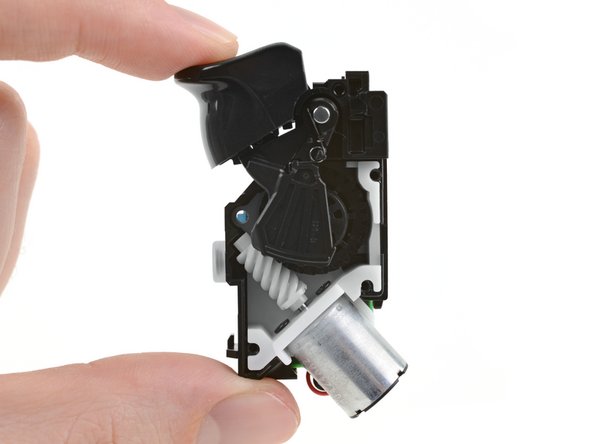
– Let’s dive into these triggers, shall we?
– First up, we have the button sensors—R1 on the left and R2 on the right. R2 is rocking a ‘two-stage’ sensor that can tell the difference between a gentle nudge and a full-on pull, while R1 keeps it simple with a straightforward digital switch.
– Next, let’s talk about the plastic frame, metal pin, and spring. These components handle the non-adaptive R2 trigger action, minus all the extra bells and whistles.
– The gear system is working in harmony, just like we showed in the last step: the white worm gear (from the green bullet below) spins the circular gear, which pushes the arm up to counter R2’s lever action.
– The white gear housing is the unsung hero, keeping all the gear components snug and secure. The silver motor peeking out from the bottom is what drives the worm gear, with its leads soldered right onto the trigger module’s circuit board (which we’ll tackle next).
– And finally, we have the circuit board that ties everything together! There are two ribbon cable connections: one for the buttons and another for the motherboard. The black encoder is on the job, measuring the rotation of the circular gear from the yellow bullet.
Step 18


Did someone mention pallesthesia?
Update: We’ve heard the buzz about joystick drift in those almost-new DualSense controllers. So, we dug in and discovered the reasons behind it. Here’s the scoop on why PS5 joysticks might be drifting off track.
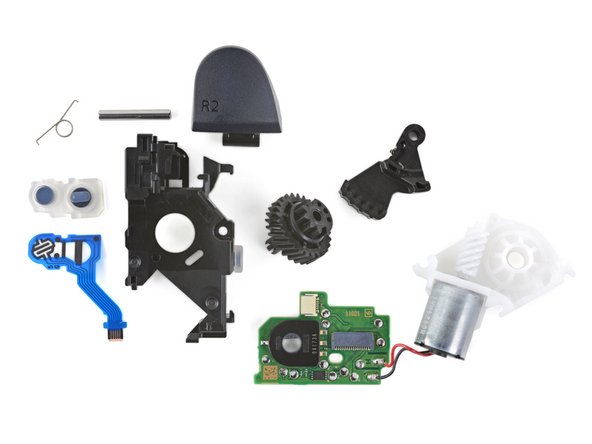
– Alright, with all the easy-to-swap parts out of the way, we’re left with the soldered crew.
– First up, meet the two Foster-branded voice coil actuators—they’re the muscle behind the haptics system.
– Next in line: the joysticks. These little guys look almost identical to the Alps-brand sticks from the DualShock 4.
– And wrapping it up: the USB-C port. This hardworking, high-traffic part could really benefit from easier replacement, don’t you think?
– When you compare these to something like replacing a Joy-Con joystick, well, it’s night and day. Sure, PlayStation joysticks are less likely to drift compared to the Joy-Cons, but having them soldered on? That’s a bit of a bummer.
Step 19


– The DualSense controller is hands-down one of the coolest upgrades the PS5 has to offer.
– As a parting gift, here’s a super slick X-ray view of the DualSense we just took apart, courtesy of our pals over at Creative Electron.
– Shoutout to the detective work that made identifying the chips on the motherboard a breeze—great teamwork all around!
– That’s it for this teardown! Time to piece it all back together and see if there’s enough liquid metal left to power through a gaming session.
– If you haven’t already, check out our Xbox Series X teardown and our PS5 vs. Xbox Series X comparison to level up your console knowledge.
– Only one last thing to check out—the repairability score!
Success!