PlayStation Move Teardown
Duration: 45 minutes
Steps: 13 Steps
Sony has joined the world of motion-controlled gaming, finally stepping into the arena where the Nintendo Wii has been doing its thing since 2006. In other news, we’ve hit a big milestone with parts and repair guides now available for most game consoles!
Step 1


– Ready to dive into your device repair? Let’s take it step by step, keeping it friendly and straightforward. Follow along carefully, and if things get tricky, remember you can always schedule a repair with Salvation Repair. Keep your tools handy, stay patient, and you’ll have your gadget back in action in no time!
Step 2


– Let’s size up the Wii Remote and the PlayStation Move—side by side and ready to rumble.
– These two controllers each have their own way of figuring out where they are in the room.
– Check out those wrist straps! Both the Wii Remote and the Move controller went for a similar look.
– The Wii Remote packs an infrared sensor and uses a sensor bar near the TV, triangulating its position by picking up on those IR points. High tech hide and seek.
– The PlayStation Move is a step up in the location game—it tracks the glowing orb with the PlayStation Eye camera, so it knows your controller’s X, Y, and even depth in 3D space. Fancy!
Step 3


– The motion controller comes packed with nine handy input buttons: the four usual control buttons (O, ☐, ∆, X), the familiar start and select buttons on the side, the trusty PS button, a trigger button, and a big ol’ Move button ready for action.
– The PlayStation Eye camera has been around for a while, first dropping in October 2007. It’s had a bit of a quiet journey, with only thirty compatible games to its name since its launch.
– The PlayStation Move’s motion controller gets its energy from a lithium-ion battery, charged through a USB Mini-B port tucked away at the bottom of the controller.
– It has two focus modes: one for up-close action (perfect for web-cam use) and one for long-distance play (ideal for gameplay).
Step 4


– Ready to take a peek under the hood?
– A few Phillips screws stand between us and the inside of the motion controller—let’s send them packing and pop that rear cover off.
– A gentle pull on the rear cover, and the guts of your PlayStation Move motion controller are revealed.
Step 5

No shocker here—the orb is crafted from a bendy rubber or vinyl. Glass would have been cool, but hey, at least you won’t worry about dropping it!
– Just lift the orb right off the motion controller assembly, it’s that simple!
– We’ve got three handy LEDs lighting up that orb, and they’re ready to shine in all the colors of the rainbow!
– These lights switch up their hues to help players stand out, and they can even change colors mid-game for an extra layer of fun. Plus, the orb adapts to its surroundings, making sure it’s always visible and easily detected by the PlayStation Eye.
Step 6


– Wait—does that say ‘IPOD’? For a second, it looked like the PlayStation Move controller had something to do with Apple’s music player.
– Oh, never mind—’TRIPOD’, not ‘IPOD’. Crisis averted! Apple doesn’t own this one. Let’s keep going.
Step 7


Sony’s not playing favorites with battery stats—they’ve got both the minimum and the typical battery capacity listed for you, with the standard coming in at 1520 mAh.
– The battery scores major points for being easily removable from the Move—no soldering required! Simply unplug the connector and plug in the new one.
– This internal lithium-ion rechargeable battery boasts a minimum capacity of 1320 mAh at 3.7 Volts.
– With that capacity, Sony claims you can enjoy up to 10 hours of playtime on a full charge.
– The Move’s Li-Ion battery is roughly the same length as a AA battery, but it’s about 35% thicker. Quite the little powerhouse!
Step 8


The vibrator motor packs a decent punch, though it’s still a bit smaller than the two motors tucked inside a Sony DualShock 3 Controller.
– Keep exploring the motion controller by removing the single Phillips screw holding the battery housing onto the motherboard. The vibrator motor will lift off, but it’s still connected to the motherboard—so don’t yank it out just yet. If you need a hand with any step, you can always schedule a repair.
Step 9

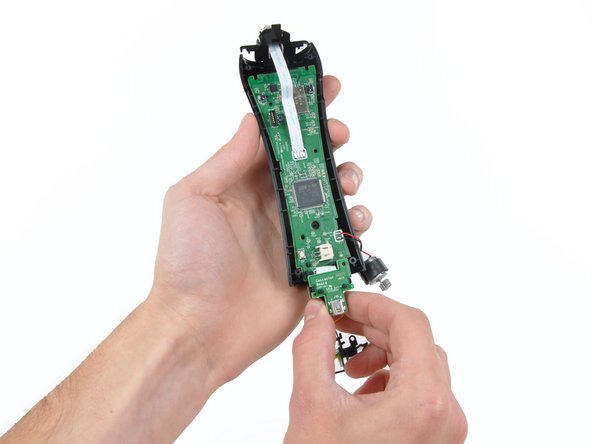
– After you’ve unscrewed those final few screws holding the motherboard in place, you should be able to gently lift it out of the case assembly. Easy does it!
Step 10


The Move board takes a bit of a hit in the repairability department because the vibrator motor, LED, charge contacts, and EXT cables are all soldered down. But don’t worry, it’s all part of the adventure!
– Here’s a look at both sides of your controller’s motherboard.
– Up top on the front, you’ll find all the button contacts—plenty of real estate for your thumbs. Down below, it’s a party for the chips—packed in tight!
– Flip it over and you’ll spot the ARM processor taking center stage on the back.
Step 11


– Check out the STM32F103VBT6 ARM-based 32-bit MCU! It’s got Flash, USB, CAN, seven 16-bit timers, two ADCs, and nine communication interfaces. Quite a powerhouse!
– Next up, we have the Y5250H 2029 K8QEZ. It’s likely the gyroscope, but we won’t know for certain until we peek inside the chip. Intriguing, isn’t it?
– Don’t forget the Kionix KXSC4 10227 2410 accelerometer! It plays a key role in detecting motion.
– Take a look at the Texas Instruments BQ24080 1-cell Li-Ion Charger. It’s essential for keeping your device powered up.
– A little birdy helped us identify the TPS63030 High Efficient Single Inductor Buck-Boost Converter. It’s a nifty little component!
– Next on our journey is the CSR (Cambridge Silicon Radio) BC4RE A16U Bluetooth transmitter. This helps keep you connected wirelessly.
– Last but certainly not least, we have the AKM AK8974 three-axis Electronic Compass (MEMS). It’s perfect for navigating your way through tech repairs!
Step 12

Just a fun fact: 24-bit color means you’ve got 16.7 million colors to choose from. That’s a lot of color options for your screen!
When LEDs heat up, they tend to get a bit dimmer. By adding a heat sink to your LED setup, you’re not only keeping things cool but also helping those LEDs work longer and stronger. It’s a win-win for performance and lifespan!
– Here’s what’s inside the light assembly, left to right: lens, LED, possibly a heat sink (?!), and the housing bracket.
– That clear plastic lens all the way to the left? Its job is to spread the LED light so your orb glows evenly.
– The LEDs at the end of the controller aren’t messing around—they can display 24-bit color, giving you a full rainbow of possibilities.
Step 13


– PlayStation Move Repairability: 8 out of 10 (10 is easiest to repair). Good news—this controller is pretty friendly to open up and tinker with. The battery is a snap to swap out since it’s connected via a connector instead of being soldered, so no need to sweat soldering skills. The trigger comes out as a single piece, making replacement straightforward. Plus, the LED includes a heatsink that helps it run cooler and last longer. Just a heads-up: some parts like the vibrator motor and LED are soldered directly onto the motherboard, so those parts are a bit more involved to replace. If you need a hand along the way, you can always schedule a repair with Salvation Repair.
Success!