Polaroid PTAB7XC Battery Replacement
Duration: 45 minutes
Steps: 4 Steps
This step requires some soldering and a fair amount of stubborn adhesive—yes, it’s as smelly as it sounds. If you’re new to soldering, check out this guide before diving in. Oh, and handle that battery with care—rupturing one is not on anyone’s wish list!
Step 1


If the screw heads are a bit too worn out or corroded, you might need to grab a larger screwdriver, like the J0, to get the job done.
– Grab your trusty J00 Phillips screwdriver and get ready to work some magic! Carefully unscrew those two 7 mm screws sitting at the top of your device by turning them to the left. You’ve got this!
Step 2


At this stage, the power and/or volume buttons might just pop out. No worries, though—it’s totally normal! Just make sure to pop them back in when you’re putting everything back together.
– Gently work your way around the device, using a plastic opening tool to separate the screen from the case on all four sides. Keep going until the plastic casing lifts off without a fuss.
– Once the case is off, carefully lift the device and flip it over so the screen faces down.
– And just like that, the device is free from its plastic casing. You’re on the right track!
Step 3


Handle that battery with care, folks! Popping it could lead to some serious safety woes.
The battery has a protective plastic wrap—if it gets a little stretched or torn, no worries! It’s not a safety issue, so carry on with confidence.
– Slide a plastic card under the battery compartment.
– Gently rock the card back and forth, as well as up and down, until the adhesive holding the battery in place gives way.
Step 4
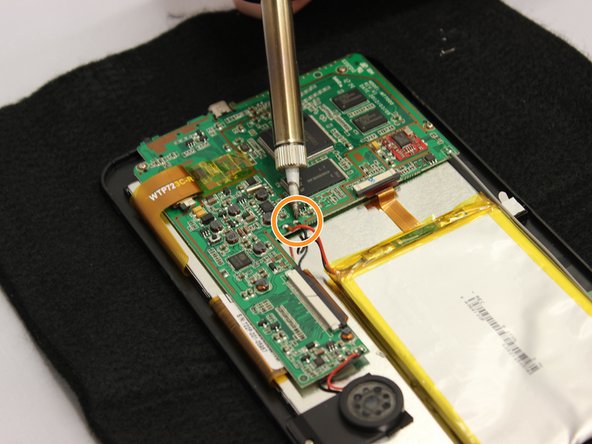


If the wires don’t quite want to let go during desoldering, no worries! Just grab some tweezers and gently coax them free. Patience is key, but you’ve got this!
– Place your device on a surface that can handle some heat, because we’re about to get toasty!
– Carefully unsolder the red wire from the motherboard; it’s the one leading to the battery unit.
– Next up, gently unsolder the black wire that’s also connected to the battery unit.
– Now, with a steady hand, lift the battery out of the device—you’re almost there!
– Congrats! The battery is now free from its cozy home in the device.
Tools Used

Success!


