
Replace Left Clutch Hinge on MacBook Pro 15 Model A1150 – Step-by-Step Guide
Duration: 45 minutes
Steps: 35 Steps
Heads up! Make sure you’ve got your tools ready and your game face on. It’s time to dive into this repair with some flair and a sprinkle of fun!
Swap out that pesky broken clutch hinge to make your display glide open smoothly again!
Step 2

– Unscrew the trio of matching Phillips screws securing the memory door. Party on!
– Keep a log of which screws came from where. It’s like a treasure map for reassembly!
Step 3

– Gently lift the memory door just enough to get a good grip on it, then slide it towards you to pop it away from the casing. You’ve got this!
Step 4

– Whip out your screwdriver and remove those two sneaky Phillips screws chilling in the battery compartment near the latch. Let’s get zippy!
Step 5

– Let’s start by taking out these cool 6 screws:
Step 6

– Unscrew the four Phillips screws on the port side of the computer. Let’s unscrew these little rascals and get to the fun part!
Step 7

– Twist your device by a cool 90 degrees and unscrew the two Phillips buddies chilling at the back. Keep it groovy!
Step 8

– Give your computer a little twist, 90 degrees one more time, and say goodbye to those four Phillips screws hanging out on the side of the computer.
Step 9

Take it easy when removing the upper case! It’s connected to the logic board with a ribbon cable, so give it a gentle nudge instead of a quick yank. Your device will thank you!
– So, let’s get started by lifting up at the rear of the case and gently working your fingers along the sides, freeing the case as you go. Once you’ve freed the sides, you might need to rock the case up and down to loosen the front of the upper case. This part can be a bit tricky. Above the DVD reader, there are 4 tabs set back that need to be pulled out vertically.
– Just a heads-up: those two small tongues on the left-hand front of the upper case might bend a little while you’re removing it. When you’re reinstalling, you may have to bend them back to fit snugly into the grooves in the lower case.
Step 10

– Get ready to party by disconnecting the trackpad and keyboard ribbon cable from the logic board and say goodbye to any tape in the way!
– Time to give your device a makeover – remove the upper case like a pro!
Step 11

– Time to unplug those two antenna cables from the Airport Extreme card! You’ve got this.
– Just a heads up, the white antenna cable is hanging out on the left side of the Airport Extreme card. Give it a gentle disconnect!
Step 12

– Wriggle those Airport antenna cables out of their cozy nook in the left speaker. It’s like freeing tiny electronic snakes—go, be free!
Step 13

– Unplug the iSight, inverter, and left fan cables from the logic board with a gentle pull, just like you’re leading them to dance off the board. Easy does it!

Step 15

– Unscrew the shiny T6 Torx screw that’s holding the ground loop on the display data cable to the casing. You’ve got this!
Step 16

– Give that display some love! Hold it with one hand and let’s bid farewell to these 3 pesky screws:
Step 17

– Grab each side of the display assembly and gently lift it out of the computer like you’re lifting a treasure chest out of the sand.
Step 18


– Unscrew the two 5 mm Phillips screws nestled in the lower left and right corners of the display—just two little screws standing between you and success!
Step 19


– Get ready to work some magic with your trusty spudger. Slide the flat end in like you’re sliding into your favorite pair of slippers – smooth and gentle. Now, give it a little twist, just like unboxing a surprise gift. Keep at it, working your way along the left side like a champ until those bezels are saying their goodbyes.
Tools Used

Step 20


– Wedge the flat end of a spudger between the plastic strip on the rear bezel and the front bezel. It should look like it’s standing straight up, ready for action!
– Keep that spudger in place and give it a twist! You’re aiming to pry the front and rear bezels apart like opening a treasure chest.
– Saunter along the right edge of the display, prying as you go, until the rear bezel pops off from the front bezel like a shell from a peanut.
Tools Used
Step 21


– Wedge the flat end of a spudger between the front bezel and the plastic strip that’s clinging onto the rear bezel near the screw holes on the bottom corners of the display.
– Twist your spudger toward the back bezel to gently pry it away from the front bezel.
– If needed, wiggle the gap between the lower edge of the rear bezel and the clutch cover wider until they part ways completely.
Tools Used

Step 23
Heads up! The display inverter is super slim and quite the fragile fellow. Handle with care to avoid any oops moments!
– Gently hoist the inverter board out of the clutch cover like you’re lifting a slice of delicious pizza.
Step 24

– Unplug the LCD backlight from the inverter by gently tugging its connector free from the inverter board. Easy peasy!
Step 25

Handle the inverter cable ground loop with care; it’s a super-thin, delicate wire. If you need help, you can always schedule a repair
– Unplug the inverter cable by sliding its connector right out of the socket on the inverter. Easy peasy!
Step 26


– Whisk away the yellow kapton tape hanging out in the bottom left corner of the display.
– Gently coax the three green antenna ground straps to part ways with the copper tape along the bottom edge of the LCD.
– Unstick the tape that’s getting cozy with the camera cable on the LCD.
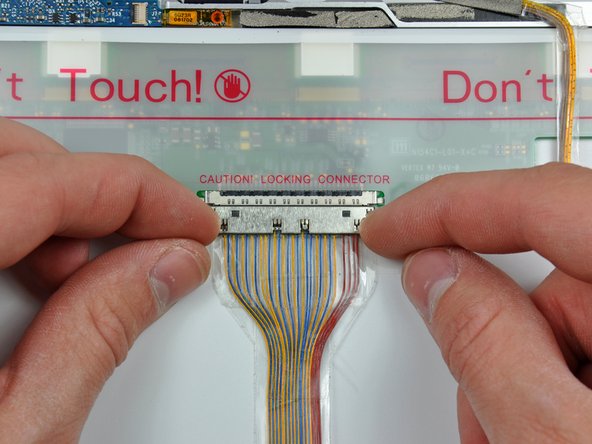
Step 27


– Gently lift off the pieces of tape that are keeping the display data cable and camera cable connectors under wraps.
– Carefully peel the camera cable away from the foam tape at the top edge of the LCD, taking your time to avoid any mishaps.
Step 28

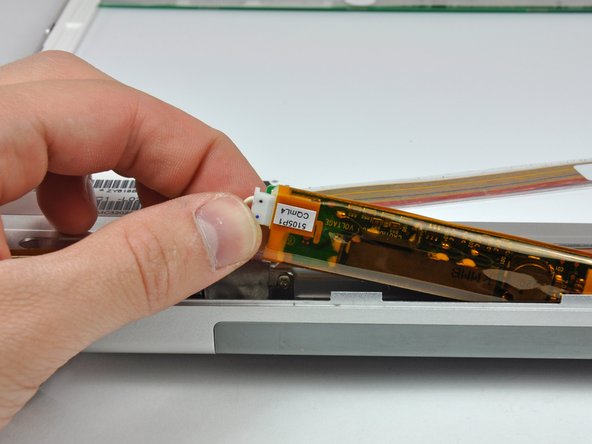
– Carefully tug the camera cable out of its cozy home on the camera board. Make sure to be gentle!
– Disconnect the display data cable connector from its nest on the LCD by giving it a smooth pull.
– Slide both cables parallel to the surface of the logic board like you’re icing a cake.
Step 29
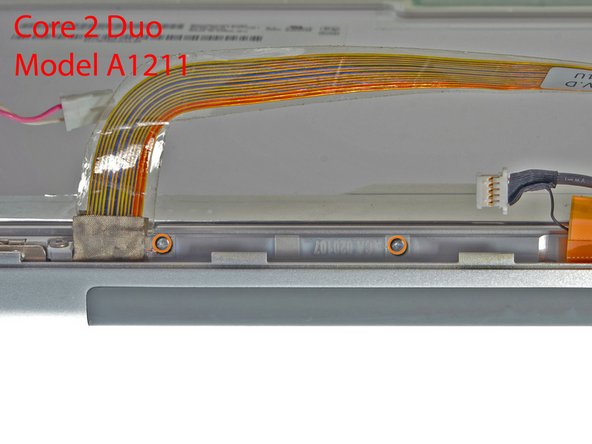

– Got a Core Duo gadget? Peep at picture 1 and whisk away three Phillips screws that are cozying up the clutch assembly to the front display bezel’s lower rim, right by the display data cable.
– Rocking a Core 2 Duo Model A1211? Check out picture 2 and unscrew two Phillips screws that are hanging out with the clutch assembly on the lower edge of the front display bezel, near the display data cable.
Step 30

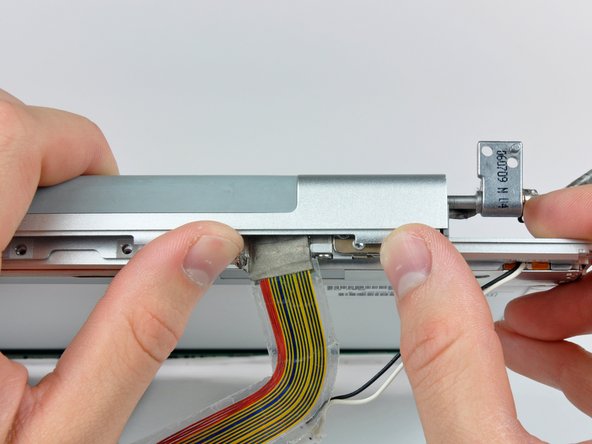
– Unscrew that tiny Phillips screw hiding behind the display data cable. Sneaky little fella!
– Slide the small rectangular steel bracket away from the right clutch hinge. It’s like sliding into home base!

Step 32

Should you need to, feel free to repeat this step for the right side of the clutch assembly. Keep the good vibes going!
Step 33

– Unhook the inverter/camera cable from the left clutch hinge and whisk it away from the display. Just like magic!


