Replace MacBook Pro 15 Subwoofer and Right Speaker Assembly Guide
Duration: 45 minutes
Steps: 20 Steps
Hey there! Need a hand with this step? Feel free to schedule a repair for expert assistance. You’ve got this!
Is the right side of your MacBook Pro feeling a bit shy on sound? Get ready to boogie as you follow this groovy guide to swap out the subwoofer & right speaker assembly.
Step 1

– Alright tech adventurer, it’s time to unscrew and conquer! You’ll need to remove these ten trusty screws that are holding the lower case to the upper case. If you need help, you can always schedule a repair.
Step 2

– With enthusiasm, use both hands to uplift the lower case adjacent to the vent, bringing about the delightful sound of two clips disengaging from the upper case.
– Gently relocate the lower case to a nearby resting place.
Step 3

No Pentalobe driver? No problem! A 1.5 mm flathead screwdriver can save the day. Just make sure the head snugly fits across two of the five ‘points’ of the screw before you start twisting. A loose fit? That’s a recipe for a stripped screw head, and we definitely don’t want that!
If your screwdriver is feeling a little too loose, don’t sweat it! Grab a bigger bit and file it down until it fits nice and snug. You’ll be ready to roll in no time.
You don’t have to follow steps 3-7 to get that battery out if you’re just swapping the hard drive. But hey, it’s always a good idea to disconnect all power sources before diving in. Safety first, right?
– To get that battery out, you’ll need to tackle three Pentalobe screws holding it snugly to the upper case. Grab that special driver and let’s get to work!
Step 4

– Time to meet those two cheeky five-point Pentalobe screws at the top of the battery! Grab your favorite precision screwdriver and remove those little rascals. If you run into any trouble, remember, you can always schedule a repair.


Step 7

– Gently tilt the battery back until you can easily reach the battery cable connector.
– Carefully disconnect the battery cable connector from its socket on the logic board and then gently remove the battery from the upper case.
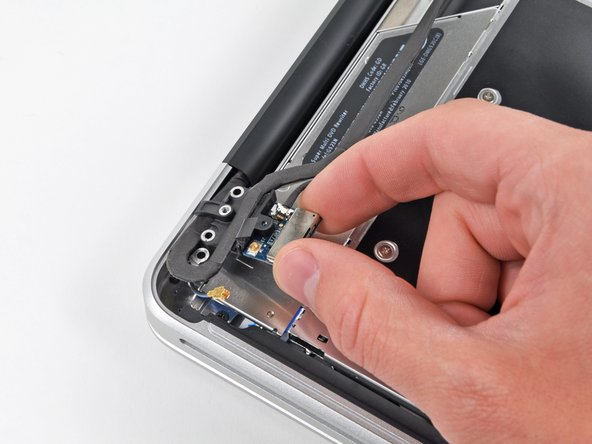
Step 8

– Keep one finger on the end of the cable retainer to hold it down, and with the tip of a spudger, gently lift the other end and swing it away from the camera cable connector. If you need help, you can always schedule a repair.
Apple’s got this nifty strip of clear plastic with adhesive on one side to keep the camera cable connector snug in its socket on the logic board. When you’re moving it out of the way, be super careful not to knock off any surface-mount components. If you need help, you can always schedule a repair
Tools Used
Step 9

Gently wiggle the connector in line with the logic board, avoiding any sudden movements.
– Gently unplug the camera cable by pulling the connector straight out from its socket, just like unplugging a favorite old-school stereo! If you need help, you can always schedule a repair
Step 10

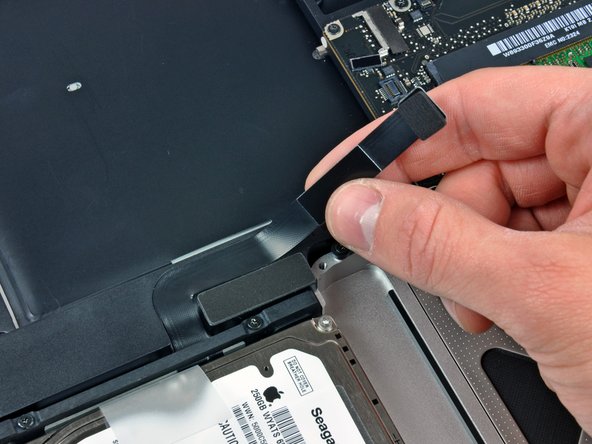
– Gently lift the camera cable away from the sticky stuff holding it to the optical drive. You’ve got this!
Step 11


Gently slide the connector out parallel to the logic board’s surface—no need to pull it straight up!
Hey there! If your device is rocking an anti-glare screen, this is the time to shine. But if it’s more of a glossy screen affair, you can give this step a little skip-a-roo!
Need a hand? Don’t sweat it – you can always schedule a repair with Salvation Repair.
– Unplug the Bluetooth cable by pulling the male end straight out of its socket. Easy-peasy!
– Use the flat end of a spudger to gently pop the Bluetooth antenna cable from its socket on the board. If you need help, you can always schedule a repair.
Tools Used
Step 12

Only needed if you’ve got an anti-glare display.
One screw might stay put in the Bluetooth/camera cable ground loop. Swapping out the display? Don’t forget to move this screw to the new unit.
– Unscrew those two 8 mm Phillips screws holding the Bluetooth/camera cable retainer snugly to the upper case.
– Gently lift the Bluetooth board/cable retainer assembly out of the upper case like a pro.
Step 13

– Grab your trusty spudger and gently pop the optical drive connector right off the logic board! Need a hand? You can always schedule a repair.
Tools Used
Step 14

– Unscrew those three 3.5 mm Phillips screws holding the optical drive snugly in the upper case. You’ve got this!
Step 15


– Gently lift the optical drive by its left edge and smoothly slide it out of the computer. Easy peasy!
– When putting everything back together, just keep an eye on that SATA cable—let’s make sure it doesn’t get trapped under the logic board!

Step 17

– Gently coax the hard drive/IR sensor cable connector away from the logic board using the flat end of a spudger. A little nudge goes a long way!
– Carefully peel the hard drive cable from its cozy spot in the channel within the subwoofer and right speaker. It’s like giving it a little hug goodbye!
Tools Used
Step 18

– Grab your trusty spudger and gently lift the subwoofer connector straight up from the logic board. You’ve got this!
Tools Used
Step 19

– Time to get your screwdriver ready! Unscrew those four little screws that are holding the subwoofer and right speaker snugly in place on the upper case. You’ve got this!
Step 20

– Gently lift the subwoofer and right speaker assembly out of the upper case, like you’re unveiling a surprise gift!


