Replace Samsung Galaxy Note10+ 5G Screen: DIY Guide
Duration: 45 minutes
Steps: 24 Steps
Get ready to tackle that screen removal or replacement on your Samsung Galaxy Note10+ 5G! Because of the unique design of the Note10+ 5G, you’ll need to pop off the back panel first to disconnect that screen cable. Before diving into this adventure, make sure you’ve got a set of replacement adhesives handy for both the back panel and the screen. This guide is based on steps for the non-5G Note10+, so keep that in mind. Some images might show slight differences, but don’t worry—they won’t throw you off track. If you need help, you can always schedule a repair.
Step 1

Hey there! Before you start taking things apart, make sure your phone is completely powered off. We wouldn’t want any surprises, right?
When using heat to loosen things up, remember that a hair dryer, heat gun, or hot plate can be super helpful – just be gentle and don’t overdo it. Your phone’s display and internal battery are sensitive to heat, so keep an eye on the temperature. If you need help, you can always schedule a repair
– Grab your trusty iOpener, give it a minute of quality time on the left edge of the rear cover, and let the magic happen.
Tools Used

Step 2


If your rear cover is looking a little rough, don’t worry! A layer of clear packing tape can help the suction cup stick. If you’re feeling adventurous, try a super strong tape instead of the suction cup. If you’re still struggling, no sweat! You can always superglue the suction cup to the cover. It’s all good!
Time for a little heat therapy! Depending on how old your phone is, this might be a bit trickier. If you’re running into some trouble, just add a little more heat to the edge and try again. You got this!
– Alrighty folks, first things first, you’re gonna need a teeny-tiny suction cup, which is best for gripping on to your device. Once you’ve got that little buddy all warmed up and ready to go, place it close to the edge of that phone case, then give it a good ol’ yank! Keep the magic strong, my friends, and let Erin Brockovich over here pop right up! Now, let’s slide in a trusty old opening pick – any will do. Just slide it into the indent created by our suction cup shenanigans and we’re good to go!
Step 3


Hey, keep that opening pick chill! Don’t push it in past the halfway point, or you might accidentally damage some important stuff inside. No worries, if you need help, you can always schedule a repair.
– Slide the opening pick along the left edge towards the bottom left corner to give that adhesive a good slice!
– Leave the pick right in the bottom left corner like a superhero holding back the bad guys, so that the adhesive doesn’t stick back together.
Step 4


As you wrap up the work on all sides of the phone, you’ll notice the rear cover starting to pop off. Keep going, you’re almost there!
– Keep the momentum going! Go ahead and repeat that cozy heating and cutting routine for the other three sides of your phone.
– And remember, as you tackle each side, pop an opening pick in place to keep that adhesive from playing tricks and resealing.
Step 5


Make sure your device is powered on and give your repair a test run before you dive into applying that new adhesive and sealing everything up. You’ve got this!
– Whoa, Sally! Lift that rear cover straight up and off, just like that. No problem!
– Alright, champ, follow this guide to put that rear cover back on and make it all nice and tidy again.
– If you’re using Tesa tape, you’re doing it right, dude! Just follow this guide and you’ll be good to go.
Step 6

– Grab your trusty Phillips screwdriver and get ready to tackle those five 4 mm screws holding the wireless charging coil in place. You’ve got this!


Step 8


– While keeping the metal shield out of the way, use the pointed end of a spudger to carefully pry up the battery connector and disconnect it. If you need help, you can always schedule a repair
Tools Used

Step 9


– Time to get funky with it! Use the pointed end of a spudger to gently disconnect the wireless charging coil connector from the motherboard. Don’t worry, it’s just a little dance. If you need help, you can always schedule a repair
Tools Used
Step 10


The wireless charging coil is held in place with a bit of light adhesive magic.
– Gently lift the metal shielding so you can easily grab it with your fingers.
– Carefully peel the wireless charging coil away from the device, just like unwrapping a present.
– Now it’s time to take out the wireless charging coil completely.
Step 11

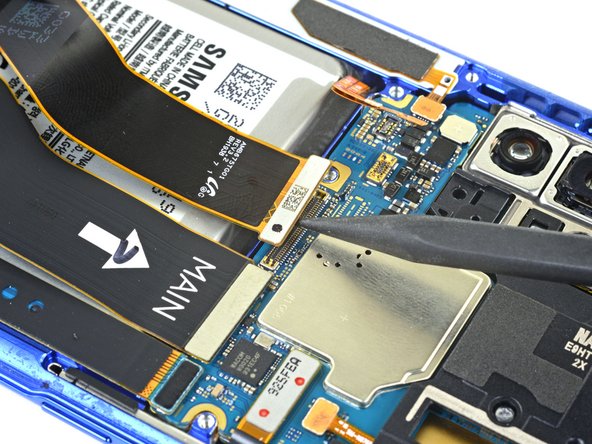
– Use the pointed end of a spudger to gently disconnect the display cable from the motherboard. It’s like giving it a little high-five, but with a tool!
– To re-attach the connector, make sure it’s lined up perfectly, then press down on one side until it clicks. Then repeat on the other side. Don’t press in the middle – that’s a no-no! If the connector is misaligned, the pins could bend, which wouldn’t be cool. If you need help, you can always schedule a repair.
Tools Used
Step 12

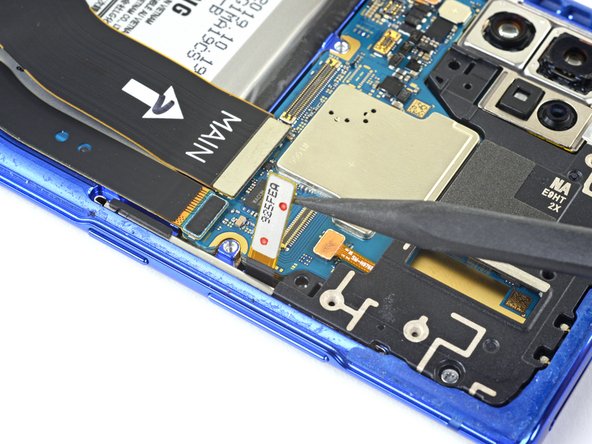
– Alright, let’s get this S-Pen touch layer cable disconnected! Grab your spudger and use the pointy end to gently pry that connector away from the motherboard. No worries if it feels a little snug, just be careful and take your time.
Tools Used
Step 13

A hair dryer, heat gun, or hot plate can be your allies in this repair journey, but tread carefully! Overheating can be a real party pooper for your phone’s display and internal battery, which are both sensitive to the heat. Keep it cool and let’s get that device back in action!
– Get your iOpener nice and warm. Pop it on the left edge of the display for about a minute. That’ll make things a little easier for us!
Tools Used
Step 14


If your screen is sporting some serious cracks, a layer of clear packing tape might just do the trick to help the suction cup stick. If you’re feeling adventurous, you can also try using some super strong tape instead of the suction cup. And if you’re really in a bind, a little superglue on the suction cup can help it cling to that broken display.
Now, depending on how old your phone is, this might be a bit tricky. If you’re running into some trouble, just add a bit more heat to the edge and give it another go!
– First, attach a suction cup to the heated edge of the display – get it as close to the edge as you can.
– Now, pull up on the suction cup with some strong, steady force. You’re aiming to create a gap between the display and the frame, so don’t be shy.
– Next, take the point of an opening pick and carefully insert it into the gap you just created. If you need help, you can always schedule a repair
Step 15


Just a heads up, don’t go crazy with that opening pick! Keep it chill and only insert it about halfway. You wouldn’t want to hurt those delicate components, would you? If you need help, you can always schedule a repair.
– Slide that opening pick along the left side, bringing it down towards the bottom left corner. This will slice through the adhesive holding things together.
– Leave the pick in place at that bottom left corner. It’ll keep the adhesive from sticking back together and making things tricky.
Step 16


– Grab a second opening pick and slide it along the left edge, making your way to the top left corner to break that adhesive seal. You’re doing great!
– Keep that pick snugly in the top left corner to stop that adhesive from re-sticking. You’re almost there!
Step 17

– Grab your trusty iOpener and give it a warm hug against the bottom edge of your phone for a solid minute. You’re doing great!
Tools Used
Step 18


– Pop a third opening pick into the little gap at the bottom edge of your phone.
– Gently slide that pick over to the bottom right corner, cutting through the adhesive like a pro.
– Keep the pick snugly in the bottom right corner to stop that adhesive from getting all clingy again.
Step 19

– Warm up your iOpener and give it a cozy spot on the top edge of the phone for about a minute.
Tools Used
Step 20


– Pop in a fourth opening pick snugly into that little gap at the top edge of your phone.
– Gently slide the pick over to the top right corner, cutting through that sticky adhesive like a pro.
– Keep that pick in place at the top right corner so the adhesive doesn’t decide to play hide and seek with you again.
Step 21

– Get your iOpener nice and toasty and press it against the right side of your phone for about a minute. It’s like a warm hug for your phone!
Tools Used
Step 22


As you work your way down to the bottom edge, you’ll start to see the display separate from the phone – you’re making progress!
– Let’s get this party started! Slide the opening pick from the top right corner down towards the bottom right corner of the phone to slice the adhesive.
– Now, let’s make sure we get every bit of that sticky stuff! Slide an opening pick back and forth around the entire perimeter of the phone to release any missed adhesive. If you find any stubborn spots, just give it a little heat and try again. You got this!
Step 23


Be careful not to completely remove the screen just yet – there are still some cables routed through the phone’s frame that you’ll need to deal with first. If you need help, you can always schedule a repair
Keep that screen at a chill 15º angle or less—no need to go all the way up!
– Carefully pry the screen away from the top edge of your phone to get started on this repair.
Step 24


– Alright, let’s get those cables moving! Carefully thread the display and S-Pen touch layer cables through their cutouts on the phone frame.
– Time to give that display a little break. Remove it gently.
– Let’s make sure that display is sparkling clean! Remove any leftover adhesive before installing a new one.
– Ready for some adhesive magic? Follow this guide for instructions on how to apply adhesive to the replacement screen. It’s like a little glue party!
– Always test your repairs before sealing the deal with new adhesives. You got this!