Replace Samsung Galaxy Note10 Battery
Duration: 45 minutes
Steps: 22 Steps
To keep things safe and sound, make sure your battery is below 25% before diving into disassembling your phone. You’ve got this!
Get ready to breathe new life into your Samsung Galaxy Note10 by removing or replacing the battery. If you notice any swelling, be sure to take the necessary precautions to stay safe. Before you start disassembling your phone, make sure to discharge the battery to below 25% to minimize the risk of any unexpected thermal events. If you need help or want some expert guidance, you can always schedule a repair.
Step 1

Make sure to give your phone a little break and power it down completely before diving into the disassembly adventure!
A hair dryer, heat gun, or hot plate can also help, but keep an eye on the temperature! We don’t want to fry the phone—the display and battery are sensitive to heat. If you need help, you can always schedule a repair.
– Heat up that iOpener and set it on the left edge of the back panel for a cozy minute. You’re doing great!
Tools Used

Step 2


If your back glass is cracked like a spiderweb, try covering it with some clear packing tape. This will give the suction cup a better grip. If you’re feeling extra adventurous, you can use strong tape instead of the suction cup altogether! If all else fails, grab some superglue and give that suction cup a little boost!
Depending on how old your phone is, this step might be a bit tricky. If you’re having trouble, just keep applying heat to the edge and give it another try. You got this!
– Get ready to separate those panels! Grab your suction cup and give that back panel a little heat – just enough to loosen things up. Now, stick that suction cup right on the edge, as close as you can get.
– Time to get things moving! Pull on that suction cup with a steady hand – you’ve got this! You should feel a tiny gap opening up between the panel and the frame.
– Now for the finishing touch! Gently slide the opening pick into that gap you created – it’s like giving your device a little nudge in the right direction.
Step 3


Keep that opening pick to a safe distance—don’t push it more than halfway into your device! You wouldn’t want to accidentally poke something important inside.
– Slide the opening pick along the left edge towards the bottom left corner to slice the adhesive. It’s like you’re giving the adhesive a little tickle, but in a good way!
– Leave the pick in the bottom left corner to prevent the adhesive from re-sealing. Think of it like holding the door open for the next step. You’re doing great!
Step 4


– Now it’s time to bring in some extra help – insert a second opening pick and gently slide it across the left side, making your way towards the top left corner. This will help you slice through the adhesive and make the repair process smoother.
– Leave that pick right where it is, nestled in the top left corner, to keep the adhesive from re-sealing and making your job more difficult. If you need help, you can always schedule a repair
Step 5

– Kick things off by grabbing your trusty iOpener and warming up the top edge of your phone for a smooth one minute. Let’s get this repair party started!
Tools Used
Step 6


– Let’s get this party started! We’re going to insert a third opening pick into that gap on the top edge of the phone.
– Now, slide the pick to the top right corner, like a little dance move, slicing through that adhesive.
– Keep that pick right there in the corner to stop the adhesive from getting all cuddly again.
Step 7

– Get ready to unlock your phone’s full potential – start by heating up an iOpener and applying it to the right edge of your phone for about a minute. If you need help, you can always schedule a repair
Tools Used
Step 8


As you work your way to the bottom edge, the back panel will start to pop away from the phone. Keep at it!
– Now it’s time to add the final opening pick to the right side of your phone. Slide it down towards the bottom right corner to cut through the remaining adhesive. You’re almost there!
– Take your opening pick and run it around the entire edge of your phone to make sure all the adhesive is released. If you hit any stubborn spots, don’t worry – just reheat the area and try again. If you need help, you can always schedule a repair
Step 9


– Gently lift the back panel and set it aside with care.
Step 10

– Alright, grab your trusty Phillips screwdriver and give those five 4mm screws securing the wireless charging coil a good twist. They’re just hanging on, so they’ll come right off. If you need help, you can always schedule a repair.


Step 13


– Alright, let’s get this wireless charging coil unplugged! Grab your trusty spudger (that pointy tool) and gently pry the connector loose from the motherboard. It’s like giving it a little high-five, but with less enthusiasm. If you need help, you can always schedule a repair.
Tools Used
Step 14


The wireless charging coil is held in place by a bit of light adhesive magic.
– Wahoo, almost there! Time to turn up the heat! 🎉 Lift up that metal shielding and get a grip on it.
– Yay, we’re getting juicy now! Carefully peel up that wireless charging coil, like a peel and stick decal.
– Oh wow, look at you go! Successfully removed that wireless charging coil, give yourself a pat on the back! 🙌
Step 15

– Alright, let’s get those speakers out! Grab your trusty Phillips screwdriver and give those five 4 mm screws holding the speaker in place a little twist. You got this! If you need help, you can always schedule a repair


Step 17
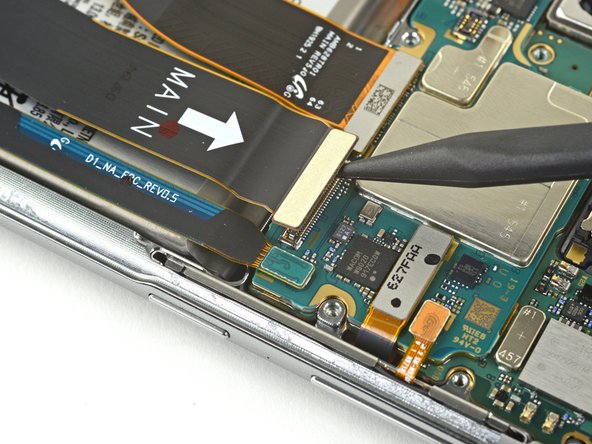


– Alright, let’s disconnect those cables! Take your spudger (that handy little tool) and gently detach the main interconnect cable from the motherboard.
– Now for the secondary interconnect cable – give it a little nudge and it’ll come right off the motherboard. You’re doing great!
Tools Used


Step 19


– Unplug those interconnect cables and set them aside like a pro!
Step 20
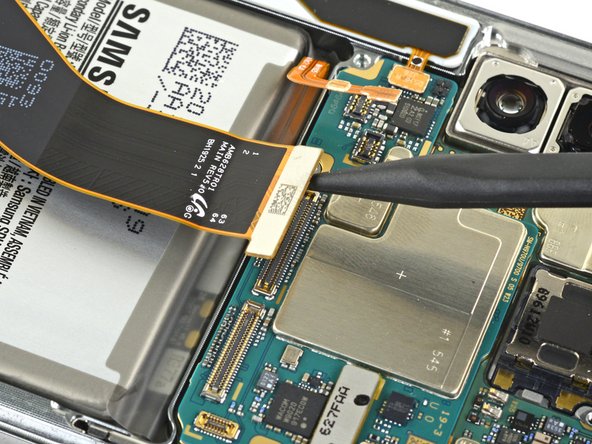

– Now it’s time to get a little tricky – use the pointed end of a spudger to carefully disconnect the display cable connector from the motherboard. Take your time and be gentle, you got this! If you need help, you can always schedule a repair
Tools Used
Step 21

Hey there, champ! We’re just sayin’, keep the party drinks away from your device. A little splash could lead to a big problem. Just a heads-up, ya know? If you need help, you can always schedule a repair.
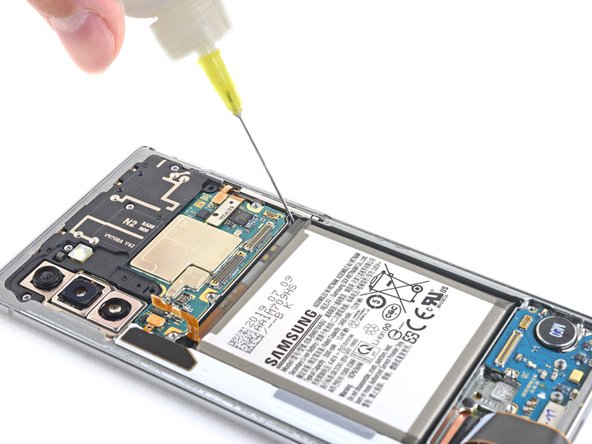
– First, let’s get that battery loose. Apply 1-2 drops of high concentration (90% or greater) isopropyl alcohol to the tear-shaped indents near the corners of the battery well, right underneath the battery. This will help break down the adhesive.
– Now, take a deep breath and wait about two minutes. This will give the isopropyl alcohol time to penetrate and weaken the battery adhesive, making the next step a whole lot easier. If you need help, you can always schedule a repair
Step 22


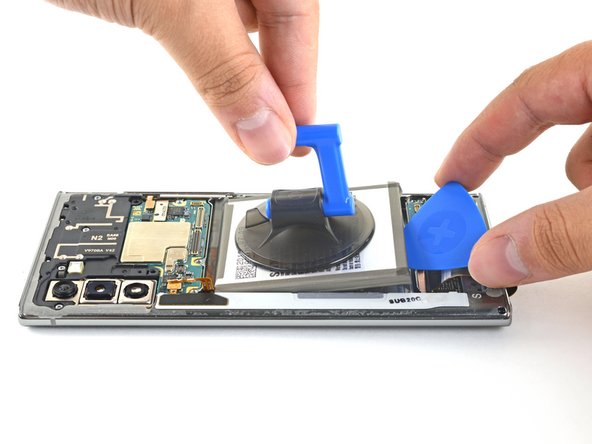
Hey, be careful not to go too far with the opening pick! If you go more than halfway, you might give the fingerprint sensor under there a little tap on the head. We don’t want that, right? If you need help, you can always schedule a repair.
If you’re having a tough time, don’t worry! Just add 1-2 more drops of isopropyl alcohol right beneath the battery, give it a couple of minutes to do its thing, and then give it another shot.
– Alright, let’s get this battery out! Stick a suction cup to the back of the battery.
– Now, give that suction cup a good, strong pull upwards to start separating the battery from the phone. You’re doing great!
– Slide the tip of an opening pick into the little gap you just made.
– Keep pulling up on that suction cup and watch the battery come right off!
– If you used some isopropyl alcohol, give it a ten-minute break to dry out before you put in the new battery.
– Time to put that new battery in! Before you do, add some stretch release