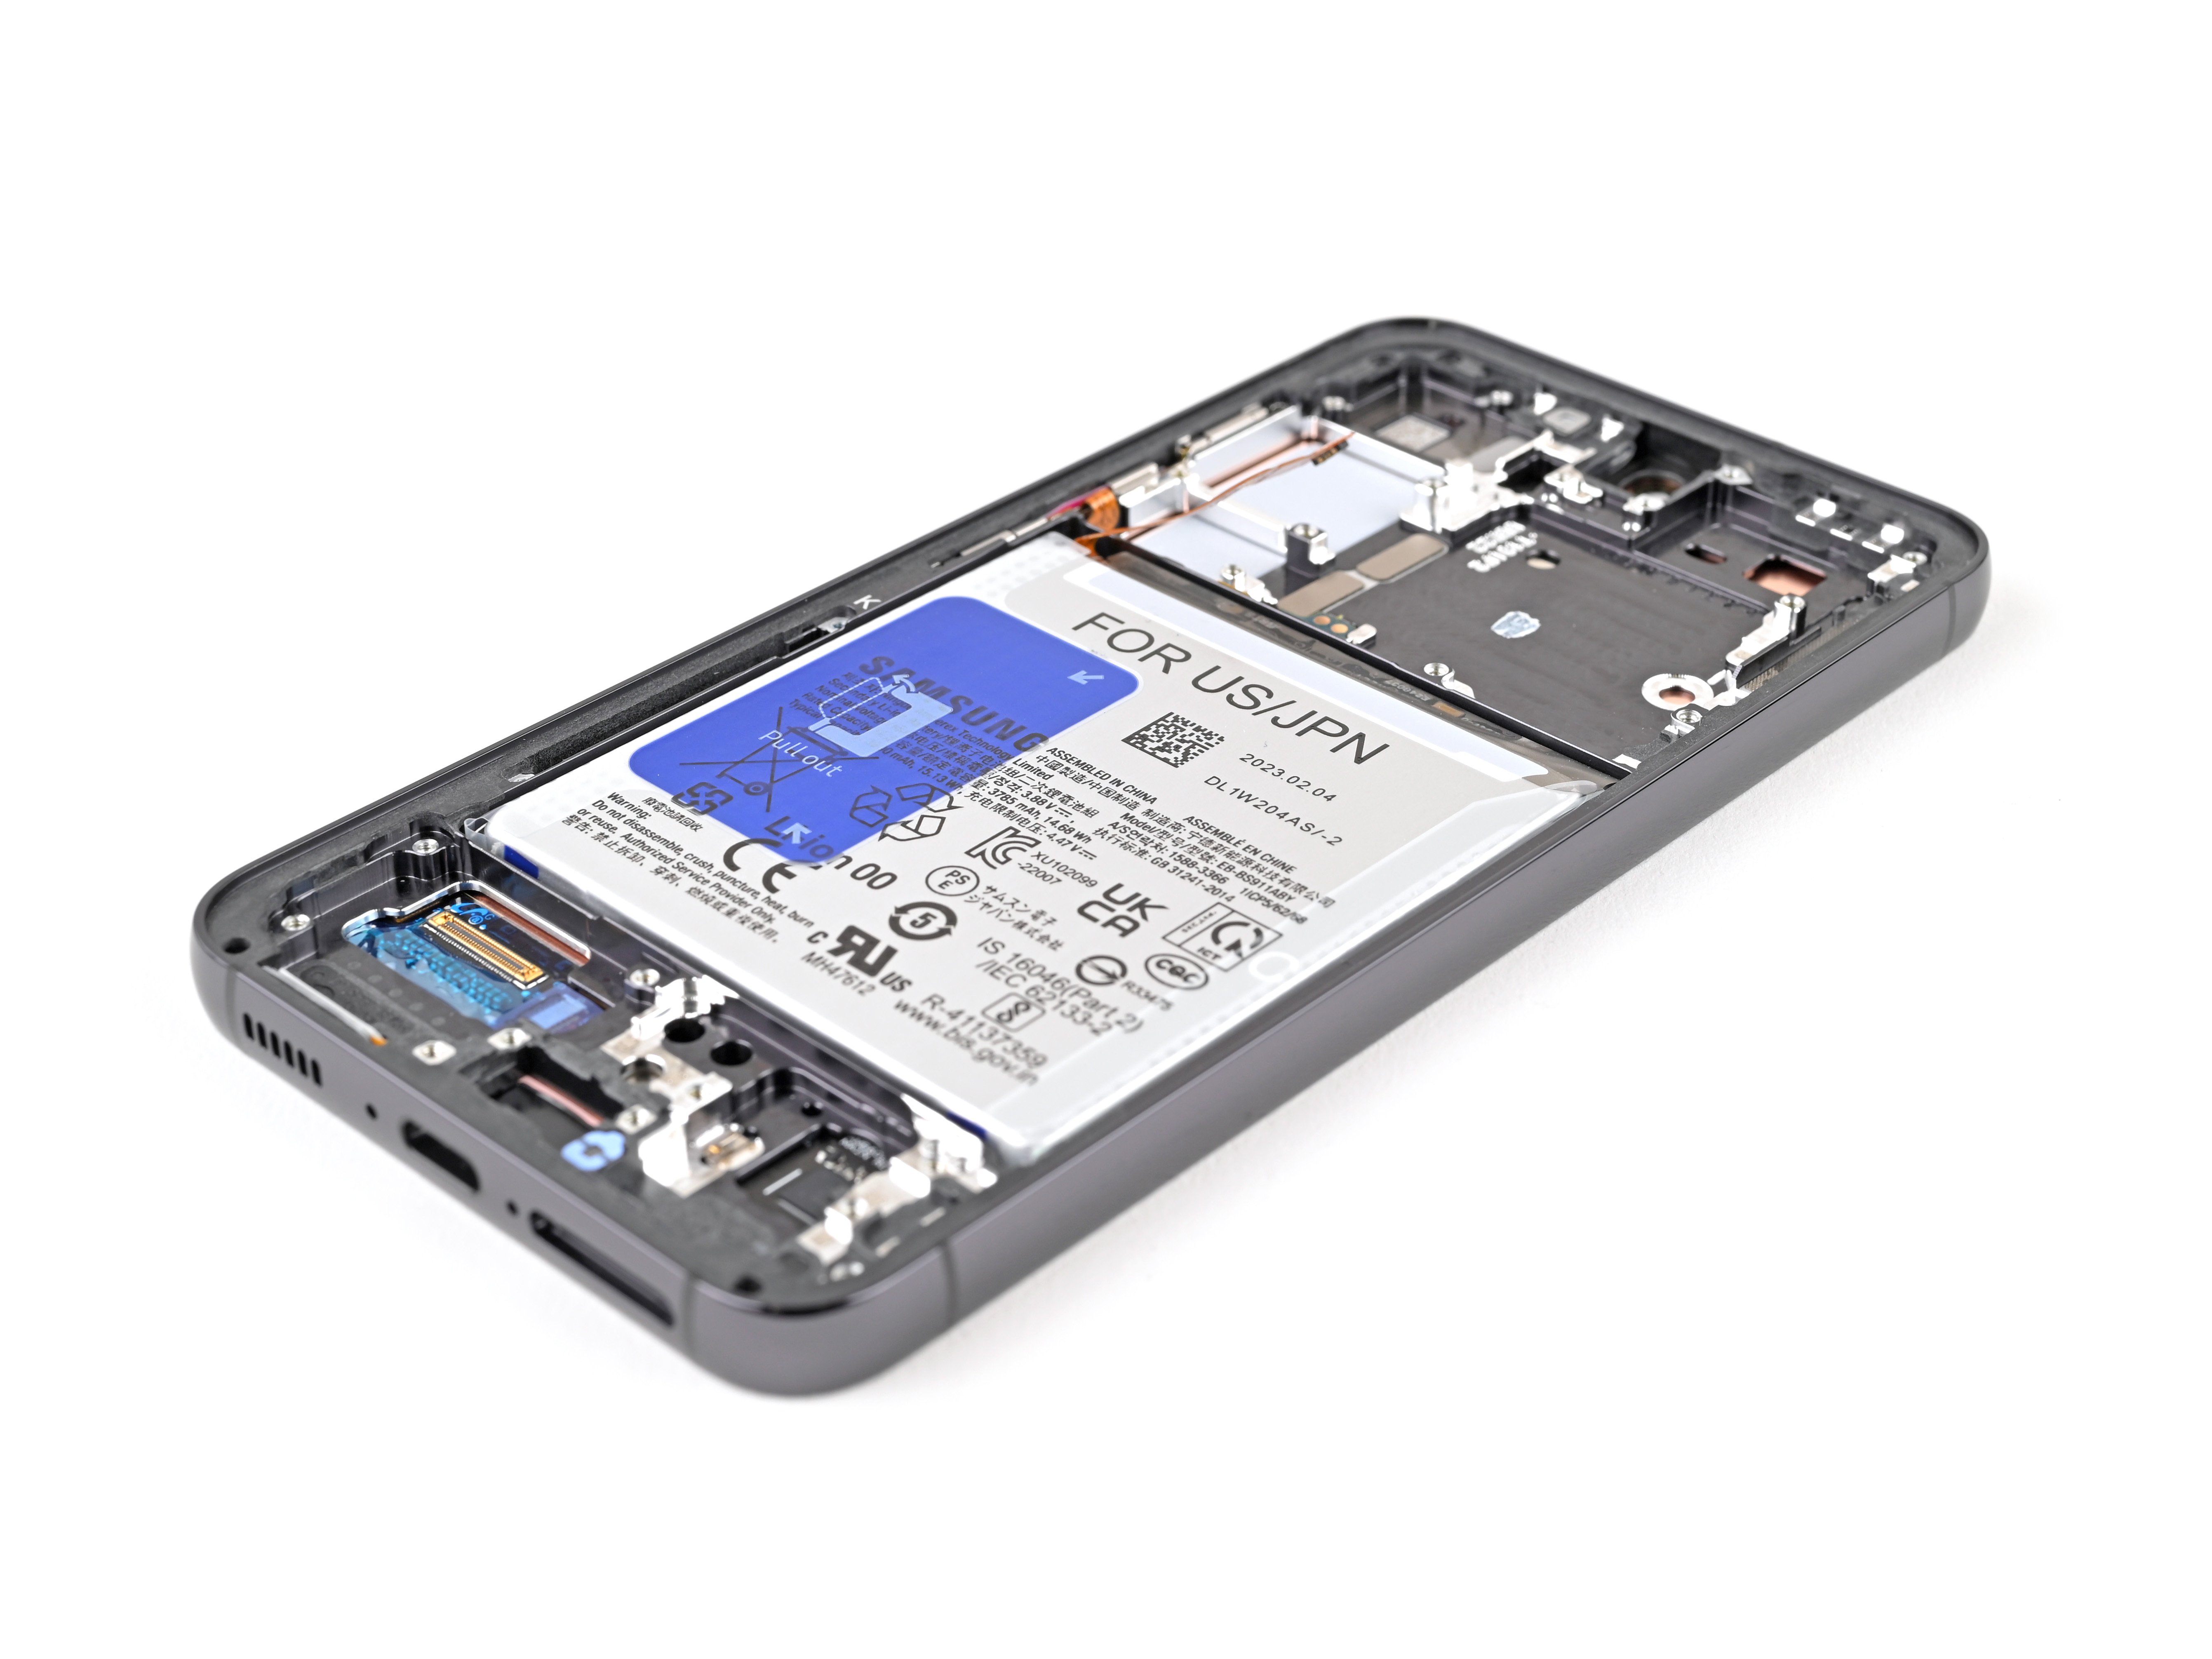
Replace Samsung Galaxy S23 Earpiece Speaker
Duration: 45 minutes
Steps: 23 Steps
Ready to give your Samsung Galaxy S23 a boost? Follow this guide to switch out the earpiece speaker like a pro! Just a heads-up: keeping that water resistance intact is all about how you handle the back cover adhesive. Remember, once you’re done, your device might not keep its IP (Ingress Protection) rating. But don’t worry, you’ve got this! And if you ever feel stuck, you can always schedule a repair for a little extra support.
Step 1


– First things first, let’s unplug all the cables from your phone and say goodbye to the chaos.
– Now, press and hold the side key along with the volume down button, and choose ‘Power off’ to send your phone into a peaceful slumber.
Step 2

You can also use a hairdryer, heat gun, or hot plate to help loosen the adhesive, but be careful not to overheat the phone. The display and internal battery can be sensitive to heat. If you need help, you can always schedule a repair.
– Let’s get this repair started. Heat an iOpener and apply it to the right edge of the back cover for about two minutes. This will help loosen the adhesive, making the next steps a breeze. If you need help, you can always schedule a repair
Tools Used


Step 3


If you’re struggling to create that perfect gap, just give it a little more heat to help loosen the adhesive. And remember, check out the iOpener instructions to keep things from getting too toasty!
– Get ready to unleash your inner phone-fixing superhero! Grab a suction handle and stick it firmly to the back cover, aiming for the center of the right edge.
– Now, give that suction handle a good, strong pull – like you’re trying to open a really stubborn jar of pickles. This will create a tiny gap between the cover and the frame.
– Time to slip in an opening pick! Carefully insert it into that gap you just created. You’re almost there!
Tools Used


Step 5

– Hey, have you tried heating up an iOpener and gently placing it along the bottom edge of your device’s back cover for about two minutes? If you’re feeling stuck, you can always check out our repair guide for some extra help!
Tools Used
Step 6


– Slide a second opening pick into the bottom right corner.
– Gently wiggle it around that corner to break free the adhesive.
Step 7


– Gently slide your opening pick into the bottom left corner to break the adhesive seal.
– Keep that pick in place at the bottom left to make sure the adhesive doesn’t decide to stick again.
Step 8

– Place a warm iOpener on the left edge of the back cover and let it do its magic for a couple of minutes.
Tools Used
Step 9


– Now, let’s get this party started! Slide that opening pick around the bottom left corner, gently separating the adhesive. You got this!
Step 10


– Slide in a trusty third opening pick right at the bottom left corner.
– Gently glide your pick up towards the top left corner to peel away that adhesive.
– Keep that pick snug in the top left corner to stop the adhesive from sticking back together.
Step 11

– Warm up your trusty iOpener and give it a cozy spot on the top edge of the back cover for about two minutes. You got this!
Tools Used
Step 12


– Let’s get that top left corner separated! Insert a fourth opening pick, right at the top left. Now, give that pick a little spin around the corner, gently working that adhesive loose.
Step 13


– Let’s get this party started! Slide your opening pick up to the top right corner, like you’re giving the device a high five. You’ll feel the adhesive give way.
– Now, leave the pick in the top right corner. This prevents the adhesive from getting all sticky again. You got this!
Step 14


Be careful not to touch the rear cameras with your pick, as pushing against the lenses can cause damage. Take your time and work carefully to avoid any accidents. If you need help, you can always schedule a repair
Hey there! There might be a little bit of adhesive left under the flash.
You should see the opening pick poking through the flash cutout. Don’t worry, it’s all good!
– Get your opening pick ready and line it up with the flash cutout – this is where the magic starts.
– Gently slide the pick under the top of the back cover until you feel it catch on the adhesive. Don’t worry, it’s supposed to do that.
– Keep sliding the pick down toward the bottom of the phone until the adhesive lets go of the back cover. If you need help, you can always schedule a repair
Step 15


Still having trouble getting that cover to come off? No worries, just grab an opening pick and gently slide it around the edges until it pops free.
Now’s a great time to turn your phone back on and make sure everything is working smoothly. Just remember to power it back down before moving on to the next steps. If you need help, you can always schedule a repair
– Grab that back cover and give it a gentle tug to remove it. Easy peasy!
– During reassembly, you’ll be rockin’ those parts back into place. Here’s a quick tip:
– Use your trusty tweezers or fingers to grab any leftover adhesive bits.
– If that adhesive is being stubborn, grab your heat gun and some isopropyl alcohol (90% or stronger) and give it a little love. It’ll come right off!
– Need a little help with those custom-cut adhesives? We’ve got you covered! Check out this guide!
– If you’re using double-sided tape, no worries! We’ve got a guide for that too!
– And if you need help, you can always schedule a repair
Tools Used


Step 16


– Grab your trusty spudger and gently lift up to disconnect the wireless charging coil press connector from the motherboard. Easy peasy!
– When it’s time to reconnect those press connectors, just make sure to line them up nicely and press down on one side until you hear that satisfying click. Then, do the same on the other side. Avoid pressing in the middle, as that can lead to misalignment and bent pins—yikes! If you find yourself in a bind, remember, you can always schedule a repair.
Tools Used

Step 17


– Grab your trusty Phillips screwdriver and remove the thirteen 3.5mm-long screws that hold the wireless charging coil and loudspeaker in place:
– You’ll find six screws securing the wireless charging coil – take those out first
– Next, remove the seven screws that keep the loudspeaker locked down. If you need help, you can always schedule a repair


Step 19


– Gently lift the loudspeaker away from the frame using your fingers to completely detach it.
– Take out the wireless charging coil and loudspeaker from the frame.
– When putting everything back together, give the loudspeaker a little love by pressing around its edges to snap it back onto the frame.


Step 21


– Gently wiggle the tip of a spudger to pop up and unplug the earpiece speaker press connector. If you need help, you can always schedule a repair
Tools Used
Step 22


– Grab your trusty Phillips screwdriver and take out the five 3.5mm screws holding the earpiece speaker in place. If you need help, you can always schedule a repair.
Step 23


Be careful not to insert your spudger in the wrong spot, or you might accidentally dislodge some of the phone’s delicate surface-mounted components. If you need help, you can always schedule a repair
– Slide that trusty flat end of your spudger between the bottom edge of your earpiece speaker and the sliver shield on the motherboard. You got this!
– Now, give that spudger a little twist to gently unclip the earpiece speaker from the frame and pop it out. You’re doing great!
– When you’re ready to put things back together, just slide the top end of that earpiece speaker into the frame first. Then, give it a good press down and clip it back in. You’re a repair rockstar! If you need help, you can always schedule a repair.
Tools Used