Replace Samsung Galaxy S9 NFC Antenna and Charging Coil – Step-by-Step DIY Tutorial
Duration: 45 minutes
Steps: 11 Steps
might damage those fancy waterproof seals
will continue to function like a champ
may lose its cool water protection
replacement adhesive is your new best friend
Ready to give your Samsung Galaxy S9 a little makeover? Time to say goodbye to the NFC antenna and charging coil! Just a heads up, opening up your S9 might mess with those watertight seals. Don’t worry, though! Even without the seals, your phone will be A-okay, just keep it away from water. Make sure to stock up on replacement adhesive for putting everything back together. Need a hand? Feel free to schedule a repair!
Step 1
– First things first, let’s power down that phone of yours. Safety first, right?
– Now, grab your trusty heated iOpener and apply it to one of the long edges of the phone. This will help loosen up the adhesive holding that rear glass in place. Make sure to keep it there for at least two minutes to work its magic!
Caution: The Samsung Galaxy S9 adhesive is a beast! Using a hair dryer, heat gun, or hot plate as your last resort is cool, but exercise caution to prevent overheating which can damage the AMOLED display and battery. If things get tricky, you can always schedule a repair and we’ll have you back to swiping in no time!
Tools Used
Step 2
The adhesive on the inside of the back cover is arranged just like you see in the image.
– Alright, let’s dive into the fun part! We’re going to tackle that pesky adhesive holding the back cover in place.
– Get ready to slice through the sticky stuff in the areas highlighted below:
Step 3
If the rear glass of your phone is cracked, it might be a bit tricky for the suction cup to stick. No worries! You can give it a go with some sturdy tape, or if you’re feeling adventurous, use a bit of superglue to secure the suction cup in place and let it set. Then you’re all set to move forward with your repair!
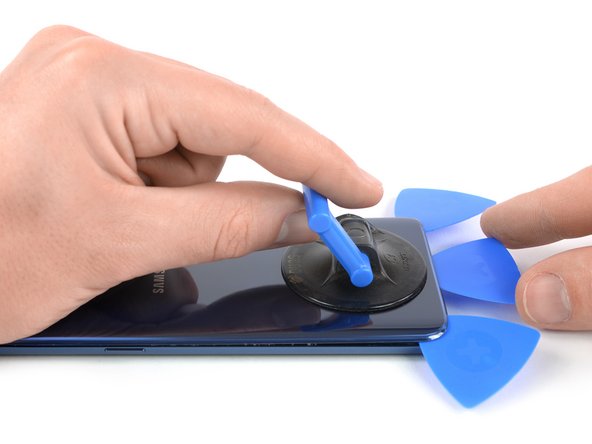
– Time to get to work! Start by placing a suction cup on the back cover.
– Gently lift the bottom edge of the back cover with your suction cup, creating a tiny gap between the cover and the frame.
– Slide an opening pick into that gap you just made and work it down to the bottom right corner.
– Now, grab a second opening pick and slide it over to the bottom left corner.
– Insert a third opening pick to keep that adhesive from sticking back together while you continue the removal process.
Step 4
– Gently slide the tip of the opening pick from the bottom left corner along the side to the top. Keep it cool, this isn’t a race!
– Maneuver the pick around the top corner and leave it there to keep the adhesive from sealing back. Smooth move! If you need help, you can always schedule a repair
Step 5
Hold your horses! Don’t fully open up the phone just yet. That delicate fingerprint sensor cable is still hanging out between the back cover and the motherboard, and we don’t want to break any friendships here.
– Glide the opening pick from the bottom right corner up along the side to the top.
– Swing the opening pick around the corner and slice through the last bit of adhesive at the top of the phone.
Step 6
– Gently lift up the side of the rear glass where you’ll find the volume button hanging out.
– Grab your trusty spudger and use its edge to carefully pry up and disconnect that sneaky fingerprint sensor flex cable.
Tools Used
Step 7
– Pop off the rear glass.
– When putting it back together, follow this guide to swap out the adhesive and snap the rear glass back in place.
– If you need a rear glass replacement, use this guide to transfer the rear camera bezel, including the fingerprint sensor.
Step 8
– Unscrew those eight 4 mm Phillips #00 screws like a pro!
Step 9
– Slide an opening pick under the right edge of the plastic cover that houses the NFC antenna and charging coil.
– Gently twist or pry to pop open the plastic clips that are holding the cover in place.
Step 10
– Let’s get this show on the road! First, gently slide an opening pick under the left side of that plastic cover, then do a little twist or pry to release the plastic clips and give that cover some freedom! You’re doing great, champ!
Step 11
– Gently lift off the plastic cover that houses the NFC antenna and charging coil. It’s a simple step—just a little finesse and you’re on your way!


