Replace Xbox One Elite Rumble
Duration: 45 minutes
Steps: 8 Steps
If your Xbox One Elite Controller isn’t giving you those satisfying vibrations, it might be time to check out the rumble motors. They could be disconnected or just not up to snuff! Don’t worry, though—we’ve got you covered with some easy-peasy instructions to swap out those rumble motors. Just grab your trusty soldering iron and follow the Soldering Iron Guide to get those wires from the new rumble motor snugly attached to the motherboard. Let’s get vibrating again!
Step 1

Alright, superstar, gently remove the cover. We don’t want to break those little plastic tabs holding everything together!
– Flip the controller over so the buttons are facing downwards – don’t worry, it’s an easy start!
– Carefully slide the battery cover up in the direction of the arrow to remove it. Take your time, you’ve got this!
Step 2


– Ready to give those batteries the boot? Just grab ’em by the end and pull ’em out. No need to be shy, those batteries are ready to be replaced!
Step 3


Watch out for those little plastic tabs that keep each grip cover snug to the back of your controller! They can be a bit fussy, so handle with care!
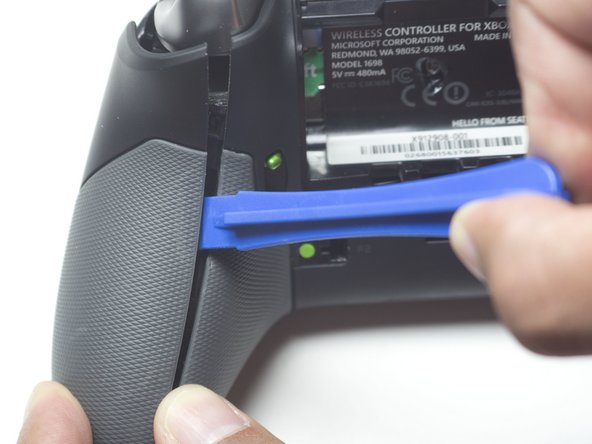
– Start the fun by popping off each grip! Slip the plastic opening tool in at the top of the controller.
– Now, glide that tool along the whole seam, gently prying and lifting as you go. Before you know it, the grip will be free and ready for whatever comes next!
Step 4


Underneath each grip, at the bottom tip and near the triggers, you’ll find four sneaky screws just waiting to be unscrewed. They’re like little hidden treasures! And don’t forget about the last screw, hiding out in the center of the battery tray beneath a sticker—it’s playing hard to get!
– Let’s get started by removing the five 2.3 mm screws using your trusty TR8 Torx Security screwdriver.
– Now, use that same TR8 Torx Security Screwdriver to carefully puncture the sticker and remove the last screw – you’re making great progress!
Tools Used
Step 5


– Give your controller a flip so the buttons are facing up—this way, those pesky vibration motors won’t take a tumble out!
– Let’s tackle that D-pad! Gently lift the bottom part and give it a pull to liberate it.
– Next up, time to say goodbye to the plastic faceplate! Carefully pull it up and off with a gentle touch.
– Finally, it’s thumbstick removal time! Just pull them off from the top, and you’re set!
Step 6


Alright, time to split those components! Just be careful when separating the main assembly from the backplate. There’s a tiny ribbon cable connecting them, so give it some gentle love and make sure it stays connected. You got this!
The backplate might be a bit clingy around the bottom port, so don’t hesitate to give it a little gentle nudge with a prying motion to get it free.
– Let’s take that little black mode switch off the front of the controller. No sweat! It’s a breeze.
– Alright, time to give that backplate a little tug. It should come right off the main assembly. You’ve got this!
Step 7

The small ribbon cable connects the back cover to the controller’s internals. To remove it, simply flip up the black lever on the opposite side of the connector – it’s like releasing a tiny latch. This will set the cable free, and you’ll be one step closer to fixing your device. If you’re not feeling confident, don’t worry – just take your time and remember that you can always schedule a repair if you need a hand.
– Grab those trusty tweezers and gently unplug the ribbon cable from the side closest to the back cover! Just a little pull parallel to the circuit board should do the trick—easy peasy!
Step 8


Make sure to remember the spots where those cheeky red and black motor wires connect— they need to go back where they belong!
Now, let’s gently free the rumble motor from the controller assembly. You’ve got this!
– To put everything back together, just follow these steps in reverse – easy peasy!
– If you didn’t quite get it done, no worries! You can always schedule a repair and let the pros handle it.
– You’re almost done! Take a deep breath, and you’ll be enjoying your freshly repaired device in no time.
Tools Used

Success!

