Replace Xbox One S Hard Drive: Step-by-Step Guide
Duration: 45 minutes
Steps: 14 Steps
This repair guide is a step-by-step guide to help you get your device back in tip-top shape! We’ve made it easy to follow, so you can feel like a pro in no time. If you get stuck or need a helping hand, you can always schedule a repair with our team. We’re always here to lend a hand and help you fix your device.
Step 1

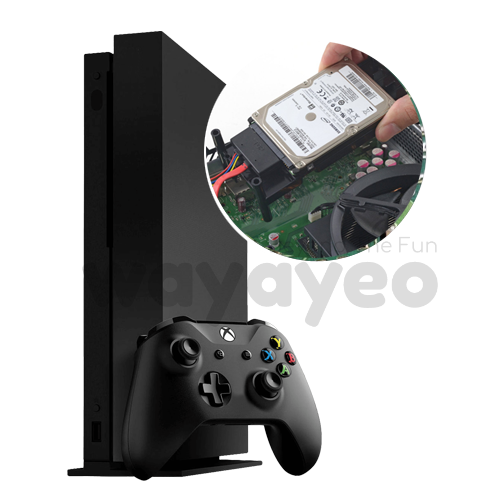
– Hey there, before you go messing around with any updates or software on that hard drive, make sure everything is plugged in nice and tight. We don’t want you accidentally bricking that motherboard. If you’re not sure, it’s always a good idea to double-check all the connections, like that disc drive, to make sure everything is secure. You can always schedule a repair if you need help!
Step 2

Hey, sometimes those Seagate drives can cause a little trouble with your Xbox One. Don’t worry, it happens!
– Before diving into this guide, take a moment to familiarize yourself with the hardware steps. It’ll make your journey smoother! You can check out the details at the link provided.
– Let’s tackle the Xbox One S Hard Drive Replacement together!
– Make sure you’ve got a Windows PC and a hard drive reader (that’s Sata Data and Sata Power to USB) ready to go!
Step 3

– Plug in that shiny new hard drive to your PC! Just make sure it’s snug and secure in its spot so it doesn’t go wandering off on its own.
Step 4

– Get ready to partition that HDD/SSD by running a nifty script!
– Below you’ll find handy links for both downloading the script and checking out the original forum post by the talented user tai1976 from gbatemp.net.
– First things first, unzip that file!
– https://filetrip.net/dl?RJsmapOKkV
– https://gbatemp.net/threads/xbox-one-int…
Step 5

– Hit that Windows key or open up the Start menu and type in ‘CMD’. Then, give it a right-click and choose ‘Run as Administrator’. You’re on your way!
– Next up, type in the command: ‘cd C:\Users\(Your Name)\Downloads\xboxonehdd-master-6.1\xboxonehdd-master\win’.
– And don’t forget to swap out (Your Name) with your actual user profile name. Easy peasy!
Step 6

– Let’s make some magic happen! Type in “create_xbox_drive” and hit enter. Now we’re gonna create a drive with some serious storage – either 500GB, 1TB, or 2TB. Don’t worry if you get a little lost, there’s a handy-dandy readme file in the folder you extracted to guide you.
Step 7


– Let’s get started with this repair guide. For this step-by-step process, we’ll be using the first option: replacing or upgrading without a working original drive. If you need help, you can always schedule a repair
Step 8


– Alright, let’s choose the right drive to format. Disk 0 is usually where your operating system hangs out, so don’t pick that one! 😉
– It’ll ask you to double-check your choice – just make sure you’ve got the right drive.
– Now, you’ll get to decide how big you want the drive to be. You got this! 💪
Step 9

– When you see 6 rows of lengthy numbers with “GUID” shining at the top, you’re in the clear—the command line has done its job!
– If things didn’t go as planned, try giving the disk a nice little cleanup with diskpart (link below) and give it another go!
– http://knowledge.seagate.com/articles/en…
Step 10

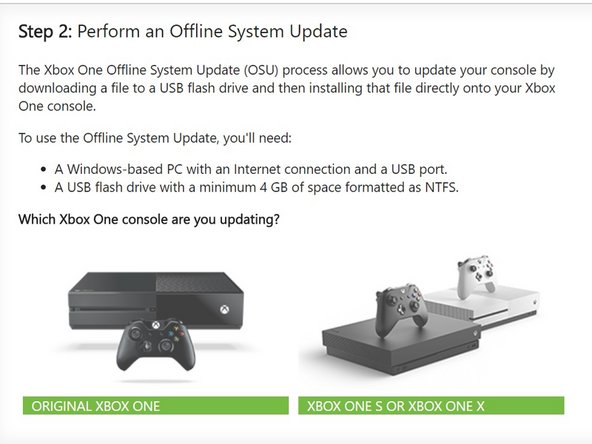

– Alright, let’s get this console updated! Head over to the official XBox website and grab a file called OSU 1.
– https://support.xbox.com/en-US/xbox-one/…
– Now, you’re going to select “I need to update my console offline”. No worries, we’ve got this.
– Next, choose “Xbox One S or Xbox One X”. You got this!
– Click the green “OSU1” link to start the download. You’re on your way to a smooth-running console!
Step 11


– First, head to the System Update (X) drive and create two new folders – let’s call them ‘A’ and ‘B’. Easy peasy!
– Now, extract all the files from OSU1 and copy everything in $SystemUpdate, except for ‘updater.xvd’. Don’t worry, you got this!
– Next, paste these files into the ‘A’ and ‘B’ folders you just created. You’re doing great!
– After that, copy ‘updater.xvd’ from $SystemUpdate and paste it into the root of System Update (X). Almost there!
– One more thing: you’ll need to download the bootanim.dat file and store it in both folders ‘A’ and ‘B’. There are two versions available – one for OG / S and one for the X. Don’t forget, or your Xbox might boot with a black screen instead of the cool boot logo. If you need help, you can always schedule a repair with Salvation Repair.
Step 12

– Carefully remove the media and then slide it back into your XBox like a pro.
– Put your XBox back together and power it up—let’s see that familiar logo!
– Get ready for the Xbox One S Hard Drive Replacement dance!
– If your XBox starts acting stubborn, a quick Factory Reset should turn that frown upside down.
– Need more info? Check this out: support page. If you need help, you can always schedule a repair.
Step 13

– Hey there, some people have had a few hiccups with signing in after upgrading their SSDs. If you run into this, just give your console a quick reset (don’t worry, your games and apps will still be there!). That should sort things right out.
– If you’ve got your Xbox set to “energy saving” mode, you might notice a little pause – like a 20-30 second black screen – before things get going. No worries! Switching that setting to “instant on” will get you up and running super fast.
– Now get ready to experience those super-charged loading times and lightning-fast r/w speeds. Your standard HDD won’t stand a chance!
Step 14

– Alright, it’s time to bring your device back to life! Just slide that hard drive back into your Xbox One S and put everything back together. You’re almost there!
– Oops! If you decided to take a break from this guide, that’s totally cool.
– Remember, if you run into any tricky bits, don’t hesitate to reach out. You can always schedule a repair!
Success!