Replace Xbox Power Board: DIY Guide for Xbox Original
Duration: 45 minutes
Steps: 14 Steps
Welcome to the adventure of swapping out the power unit for your Microsoft Xbox! If your console refuses to power up, this little gem might be the culprit. Let’s roll up our sleeves and bring your Xbox back to life!
Step 1

– Alright, cool cat, let’s get this show on the road! Make sure your Xbox is unplugged and chillin’ on a flat, stable surface. You know, just relaxin’ and ready to get fixed.
Step 2

Flip your Xbox over to discover its four little rubber feet waiting for you.
– Time to deploy that trusty metal spudger! Gently use it to pop off those four rubber feet.
Tools Used

Step 3


– Surprise! There are 2 sneaky screws hiding under the two labels at the bottom of the case. Time to uncover their hiding spots!
– You have a choice: either peel off those labels like a pro or just give them a little poke to feel for the screw holes. If you’re feeling adventurous, you can punch or cut a hole through them. You’ve got this!
Step 4

– Let’s get started by removing the six T20 Torx screws that hold the top cover in place – this will give you access to the goodies inside. Take your time and make sure they’re all out before moving on to the next step.
Step 5


– Now that the bottom and top shells are separated, it’s time to flip your Xbox right-side-up. Carefully lift and remove the top cover to get to the next step.
Step 6


That screw down in the lower left corner of the disk drive might be playing hide-and-seek. It’s not actually *in* the hole—it’s just hanging out close by.
– Time to loosen things up a bit! Start by taking out those three 3 mm T10 screws holding the hard drive snug in the Xbox.
– Now, let’s get a little sneaky! One of those screws is hanging out on the rear left side of the hard drive, but you can only spot it when you give the IDE ribbon cable a little lift. The other two are chilling at the front right and left sides of the hard drive, just waiting for their turn!
Step 7


– Give that hard drive power cable some slack – enough to comfortably lift the hard drive out.
– Now, gently lift the plastic carrier holding the hard drive out of the Xbox case. You’re doing great!
Step 8


– Grab your trusty T15 Torx screwdriver and unscrew those four 3.4 mm screws holding the plastic hard drive carrier in place—two screws on each side. You’ve got this!
– Now, let’s gently coax that hard drive out of its plastic snug-fit. A little bit of wiggling and rocking will help it slip out without a hitch. Easy peasy!
Step 9


Be gentle when removing them, as they might be stuck in place. Remember to handle the wires with care – pulling too hard could damage the cable assembly, and that’s not what we want!
– Carefully pull up on both the hard drive’s data ribbon cable and power cable to release them from the hard drive.
Step 10

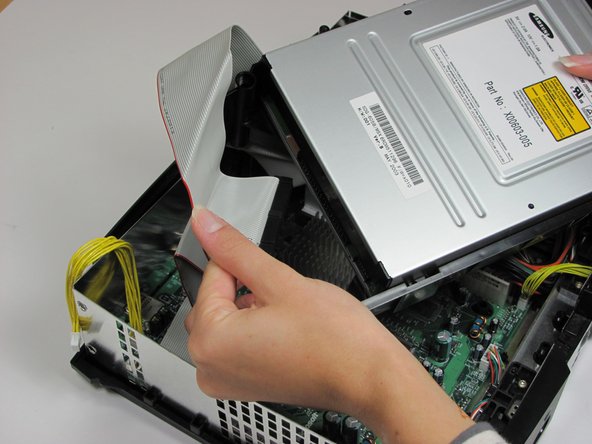

– Gently pull out the disk drive – it should come out easily.
– Next, carefully unplug the ribbon cable and yellow cables from the back of the disk drive.
Step 11

Taking out the disk drive to get to the motherboard? No need to remove its plastic home!
– Let’s get this show on the road! Gently pry those black plastic tabs holding the disk drive in place. They’ll pop right off. Once you’ve freed the drive, set it aside for a moment.
Step 12

– Gently yank the multi-colored power cord out from the motherboard. It might be holding on a bit tighter than your favorite pair of jeans, so don’t hesitate to put in some elbow grease!
Step 13

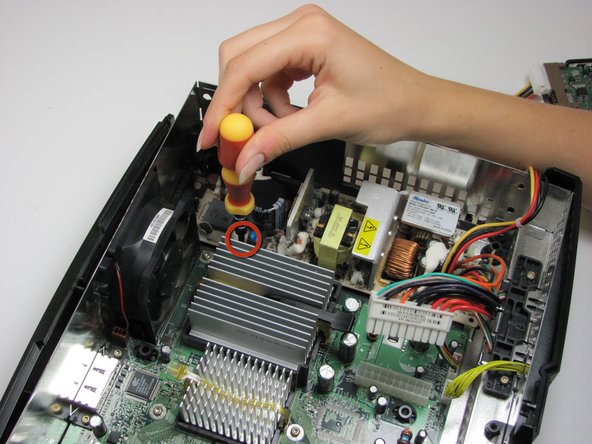
Watch out for the shiny copper coil and those sneaky capacitors on the power supply! They’re a bit touchy, so keep your fingers clear and stay in the safe zone.
– Okay, time to grab your trusty T10 Torx screwdriver! Use it to remove the two 3mm screws holding the tan power supply board in place. You got this!
Step 14

Watch out for that copper coil and those capacitors on the power supply! They can give you a bit of a jolt if you aren’t careful. Stay safe and keep your fingers clear!
– Alright, power down your device and give that power supply a gentle nudge. It should pop right out, no drama!
Success!