Samsung Galaxy A15 Vibration Motor Replacement Guide
Duration: 45 minutes
Steps: 30 Steps
Get ready to swap out the vibration motor in your Samsung Galaxy A15! When you’re putting your device back together, don’t forget to grab some replacement adhesive for both the vibration motor and the back cover. If you need help, you can always schedule a repair.
Step 1


– First things first, unplug all those pesky cables and power down your phone completely.
– Now, press and hold the power button and the volume down button together to pull up the shutdown menu.
Step 2

You can use a hair dryer too, but keep an eye on the heat! Overheating can be a real bummer for your phone—the display, battery, and plastic back can get damaged if things get too toasty. Aim for it to be warm, but not so hot that it feels uncomfortable to touch.
– Warm up your trusty iOpener and let it cozy up to the right edge of the back cover for a solid two minutes.
Tools Used


Step 3

Just a heads up! There’s an extra layer of adhesive hanging out at the bottom of your phone. Other than this little spot, make sure to stay within 4 mm from the edge.
– While the adhesive is taking its sweet time to soften, here’s a little nugget of wisdom for you:
– The back cover is held in place by adhesive all around the edges of the frame.
Step 4


If you’re having a tough time, just crank up the heat a bit more to help loosen that adhesive like a pro!
– Grab a suction handle and stick it onto the back cover, aiming for the sweet spot near the center of the right edge.
– Now, give that suction handle a strong, steady pull to open up a little gap between the cover and the frame.
– Slide an opening pick into that gap and let’s keep moving forward!
Tools Used

Step 5


– Gently glide your opening pick along the right edge, slipping it between the back cover and the frame to break that adhesive seal.
– Once you’re in, tuck your opening pick into the bottom right corner to prevent the adhesive from sealing back up.
Step 6

– Warm up your iOpener and gently press it against the bottom of the back cover for a solid two minutes. You’ve got this!
Tools Used
Step 7


– Grab another opening pick and gently slide it into the bottom right corner. Wiggle it along the bottom edge to cut through that sticky adhesive like a pro!
– Keep your opening pick snugly in the bottom left edge to stop the adhesive from sticking back together. You’re doing great!
Step 8

– Give your iOpener a little warm-up and then stick it to the left side of the back cover for a cozy two minutes.
Tools Used
Step 9


Hey there! Just a friendly reminder to only slide your pick in about 4 mm deep. This way, you’ll keep those rear cameras and flash safe and sound!
– Pop in another opening pick at the bottom left corner and glide it along the left edge to carve through that adhesive like a pro.
– Keep your opening pick in the top left corner to stop the adhesive from making a comeback.
Step 10

– Warm up your iOpener and place it on the top of the back cover for a cozy two minutes.
Tools Used
Step 11


– Pop in another opening pick at the top left corner, matching the depth, and glide it along the top edge to cut through that pesky adhesive.
– Keep your opening pick snug in the top right corner to make sure that adhesive doesn’t decide to seal itself up again.
Step 12


Be careful and only slide your pick in up to 4 mm to keep those rear cameras and flash safe and sound!
– Gently slide your trusty opening pick along the top edge of the phone and give it a little twist to loosen those camera clips.
– Now, take that same pick and glide it around the edges of the camera modules to release the rest of those pesky clips.
Step 13


– Once the adhesive around the edges is feeling a bit loose, gently slide your opening pick deeper into the bottom edge, starting from the bottom left corner.
– Now, glide that pick across the bottom edge of the phone, cutting through the remaining adhesive like a pro.
Step 14


Now’s a perfect time to fire up your phone and give all the functions a quick test before sealing everything back up. Just make sure to power it down completely before diving back into your work!
– Pop off that back cover like a pro!
– When putting everything back together:
– Use tweezers or your fingers to clear out any sticky adhesive remnants. If it’s being stubborn, a little heat and some isopropyl alcohol (90% or stronger) will do the trick!
– Got custom-cut adhesives? Just follow our guide.
– Using double-sided tape? We’ve got a guide for that too!
Step 15


– Grab your trusty SIM card eject tool, a bit, or even a straightened paperclip and gently insert it into the hole on the SIM tray, which is hanging out at the top left edge of your phone.
– Give it a firm push to pop that tray out and slide it right on out!
Tools Used

Step 16

– Time to get your screwdriver ready! Take out those fifteen 4 mm-long screws that are connecting the frame to the chassis. You’ve got this!
Step 17


– Grab your trusty spudger and gently use the flat end to lift and disconnect the fingerprint button press connector from the motherboard. You’ve got this!
Tools Used

Step 18


– Pop your trusty opening pick right above the SIM card tray cutout to create a little space between the frame and your phone.
– Gently glide your opening pick down the left side of the device to release those pesky frame clips.
Step 19


If your opening pick pops out of the phone, just slide it back in at the last corner that’s feeling a bit loose.
– Keep gliding your trusty opening pick all around the edge of the phone until every last clip is free and clear!
Step 20


– Gently detach the frame from the phone like it’s a cozy blanket coming off on a lazy Sunday.
Step 21


– Grab your trusty spudger and gently use the flat end to lift and disconnect the battery press connector from the motherboard. You’ve got this!
Tools Used
Step 22


Hey there! It looks like the connector named ‘OCTA’ is having a bit of an identity crisis—it’s not hooked up to the board like it should be, but instead, it’s getting cozy with the display cable connector. Just a friendly reminder: be sure to separate those connectors before moving on!
– Slide the flat end of your trusty spudger under the edge of the top ‘OCTA’ cable connector.
– Gently nudge the top connector upwards, separating it from the bottom one until they’re fully apart.
Tools Used


Step 24


– Grab that trusty spudger and gently nudge the “MAIN” connector away from the motherboard to disconnect it. You’ve got this!
Tools Used
Step 25


– Grab that interconnect cable and gently wiggle it free from your phone.
Step 26


Take it easy when you’re pulling out the red antenna cable from its holder—treat it like the delicate little gem it is, and you won’t have any issues!
– Take your trusty angled tweezers and slide one arm underneath the metal neck of the bright red antenna coaxial connector on the daughterboard. Give it a gentle lift straight up to disconnect it.
– Now, do the same for the other connector. You got this!
– When it’s time to put things back together, use those tweezers to hold the connector right over its socket. With a light touch, press down with your finger or a spudger. You should hear a satisfying ‘snap’ when it clicks into place. If it’s being stubborn, just adjust the angle and give it another go. You’re on your way to a successful repair! If you need help, you can always schedule a repair.
Tools Used

Step 27


– Gently slide your spudger under the flex ribbon connector and give it a little nudge to pop it off the board. You’ve got this!
– As you put everything back together, keep an eye on that adhesive holding the connector to the daughterboard. If your new daughterboard skipped out on it, just grab some thin, double-sided adhesive to keep things snug.
Tools Used
Step 28


– Grab your trusty Phillips screwdriver and get ready to tackle that 3 mm-long screw holding the daughterboard in place on your phone. You’ve got this!
Step 29


– Carefully take hold of the daughterboard by its edges and gently lift it out of the phone. You’ve got this!
Step 30
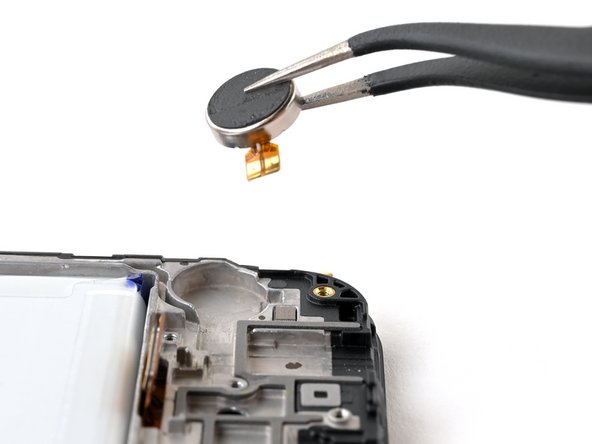

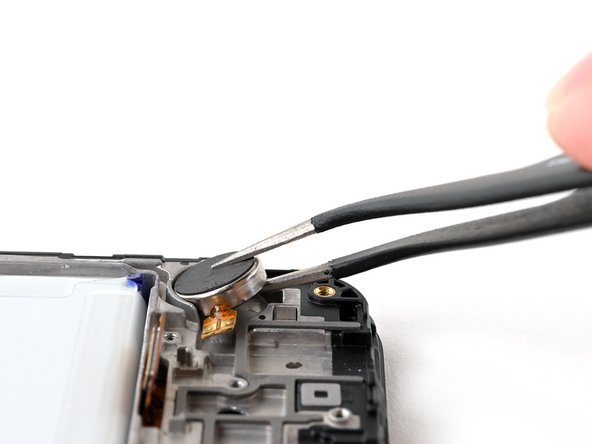
– Slide one arm of your angled tweezers into the little notch beneath the vibration motor.
– Gently grasp the motor with your tweezers and lift it up to break the adhesive’s hold.
– Carefully take out the vibration motor.
– If your shiny new vibration motor doesn’t come with adhesive, don’t worry! Just grab some thin, double-sided tape and you’re good to go.
Tools Used