Samsung Galaxy A3 2017 Display Replacement Guide
Duration: 45 minutes
Steps: 13 Steps
watch out for that waterproof seal, we don’t want it to break!
make sure everything keeps running smoothly!
let’s not let that water protection slip away!
grab some fresh adhesive for a solid fix!
Ready to give your Samsung Galaxy A3 (2017) a shiny new display? Let’s get started! Just a heads up, opening up your device will compromise its waterproof sealing. If you skip replacing the adhesive seals, your phone will still work like a champ, but it might not be as water-resistant anymore. This guide is all about swapping out the display while keeping the original frame, logic board, and battery intact. Keep in mind that some replacement screens come with a new frame (also known as a chassis), which means a different approach—like moving your phone’s insides and maybe putting in a new battery. So, double-check that you have the right part before diving in! Be careful though; separating the display from the frame can usually lead to a display that’s beyond saving, so only follow this guide if you’re planning to replace the display. Plus, don’t forget to grab some replacement adhesive to stick that new display and back cover back on when you’re done. If you need help, you can always schedule a repair!
Step 1

The adhesive on the Samsung Galaxy A3 (2017) is no joke—it’s super strong! If the iOpener isn’t getting the job done, feel free to bring in a hair dryer, heat gun, or hot plate for some extra heat. Just remember, we don’t want to turn your phone into a hot mess—both the AMOLED display and internal battery are a bit sensitive to heat. If you need help, you can always schedule a repair.
– First things first, let’s power down your phone before diving in. Safety first, right?
– Grab your trusty iOpener and use it to gently loosen the adhesive holding that back cover in place. Give it a good two minutes on the job. You might find it handy to repeat this step a few times to make the back cover removal smooth sailing!
Tools Used

Step 2


– Grab a small suction handle and gently pull to create a little gap at the bottom of your Galaxy A3.
– Now, take your trusty opening pick and slide it into that gap, moving the tip to the bottom left corner to slice through the adhesive.
– Keep that opening pick in place at the bottom left so the adhesive doesn’t sneak back into action.
– Insert another opening pick and start cutting the adhesive toward the bottom left side of your phone. You’re doing great!
Tools Used

Step 3


If the adhesive feels like it’s putting up a fight, grab that trusty iOpener! Remember, while you’re working on removing the back cover, it’s under a bit of pressure and can be a bit temperamental. So, make sure the adhesive is nice and loose to avoid any breakage!
– Grab an opening pick and gently slice through the adhesive all around your phone. To keep things neat, leave one pick in each corner to stop that pesky adhesive from sticking back together.
– Once you’ve cut the adhesive, slide an opening pick into the right side of the phone. Give it a little twist until you’ve got a solid hold on the back cover.
Tools Used
Step 4

– Let’s get that back cover off your phone, shall we?
– Before slapping on new adhesive, take a moment to remove any leftover sticky stuff from both the back cover and the frame. Give those areas a nice clean with some isopropyl alcohol and a lint-free cloth. You’re doing great!
Step 5

– Let’s get those five Phillips #00 screws out of there! They’re the ones keeping the motherboard covers snug and secure. Grab your screwdriver and show them who’s boss!
Step 6

The cover is held in place by tiny plastic clamps. Be gentle with them during the removal process to keep everything intact.
– Grab your trusty tweezers and gently lift off the top section of the motherboard cover. You’re doing great! If you need help, you can always schedule a repair.
Tools Used

Step 7

– Grab a trusty pair of tweezers and gently lift the motherboard cover along with the loudspeaker and NFC antenna. Once you’re all set, go ahead and remove it!
Tools Used


Step 9

– Grab that trusty spudger and use its flat end to gently disconnect the display flex cable. You’ve got this!
Tools Used
Step 10

Don’t forget to rock those safety glasses! They’ll keep your peepers safe from any sneaky glass bits trying to escape during the repair.
Get ready to reheat and reapply the iOpener a few times to ensure your phone gets nice and toasty. Just stick to the iOpener instructions to keep everything safe and sound!
– Grab your iOpener and stick it on the display for at least two minutes to get that adhesive nice and loose.
– If you see cracks in your display glass, don’t panic! Just tape over those bad boys to keep them from shattering everywhere and to stay safe while you work.
– Next, lay down some overlapping strips of clear packing tape over the whole display until it’s fully covered.
– This will keep those pesky glass shards contained and give you some solid support when you’re prying and lifting the display.
Tools Used
Step 11


Hey there! The home button and soft key cables are hanging out just below the bottom of the display assembly. Make sure to only slide in the tip of your opening pick, and you’re good to go!
– When your display is feeling cozy and warm, grab a suction cup and place it on the upper edge of your phone.
– Give that suction cup a little lift, and slide an opening pick under the display assembly.
– Start gliding the opening pick along the upper edge to slice through the adhesive. Don’t forget to leave a pick at the corner to keep the adhesive from sealing back up.
– Keep on cutting the adhesive around the rest of the phone, and remember to tuck an opening pick in each corner.
Step 12


Hey there! Just a heads up: the flex cable for the screen is hiding right behind the volume buttons, which might get in the way of your cutting tool. Keep an eye out!
Step 13
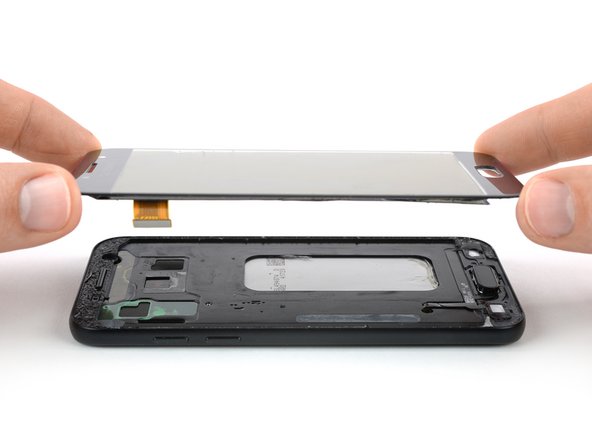
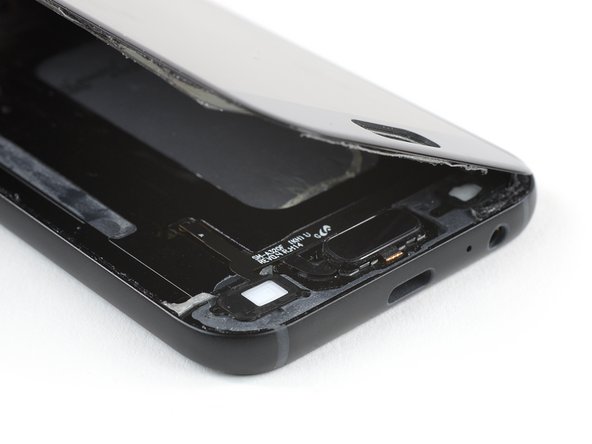

Hold your horses! Don’t fully open the phone just yet. That display cable is still hanging on, and we don’t want to accidentally tug on those home and menu button cables.
Before you go all in and remove the display, take a moment to check if the home button or soft key button cables are cozying up to the display assembly. We want to avoid any last-minute surprises!
– Begin by gently lifting the upper edge of the display assembly while threading that display flex cable through the mid frame. Easy peasy!
– Next up, carefully detach the display assembly from the phone. You’ve got this!
– Before putting everything back together, make sure to wipe away any leftover adhesive from the frame using some isopropyl alcohol (97% or higher) and a lint-free cloth or Q-tip. A clean frame is a happy frame!
– If any cables decide to play hard to get and stick to the display, just take a pair of tweezers or an opening pick and peel them off gently. No need to fret!
Tools Used