Samsung Galaxy A40 Battery Replacement Guide: Step-by-Step DIY Tutorial
Duration: 45 minutes
Steps: 20 Steps
Make sure your battery is below 25% before diving in!
Ready to give your Samsung Galaxy A40 a fresh start with a new battery? Awesome! Just keep in mind, if your battery looks a bit puffy, it’s time to be super safe. Make sure to drain your battery to below 25% before diving in. This little step helps avoid any unexpected surprises if the battery gets a bit cranky during the repair. And don’t forget, you’ll want some replacement adhesive on hand to stick everything back together when you’re done. If you need help, you can always schedule a repair.
Step 1


When you’re popping those cards back in, make sure they’re lined up perfectly in the tray. If you need help, you can always schedule a repair.
– Grab a SIM card eject tool, a SIM eject bit, or even a straightened paper clip and gently poke it into the little hole on the SIM tray on the left side of your phone.
– With a little bit of pressure, push your SIM card eject tool into that hole to pop the SIM card tray right out.
– Now, carefully lift out the SIM card tray and set it aside.
Tools Used

Step 2

– Hey there! Warm up that iOpener and get it cozy on the back cover to make the adhesive less clingy. Let it chill there for at least two minutes. If you need help, you can always schedule a repair!
Tools Used

Step 3


If the phone’s back cover looks a bit banged-up, your suction tool might play hard to get. Fear not! Try using strong tape to lift it, or if you’re feeling all MacGyver-like, superglue the suction gizmo in place. Just give it time to set, and you’re good to go!
Having a hard time making a gap appear? No problem! Heap some more heat on there to soften up that stubborn adhesive. Just remember to follow the iOpener guide like a pro, so you don’t overdo it. Need a hand? Feel free to schedule a repair.
– Grab a suction handle and latch it onto the right edge of the back cover, keeping it snug near the edge.
– Give it a good pull to lift the back cover just enough to create a tiny gap between it and the frame.
– Slide an opening pick into that newfound gap.
Tools Used

Step 4


– Gently move the pick along to the lower right corner and leave it there like a superhero on standby, ensuring the adhesive doesn’t sneak back together. If you need help, you can always schedule a repair.
Step 5


This is the moment to decide: you can ditch that suction cup for a smoother move, or keep it handy for some extra pull power. If you need help, you can always schedule a repair.
– Pop in another opening pick at the bottom right corner.
– Glide that pick along the right side of your phone to slice through the adhesive holding the back cover.
– Let the opening pick chill in the top right corner.
Step 6


If the adhesive is getting stubborn and tricky to cut, it probably just got cold. Give it some warmth with your trusty iOpener to get back on track.
– Pop in a third opening pick at the top right corner of your phone to get things started.
– Gently slide that pick along the top edge to slice through the adhesive like a pro.
– Keep the pick snug in the top left corner to keep that adhesive from sticking back together.
Tools Used
Step 7


– Pop in a fourth opening pick at the top left corner of your phone and get ready to work some magic!
– Gently glide the opening pick down the left edge of your device to slice through that pesky adhesive.
– Keep the opening pick resting in the bottom left corner, just waiting for the next step.
Step 8


To tackle that pesky adhesive along the bottom edge of your device, gently slide the opening pick in about 0.4 inch (1cm). You’ve got this!
– Slide in a fifth opening pick to slice through that pesky adhesive clinging to the bottom edge of your phone. You’ve got this!
Step 9


Just a heads up! To keep that fingerprint cable safe during the next step, be sure to give the fingerprint reader a gentle press down while you lift the back cover. You’re doing great! If you need help, you can always schedule a repair.
– Gently lift the back cover and take it off with care.
Step 10

– Time to unscrew! Go ahead and take out those thirteen 3.4 mm-long Phillips #00 screws. You’ve got this!
Step 11


– Grab that opening pick and sneak it between the left side of your phone and the midframe, like you’re sliding a note in class.
– Now, shimmy that pick along the left edge to pop those plastic clips loose, freeing the midframe from its hold. Remember, if this feels tricky and you want a pro to step in, you can always schedule a repair.
Step 12


– Gently glide that nifty opening pick around the bottom right corner, and set those pesky plastic clips at the bottom edge of your phone assembly free. If you need help, you can always schedule a repair.
Step 13


– Gently slide the opening pick down the right edge of your phone assembly to pop those stubborn plastic clips loose that are keeping the midframe snug. You’re almost there!

Step 15


– Grab the flat end of a spudger and gently pop that battery cable out of its groove. If you need help, you can always schedule a repair.
Tools Used

Step 16
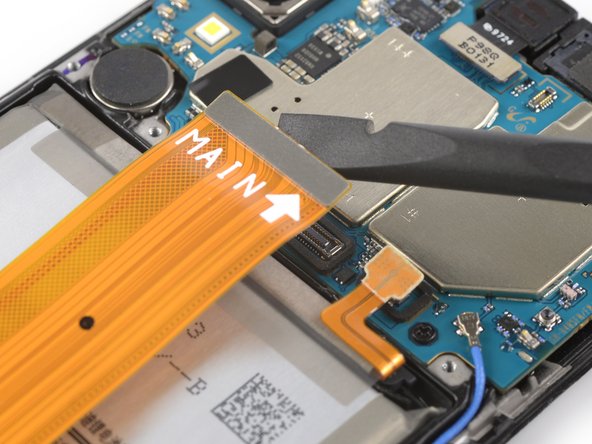

– Grab your trusty spudger and gently wiggle it to lift and disconnect the upper end of the main flex cable. You’ve got this!
Tools Used
Step 17


– Grab your trusty spudger and gently lift up to disconnect the bottom end of the main flex cable. You’ve got this!
– Time to say goodbye to the main flex cable. Just remove it with care and you’re well on your way!
Tools Used
Step 18